
Results 21 to 30 of 98
 318Likes
Thread: An idea for a contact grinder.
 LinkBack URL
 About LinkBacks
-
03-08-2019, 11:43 PM #21www.edge-dynamics.com


- Join Date
- Feb 2013
- Location
- London
- Posts
- 3,066
Thanked: 512
I do like the blade shape... I'm thinking you have a lot of learning ahead which will be exciting, frustrating and rewarding.
Good luck
-
The Following User Says Thank You to JOB15 For This Useful Post:
Voidmonster (03-08-2019)
-
03-08-2019, 11:46 PM #22Captain ARAD.


- Join Date
- May 2011
- Location
- Pacifica, CA
- Posts
- 2,474
Thanked: 2227
There's so much stuff that can only really be learned by doing it. Originally Posted by JOB15
 -Zak Jarvis. Writer. Artist. Bon vivant.
-
03-09-2019, 12:57 AM #23Senior Member


- Join Date
- Jun 2013
- Location
- archbold ohio
- Posts
- 2,379
Thanked: 546
Is there some sort of guide that follows the stiddie stick? (other than the drum sander itself)
Voidmonster and MikeT like this.
-
03-09-2019, 02:12 AM #24Captain ARAD.
- Join Date
- May 2011
- Location
- Pacifica, CA
- Posts
- 2,474
Thanked: 2227
Here's a visual of how I'll use it. The guide is just the stick itself and the way it holds the blank. Originally Posted by tintin
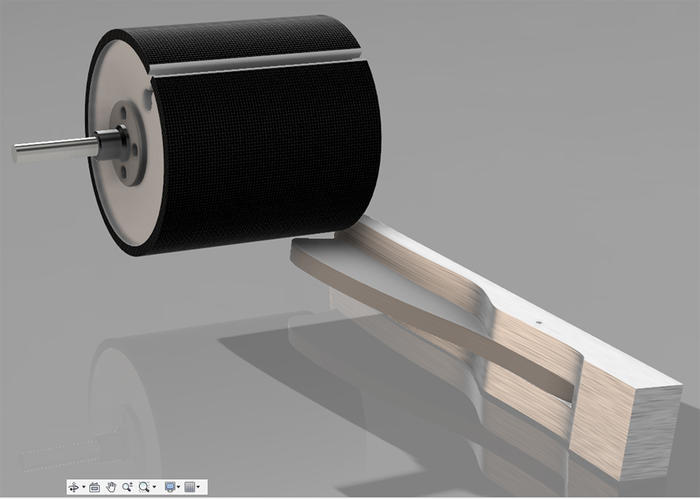
Added for clarity:
All the stick is doing, really, is protecting the part of the blank that will become the spine and shoulder, so all I can grind on is the blade face.-Zak Jarvis. Writer. Artist. Bon vivant.
-
-
03-09-2019, 02:37 AM #25Senior Member

- Join Date
- Jan 2015
- Location
- Pinole, ca
- Posts
- 1,526
Thanked: 339
You’re doing a rattler grind? I envisioned a hollow grind. Your template makes way more sense now.
-
03-09-2019, 02:40 AM #26Captain ARAD.
- Join Date
- May 2011
- Location
- Pacifica, CA
- Posts
- 2,474
Thanked: 2227
Yup! Originally Posted by jfk742
Based on the experiments I've done, this design is better suited to the tools I've got (IE, no contact grinder yet, which is ironic considering the thread title).-Zak Jarvis. Writer. Artist. Bon vivant.
-
03-09-2019, 02:52 AM #27
A fixture made of Corian counter top material would be sturdy and allow the use of hardware. Also, it can be machined with normal wood working equipment.
YMMV
~Richard
Local cabinet supply house could help locate sufficient atcha low cost.Be yourself; everyone else is already taken.
- Oscar Wilde
-
The Following 2 Users Say Thank You to Geezer For This Useful Post:
MikeT (03-10-2019), Voidmonster (03-09-2019)
-
03-09-2019, 05:22 PM #28Skeptical Member


- Join Date
- Nov 2016
- Location
- Colorado Springs
- Posts
- 10,559
Thanked: 2197
Maybe a thin piece of metal across the wood guide to cut down on it changing from use? Rattler. Ok. I got it now. Otherwise it was going to be a REAL wedge!
Voidmonster and MikeT like this.It's just Sharpening, right?
Jerry...
-
The Following User Says Thank You to Gasman For This Useful Post:
Voidmonster (03-10-2019)
-
03-09-2019, 10:53 PM #29Senior Member
- Join Date
- Jun 2013
- Location
- archbold ohio
- Posts
- 2,379
Thanked: 546
That makes more sense now. Thanks for sharing the method.
Voidmonster likes this.
-
The Following User Says Thank You to tintin For This Useful Post:
Voidmonster (03-10-2019)
-
03-10-2019, 01:28 AM #30Captain ARAD.
- Join Date
- May 2011
- Location
- Pacifica, CA
- Posts
- 2,474
Thanked: 2227
Monday I’m gonna call some of the local countertop places and see if they’ve got any Corian cutoffs I can use, because that is a great idea! Originally Posted by Gasman
I also may just make it on the mill out of a block of aluminum. Still pondering my options.
Just now I relalized I can just cut a piece off the block I cut the blades from to get the spine shape for fitting without doing anything fancy with cuting this gizmo out.
Things are slowed because I don’t have a dust collection system, and the weather hasn’t really been cooperative enough to roll the drill press outside and grind out there.
So, I’ve been doing some work on making punches for washers.
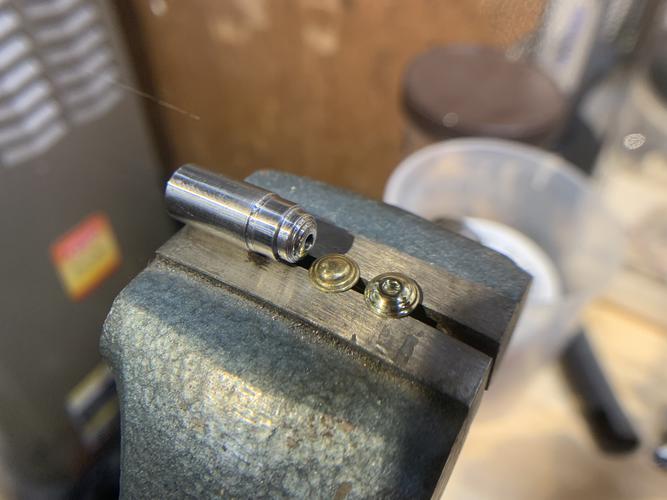
The method I settled on for these was to get the rough dimensions using the lathe tools, then doing all the rounded bits by using a file on the part while it’s spinning, then smoothing it all out with some sandpaper.
I settled on an unusual way of making a negative mold using a block of solder and some sheet metal.
Basically, I spin the cut die into the solder until it melts down to the right depth, then I stick a piece of galvanized steel under the die then sqush those together while it’s spinning until the solder gets hot enough to braze onto the galvanized metal which has been polished smooth by my cut die.
THEN I can stick the brass sheet between the two and get a really clean impression.
The next step is to make a proper, compact piece that has a punch that slides into it to knock out the center hole. I’ve made the second punch, but haven’t had a chance to make the part that holds the solder & sheet metal.
It sounds very complicated, but it’s really pretty simple and a surprisingly effective way of making a negative mold.
Also, heat treat. I should probably heat treat at least the punch die.Last edited by Voidmonster; 03-10-2019 at 01:32 AM. Reason: Wrong picture
-Zak Jarvis. Writer. Artist. Bon vivant.
-
The Following 5 Users Say Thank You to Voidmonster For This Useful Post:
Geezer (03-10-2019), jfk742 (03-10-2019), JOB15 (03-10-2019), MikeT (03-10-2019), randydance062449 (03-10-2019)


 Reply With Quote