
Results 51 to 60 of 73
 248Likes
Thread: Aluminium brush rebuild x 4
 LinkBack URL
 About LinkBacks
-
07-20-2017, 03:02 AM #51Str8Faced Gent.


- Join Date
- Aug 2013
- Location
- Orangeville, Ontario
- Posts
- 8,455
- Blog Entries
- 1
Thanked: 4207
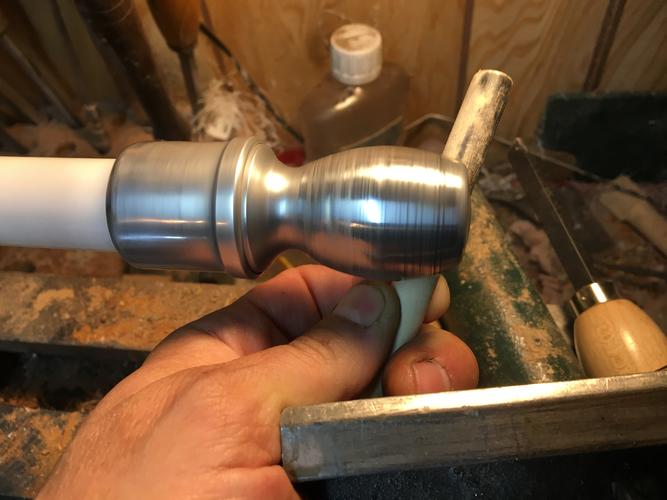
Thanks gents. The sensation through the hammer is what controls the impact and I think that needs to be manual to give the control to shape and pocket.
With practice a tube could be easily transformed into a bulbous shape I think. Found it very intuitive and frankly kinda fun. Thanks again for turning me on to the technique Richard.
Now I need to dress the dents back the other way slightly so need a rigid internal form to tap against.
Then, on to the lathe to buff it back out.
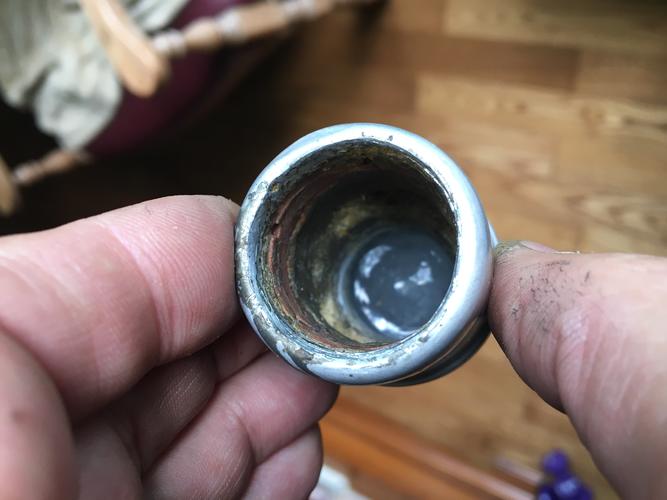
Seeing as how they used sawdust not talc to fill this handle I know why all the ones I've seen are dented now. Stuff isn't rigid enough to keep this thin walled stuff dent free over time.
I'm going to fix that by filling the entire thing with alumilite before reknoting. Will be slightly heavier, but impervious to subsequent denting and last another lifetime.Last edited by MikeB52; 07-20-2017 at 03:04 AM. Reason: Very cool cam hammer idea Tom! I am gonna think on that..
"Depression is just anger,, without the enthusiasm."
Steven Wright
https://mobro.co/michaelbolton65?mc=5
-
The Following User Says Thank You to MikeB52 For This Useful Post:
sharptonn (07-20-2017)
-
07-20-2017, 03:05 AM #52Razor Vulture

- Join Date
- Oct 2010
- Location
- Lone Star State
- Posts
- 26,119
Thanked: 8612
I loved-it! The clawhammer made it work even better!

-
The Following User Says Thank You to sharptonn For This Useful Post:
MikeB52 (07-20-2017)
-
07-20-2017, 03:07 AM #53I love Burls....... and Acrylic

- Join Date
- Mar 2012
- Location
- Baden, Ontario
- Posts
- 5,475
Thanked: 2284
What about just using regular epoxy Mike? Don't waste that good stuff??? Originally Posted by MikeB52

Sent from my LG-K121 using TapatalkBurls, Girls, and all things that Swirl....
-
07-20-2017, 03:17 AM #54Str8Faced Gent.
- Join Date
- Aug 2013
- Location
- Orangeville, Ontario
- Posts
- 8,455
- Blog Entries
- 1
Thanked: 4207
Claw hammers always make things go better. A garage staple! Hehe. That's 1's an oldie though Tom. One of my fav's. I could have done that job with my 4 oz ball peen. Originally Posted by sharptonn
And you might be right Andrew, some jb should mix up,hard enough to give it better strength than the squishy sawdust provided. A lot less cake than the alumilite.
Save that $ for the knot,, "Depression is just anger,, without the enthusiasm."
Steven Wright
https://mobro.co/michaelbolton65?mc=5
-
The Following User Says Thank You to MikeB52 For This Useful Post:
sharptonn (07-20-2017)
-
07-20-2017, 09:53 AM #55Senior Member

- Join Date
- Jun 2016
- Location
- NH
- Posts
- 1,924
Thanked: 1363
Nice job popping the dents out, so cool! Watched the vid first thing this morning. Mike, Richard, that was awe-some! And as a bonus, I let the video play to the end and the next thing I know I have a sky view of frozen Island Lake, beautiful.
"Go easy"
-
The Following User Says Thank You to xiaotuzi For This Useful Post:
MikeB52 (07-20-2017)
-
07-20-2017, 10:23 AM #56Giveaway Guy


- Join Date
- Nov 2016
- Location
- Reading MI
- Posts
- 4,784
Thanked: 1586
Great Job Mike!! And Richard, thanks for passing on your knowledge. It's things like this that are getting lost from generation to generation.
Looking forward to seeing this brush finished. I am still just amazed at how simple and effective that was. But then again, it is the simple things that get a great end result
Look sharp and smell nice for the ladies.~~~Benz
at how simple and effective that was. But then again, it is the simple things that get a great end result
Look sharp and smell nice for the ladies.~~~Benz
Imperfection is beauty, madness is genius and it's better to be absolutely ridiculous than absolutely boring ― Marilyn Monroe
-
The Following User Says Thank You to Dieseld For This Useful Post:
MikeB52 (07-20-2017)
-
07-20-2017, 12:52 PM #57I love Burls....... and Acrylic
- Join Date
- Mar 2012
- Location
- Baden, Ontario
- Posts
- 5,475
Thanked: 2284
Really cool Mike. What a great technique to referbish these old handles. Love it.
Sent from my LG-K121 using TapatalkBurls, Girls, and all things that Swirl....
-
The Following User Says Thank You to HARRYWALLY For This Useful Post:
MikeB52 (07-20-2017)
-
07-23-2017, 11:34 PM #58Str8Faced Gent.
- Join Date
- Aug 2013
- Location
- Orangeville, Ontario
- Posts
- 8,455
- Blog Entries
- 1
Thanked: 4207
Had an idea, and it worked pretty cool, literally.
Filled the handle to just below the neck with water and froze it to create my inner form to reverse dress the dings.
Had to work quickly as the ice started to melt instantly. Tapped it some with the ball peen, then spun it and used a soft wooden paint brush handle to try and blend everything back in with some gentle pressure.
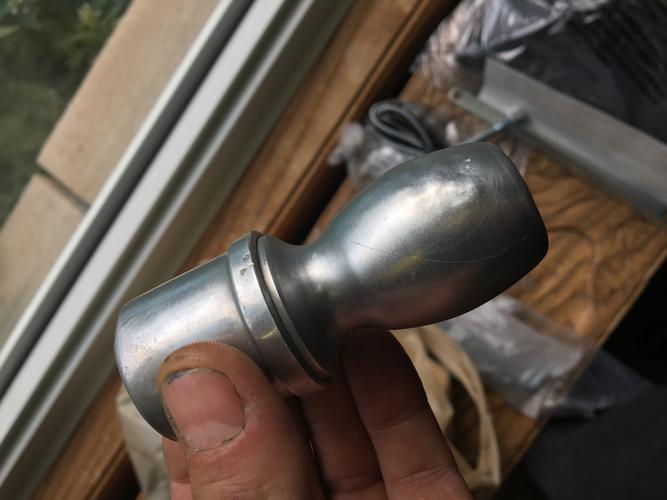
Might be as good as it gets.
All three are measured and it looks like I can stuff 24 mm knots in all three. Think the first rubberset rebuild I did I went 23 mm to be sure.
What do you think Andrew and Tom?
Cheers gents. Hope you had great weekends. Saw lots of cool projects moving along in the various threads.
"Depression is just anger,, without the enthusiasm."
Steven Wright
https://mobro.co/michaelbolton65?mc=5
-
The Following User Says Thank You to MikeB52 For This Useful Post:
Geezer (07-24-2017)
-
07-24-2017, 12:20 AM #59Senior Member
- Join Date
- Jun 2016
- Location
- NH
- Posts
- 1,924
Thanked: 1363
That's coooool! Icy cool, my friend! I think you've done a tremendous job and some ingenious ideas to get there. I mean, going back and looking at the first picture in this thread to what it is now... remarkable.
"Go easy"
-
The Following User Says Thank You to xiaotuzi For This Useful Post:
MikeB52 (07-24-2017)
-
07-24-2017, 01:04 AM #60barba crescit caput nescit

- Join Date
- Jul 2013
- Location
- Toronto, Canada
- Posts
- 9,664
Thanked: 2693
You did a smokin' job on the C-MON, when I grabbed it didn't seem that bad, looks brand spankin' new now - great job. Originally Posted by MikeB52
And yes, on the #3 you did for me, we went with the Shavemac D01 knot - 23 x 48.
With the #4, figure the same 23 x 48 and the D01-2 band this time...that way I'll be representin' two styles.....


 Reply With Quote