
Results 81 to 90 of 143
Thread: An experiment in steel
 LinkBack URL
 About LinkBacks
-
01-13-2010, 10:05 AM #81Shaveurai


- Join Date
- May 2009
- Location
- Rowley Regis, England
- Posts
- 487
Thanked: 126
Looking good, can't wait for scales.
-
01-19-2010, 02:02 AM #82Junior Honemeister

- Join Date
- Jan 2008
- Location
- Central California
- Posts
- 1,023
Thanked: 82
Just for the sake of curiosity, I took a scrap of the left over O-1 I had, did a quick HT on it and then broke it in my vice.
I am trying to get pictures, but I'm not getting anything that shows detail...
The piece broke like glass, rather easily considering it is steel...
The inside is a very light grey color, and relatively smooth to the touch.
Under 20X magnification I can see tiny microscopic grains, but only because of the occasional glint of light off of them...
In my dark garage when I do the HT it looks like it goes a little into the orange spectrum, but that's also right above nonmagnetic, so I think I have things just about right for my first blades... and I don't see any signs of grain growth.
I have several pieces of olive wood cut to about 1/8th, and sanded smooth for my scales, so I'm on to the next step...
as always, more pictures to follow.
-
01-19-2010, 03:06 AM #83"My words are of iron..."

- Join Date
- Oct 2006
- Posts
- 1,898
Thanked: 995
Magnification should not be needed. If it's a fine gray smooth surface you're on the right track. Grain growth that's bad is like sand, you can't miss it.
Try tempering one of your leftover pieces for a couple hours at 400 F then attempt to break that piece and see if you notice a difference.Nothing discloses real character like the use of power. Most people can bear adversity. But if you wish to know what a man really is, give him power. R.G.Ingersoll
-
01-19-2010, 04:52 AM #84Senior Member


- Join Date
- Oct 2007
- Posts
- 4,445
Thanked: 834
Wow, Mike, I haven't been back to this thread to view your progress for a while. I'm really excited about what you're making and I thank you for sharing your progress. Those razors look great.
 Originally Posted by Mike Blue

Thanks for the info, Mike. You can bet I'll be asking for more info from you regarding that local VFD outlet. The last time I priced a new 3 phase farm duty TEFC 1.5 HP Baldor and a VFD to match at a place in St. Cloud, the combo would have cost about $950 . I settled for a new single phase and I wired it for 220. They pulleys aren't that bad, but I can say that because they're all I know at the moment.
Chris L"Blues fallin' down like hail." Robert Johnson
"Aw, Pretty Boy, can't you show me nuthin but surrender?" Patti Smith
-
01-19-2010, 06:18 AM #85Shaveurai
- Join Date
- May 2009
- Location
- Rowley Regis, England
- Posts
- 487
Thanked: 126
Mike, seems to me it's spot on.
According to TZ it should look like satin, you shouldn't see anything that looks like sugar. This is why I think the coulor thing during ht can be a bit subjective. You have to be carefull not to dwell the blade on magent also as thier properties change as they get hotter. Also it should be quite diffcult to bust open.
-
01-20-2010, 12:46 AM #86Junior Honemeister
- Join Date
- Jan 2008
- Location
- Central California
- Posts
- 1,023
Thanked: 82
I'm not sure I'll be able to break it, I had to pull pretty hard on the piece I did to get it to break, but when it did, it snapped like glass... Originally Posted by Mike Blue
if I temper one of the small pieces I have left, I doubt I have a chance of breaking them...
I'll try later in the week, any hints on what I should expect?
I have the light grey satin look that feels almost velvety right now.
-
01-20-2010, 02:21 AM #87Senior Member
- Join Date
- Jan 2008
- Posts
- 701
Thanked: 182
wrap the steel in a old heave cloth clamp the works in a vice and hit it witha hsammer
you dont need to have much hanging out the top and you can get multi brakes
also you can score the one side of the steel on the grinder to make it easer to brake
Originally Posted by Mike_ratliff
-
01-20-2010, 06:56 AM #88Junior Honemeister
- Join Date
- Jan 2008
- Location
- Central California
- Posts
- 1,023
Thanked: 82
Okay, lots to cover here
I took a block of olive wood with a nice grain, cut strips from it using my bandsaw, and sanded them flat...
I glued them together, cut out my pattern, and drilled holes for my pins...
A bit more sanding, and here we are
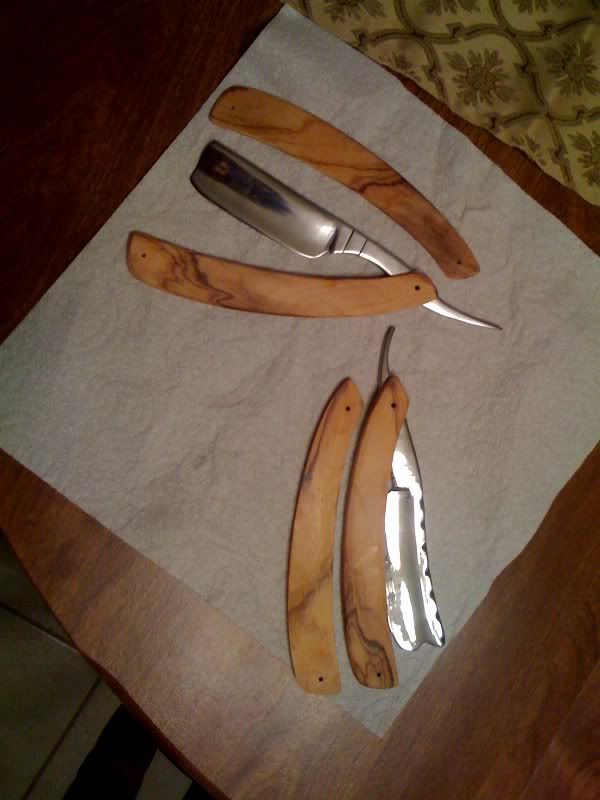
tonight they get placed in nelsonite, I will create a vaccume in my jar by carefully heating my container of nelsonite outside and in a well ventilated area...
After a good long soak, they'll get finished, and I can hone the razors.
-
01-20-2010, 05:49 PM #89Member
- Join Date
- Aug 2009
- Location
- Milwaukee, WI
- Posts
- 65
Thanked: 12
Hey Mike,
I don't know much about wood working, but your description of the vacuum process intrigues me. Would you mind telling me how it works, and what exactly it will accomplish?
Thanks.
-
01-20-2010, 11:20 PM #90Junior Honemeister
- Join Date
- Jan 2008
- Location
- Central California
- Posts
- 1,023
Thanked: 82
Nelsonite is a wood stabilizer, by impregnating the scales with it I discourage warping and other wood related problems from developing down the road ...
Introducing a vaccum pulls the stabilizer deeper into the wood.
There are several ways to create your vaccum, the easiest way is to use a large mason jar, heat your stabilizer in the jar, a pot of very hot water works well for this...
Seal the jar and allow it to cool.
The cooling creates low pressure inside the jar and forces the nelsonite deep into the wood.
I know it sounds wrong, low pressure in the jar should pull the oils out of the wood, but somehow it does work... I think it is a rebound effect. The vaccum opens the pores of the wood and allows the nelsonite in deeper, and as the vaccum is released, the pores close and hold the stabilizer better.
I have seen threads on this before, maybe someone else can explain it better.
There are also ways to create vaccum chambers if you look around...


 Reply With Quote