
Results 3,031 to 3,040 of 3718
 23400Likes
Thread: Hone of the Day
 LinkBack URL
 About LinkBacks
-
09-30-2019, 11:19 AM #3031Senior Member

- Join Date
- Sep 2014
- Location
- Boise Idaho
- Posts
- 199
Thanked: 12 I get where you are coming from but... It was actually the Ura that was wonky. I had expected the opposite. The Omote side (soft iron) came in quite easily without having to remove much steel. The Ura (front side with kanji) had uneven voids in the steel at the spine causing a teetering effect until it was flattened out a bit. This was a virgin kamisori with zero hone wear prior to this honing session.
 Originally Posted by onimaru55

-
10-01-2019, 12:06 AM #3032The Great & Powerful Oz


- Join Date
- May 2008
- Location
- Bodalla, NSW
- Posts
- 15,638
Thanked: 3751
OK, let me pull you up there again Originally Posted by Straightandproud
 Ura means back in Japanese not front but I get the issues you're describing. Sounds like the steel went for a bit of a walk in the quench.
With larger kataba (single bevel) tools such as knives it is possible to straighten any warps prior to honing. Flattening the back (ura) on chisels is also done & is called ura-oshi. The back of the chisel is not completely flattened, the hollow is retained but a bevel & the sides are all trued. Might be tricky on something as short as a razor.The white gleam of swords, not the black ink of books, clears doubts and uncertainties and bleak outlooks.
-
10-02-2019, 12:41 AM #3033Senior Member

- Join Date
- Jan 2018
- Location
- Illinois
- Posts
- 277
Thanked: 47
I honed up a Sheffield blade on Saturday that really seemed to be sharp. It was cutting through arm hairs with ease, and in my case that usually means it will be a good shaver.
It did technically shave, but it certainly wasn't a good shave.
I decided to try looking at the edge through a loupe. I couldn't see anything out of the ordinary. I compared it to one of my best shaving razors (again under a loupe) and I couldn't tell much difference between the two. It was only when I looked at an unhoned razor under the loupe that I could see the light reflections that I've been told to look for when the bevel is not set.
In regard to this, are you folks who use a loupe able to detect the difference between a blade that is almost there vs one that is going to be a great shaver? Or is this something that only a shave test will reveal? I did look at the scratch patterns on the bevel and those didn't appear significantly different.
Also, if your shave test wasn't quite there, how far back in your progression would you go- all the way to the bevel setter, maybe somewhere in between?Last edited by sonnythehooligan; 10-02-2019 at 01:06 AM.
-
10-02-2019, 02:00 AM #3034Senior Member


- Join Date
- Feb 2013
- Location
- Haida Gwaii, British Columbia, Canada
- Posts
- 14,455
Thanked: 4830
Yes,I can see when it is almost a set bevel and when it is a completely finished apex.
While looking almost straight on the point of the apex and using a decent loupe and a good light source, the missing part of the apex shows white of a bright reflection. A truly finished apex is very difficult to identify because it is much more narrow and does not reflect light back but you can roll it and see one bevel and across to the other. It’s hard to describe. It would be easier if we were honing together.It's not what you know, it's who you take fishing!
-
The Following 3 Users Say Thank You to RezDog For This Useful Post:
evnpar (10-02-2019), sonnythehooligan (10-02-2019), Steel (10-03-2019)
-
10-02-2019, 02:19 AM #3035Senior Member
- Join Date
- Jan 2018
- Location
- Illinois
- Posts
- 277
Thanked: 47
Yeah, one of these days I need to head to one of those meet ups.
-
10-02-2019, 02:26 AM #3036Senior Member
- Join Date
- Feb 2013
- Location
- Haida Gwaii, British Columbia, Canada
- Posts
- 14,455
Thanked: 4830
I first learned my basics from Glens videos, then from a great guy in Edmonton, then from Glen, then from new and older members at meets. It is pretty amazing how you can pick stuff up in a flash in person. Two people with a common interest is a meet!
It's not what you know, it's who you take fishing!
-
10-03-2019, 09:29 AM #3037Senior Member

- Join Date
- May 2011
- Location
- Merthyr Tydfil South Wales UK.
- Posts
- 5,601
Thanked: 1413
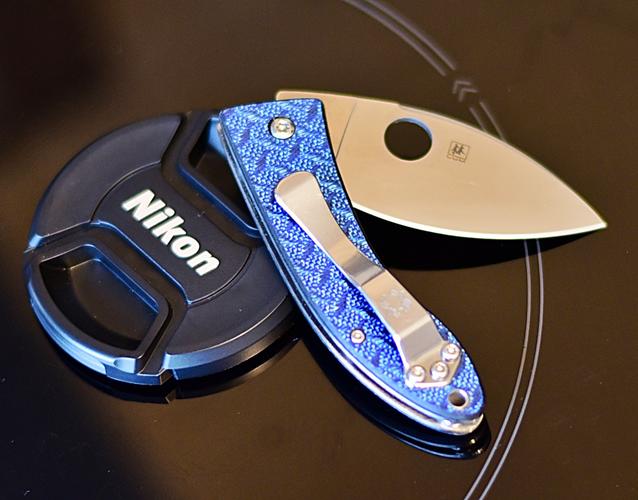
Decided to have a little fun with my own little pocket knife, a Spyderco Bob Lum made in Japan made from VG10, thought I would try and put this little knife in the same sharpness levels of razor territory, I have in my knife sharpening kit stones going from 400 right through to a Naniwa 12K, well all I will say the knife was finished on the Naniwa 12K stropped on leather and yes indeed it did pass the HHT and I now have a shave ready pocket knife .

 Wherever youre going never take an idiot with you, you can always find one when you get there.
-
10-03-2019, 11:23 AM #3038Senior Member


- Join Date
- Nov 2013
- Posts
- 2,321
Thanked: 498
Congrats Jamie. It is fun to bring a knife to that level. Even though it may not last long it is really fun while it does. Many will complain that it is not worth the work but, for me, it is. It doesnt take me much time or effort. Plus, I ENJOY doing it.
A good looking little spider there too.What a curse be a dull razor; what a prideful comfort a sharp one
-
The Following User Says Thank You to Steel For This Useful Post:
celticcrusader (10-03-2019)
-
10-03-2019, 02:08 PM #3039Senior Member
- Join Date
- Apr 2012
- Location
- Diamond Bar, CA
- Posts
- 6,553
Thanked: 3215
Your edge does not get fully developed and straight until about 6-8k, (which is where most Barber Hones are), so you will not see a fully set edge, (no reflections, a black line) when looking straight down on the edge, in the lower grits, 1&4k, but you will see any chips, (white reflections).
At 1k you will see most of the edge is black and tiny spots of reflection. As said rocking the spine will show you a bit of the bevel from both sides. This often will show you if you have a large burr, a large white line on one side only.
A good tip for a problem edge, especially if you have done some heavy honing to make a repair, like chip removal, is to joint the edge, just one stroke on the corner of the stone. This will cut off the burr and give you a straight edge to hone to.
Look at the edge after jointing, you will see a solid or near solid white line, any dark spots on the edge are micro pits. If you see large dark spots, look at them from the side, (rock the blade to one side where you see the chip) to see if they are deep chips. If so, you must go back to the 1k and hone them out.
I joint at 1k, before moving up in stone, then reset the edge, usually about 15-20 laps. Use lite pressure and alternating laps, or you will make a new burr.
The better you get the edge at 1k, the easier the rest of your honing will be. If you have a ragged edge with lots of flashing/burr eventually the burr will break off and now you have a ragged edge.
At 4k your edge should look pretty chip free, it should look like a black line with some tiny specks of white dots, at 8k it should be solid black. If you run your loupe on the edge you can roll the edge, but 10 laps will bring it back.
Dont be afraid to joint the edge at the finisher, 15-20 laps will bring the edge back without any flash/burr. I even do it on a 20k or finisher.
Here is an old post showing what to look for when looking straight down on an edge. It is a bit long, but post 42, Photos 4 & 5 (upper right- hand corner) show and edge that is close, (not fully set). Post 51, first photo, shows a fully set bevel.
Second Try at Honing.
-
The Following User Says Thank You to Euclid440 For This Useful Post:
sonnythehooligan (10-04-2019)
-
10-04-2019, 12:25 AM #3040Senior Member
- Join Date
- Jan 2018
- Location
- Illinois
- Posts
- 277
Thanked: 47
Thanks for the advice! I'm trying to take the guesswork out of my honing sessions. I'll get back at it this weekend and report back.


 Reply With Quote