Results 171 to 180 of 185
Thread: Learning Jnats with Microscope
-
07-13-2021, 04:33 AM #171FrankC

- Join Date
- May 2014
- Location
- Olympia Washington
- Posts
- 271
Thanked: 52
I have both the Gouken Hayabusa 4K and the Fuji 8K and I agree w/ Marty that you should>will be able to get more polish from the Fuji.
I have one and I set up another for a good friend and found that both stones needed quite a bit lapped off the top before the stone would hone properly.
Those two seemed to come out of the mold with surface problems and needed a couple MM's of there surface lapped off before they became consistent, so don't be afraid to lap them WELL and often until the surface brakes in. Call it settling in.
I would not recommend using slurry at all w/ the Fuji 8K and I would recommend before you do your finishing strokes that you re-lap the Fuji and rinse it toughly, then use very light WOB pressure only.
BTW the Fuji plays VERY WELL with the Hayabusa 4K used before it. Both stones finish above their grit when used as a pair I often use a Nani 3K Chosera > 4K Hayabusa > Fuji 8K then on to a natural finisher, a very go to progression on most razor steel & should produce a shaving 8K edge.
The last of your pic's shows a lot of swarf on that Fuji, I might look at what's the edge you are taking to it. What stone are you coming off of?
-
07-13-2021, 01:40 PM #172

FranfC
Thanks for the hints about the 8K.
The swarf came from 4 rounds of strokes as described on my post... don't know if they are many or few.
Razor came from some test honing (Naguras comparative test on Ozuku base stone) + two quick tests with not Jnat finishers (i.e. Llyn Idwall the first and Water of Ayr the second).
Anyway... it was just a quick first test for this 8K. Next time I'll lap it and use it after a Naniwa SS 3K. I know that I don't know (Socrates)
-
07-13-2021, 03:43 PM #173FrankC

- Join Date
- May 2014
- Location
- Olympia Washington
- Posts
- 271
Thanked: 52
Sounds great! Let us know how that goes and how smooth an edge you can produce w/ that 3>8K jump. I will do that experiment too, will come off of the 3K Nani Chosera straight to the Fuji.
-
07-14-2021, 04:15 PM #174Senior Member


- Join Date
- Apr 2012
- Location
- Diamond Bar, CA
- Posts
- 6,553
Thanked: 3215
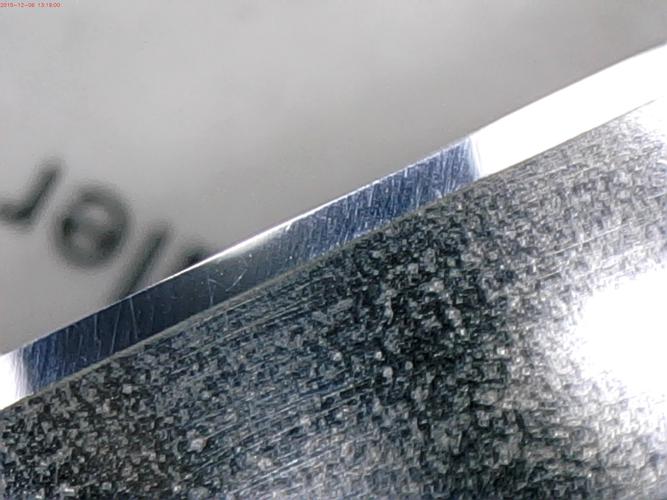
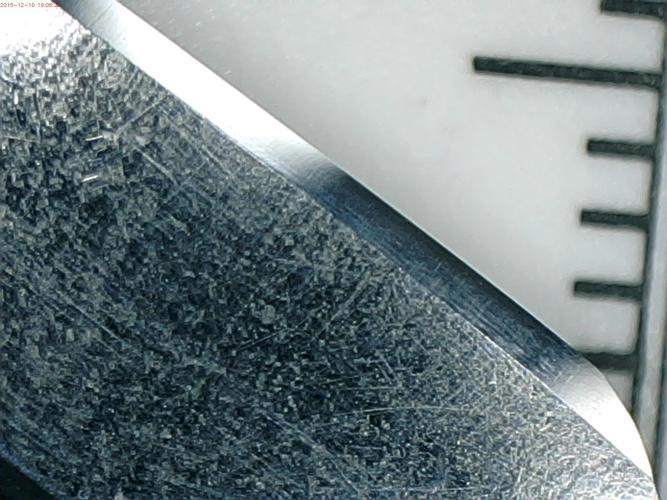
Just to keep in prospective, here are photos of a Norton 8k bevel from the 2nd Try at Honing post, by PMC. There are very good reference photos of bevels at the various stages of honing at 1,4,8 and 12k.
For new honers, this is what your bevels and edges should look like at these stages.
Here is also a photo of a Naniwia12k bevel. I am able to get bevels similar to these 12k bevels with the 8k Junpaku Snow White.
Some of these newer harder high grit stones, do require a bit more lapping to get them to perform to full potential. I believe many do not fully lap a new stone flat. Especially these hard stones, and the Fuji is considered a hard stone.
I had a similar issue with my SG20 when I first got it. It was not until I lapped it several times with a 140-grit diamond plate to get it fully flat and remove a bit of the stone surface. The SG20 is very hard.
If you do not have a low grit large diamond plate to lap flat, a sheet of 220 wet & dry and a dollar store steel cookie sheet will get it lapped. Once lapped a natural nagura will keep it clean and smooth, I use my Tsushima to clean and smooth my high grit synthetic stones.
Yesterday, I got an interesting, satin finish off my 8k Snow White with Tsushima slurry, prior to jumping to a Jnat.
With hard synthetic finishers. do not be afraid to use pressure, especially in the beginning to remove the previous stria. These hard stones are/can be aggressive and remove material. Once the bevels are flat with the new grit, wash the stone and razor and do lighter finish laps to lay down a new stria free finish. Take a look at (12K Chip Removal/Bevel Setting) to see the aggressive potential of high grit synthetics, and the 12k Super Stone is not a hard stone.
The worst that can happen using pressure with these stones is a rough edge, just joint it and reset the edge. I usually reset the edge by jointing before going to the 8k and when starting with a Jnat. The edges become rough because they get thin, jointing quickly solves that issue and makes a stronger edge.
2nd Try at Honing
12K Chip Removal/Bevel Setting

Last edited by Euclid440; 07-14-2021 at 04:21 PM.
-
The Following User Says Thank You to Euclid440 For This Useful Post:
Skorpio58 (07-14-2021)
-
07-14-2021, 06:42 PM #175
 Naniwa Gouken Fuji 8K - Second Test.
Just yesterday (so didn't saw Euclid's last post) I made another test of the Gouken 8K.
First of all, lapped (remember I bought it used and already lapped... so wasn't the first time the stone was lapped) it with 400 and 1K diamond plate.
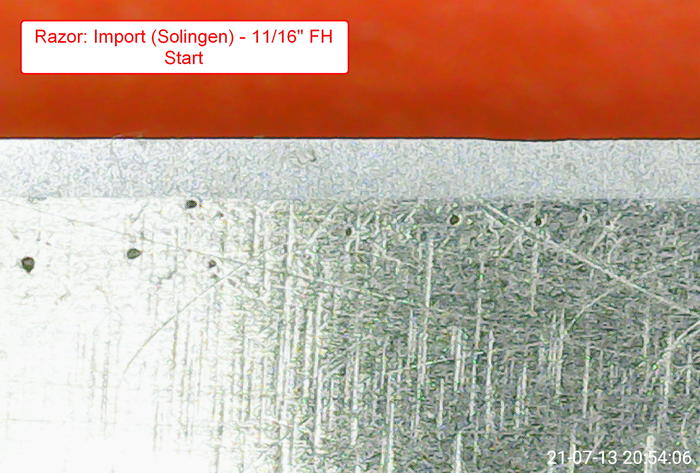
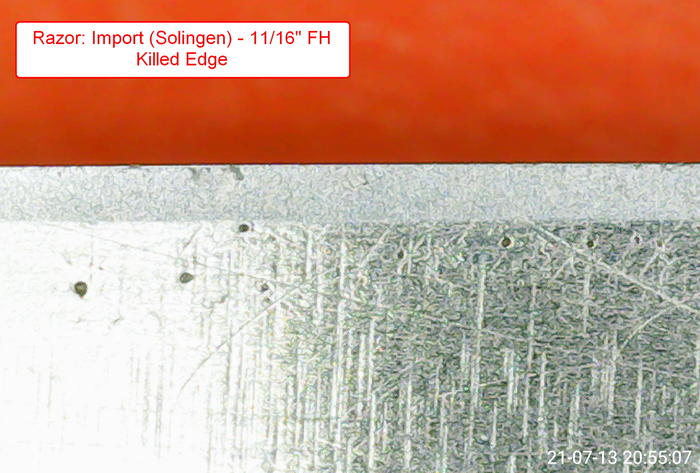
Used for this test an "Import" marked Solingen razor (11/16" - FH) that I used before to test diamond slurry from my Ozuku Asagi.
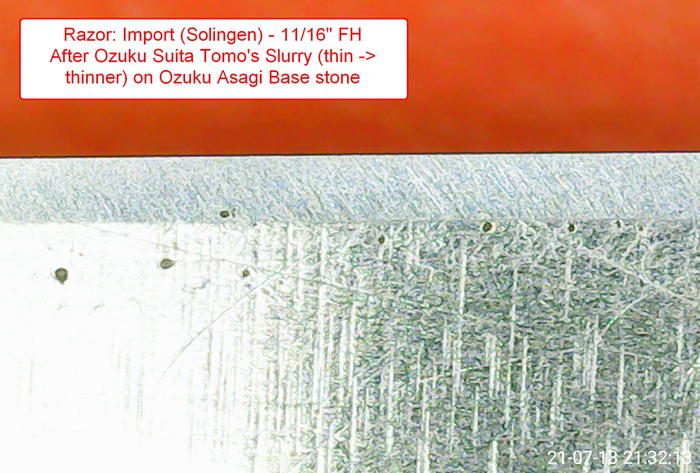
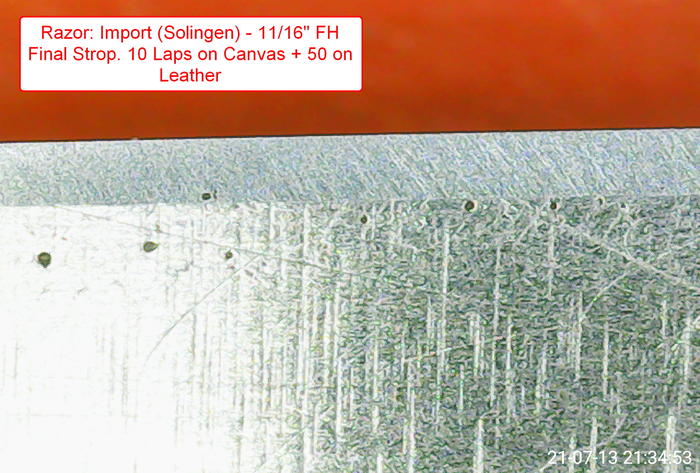
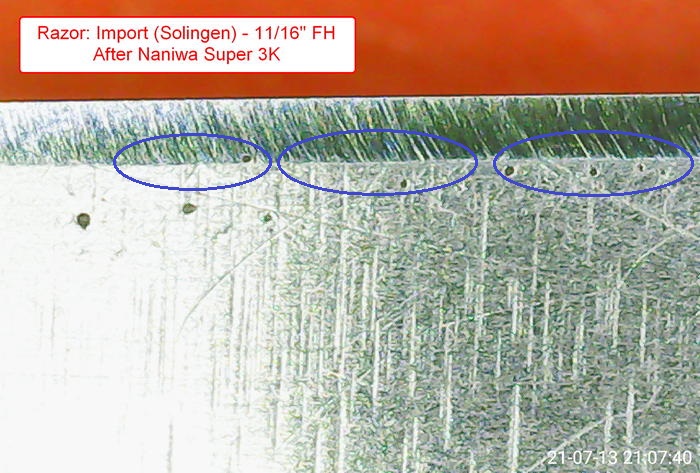
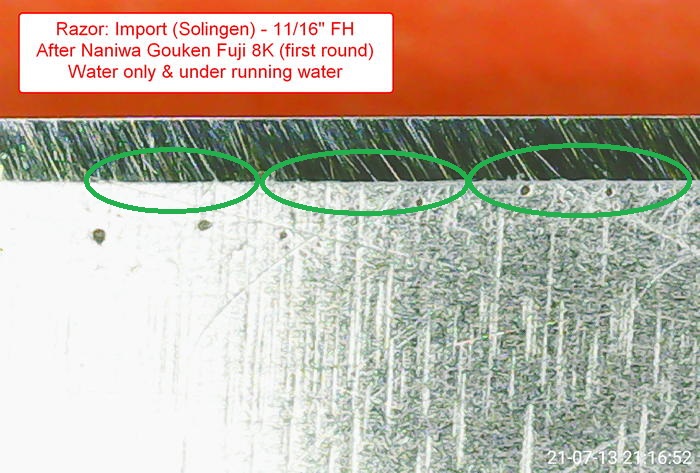
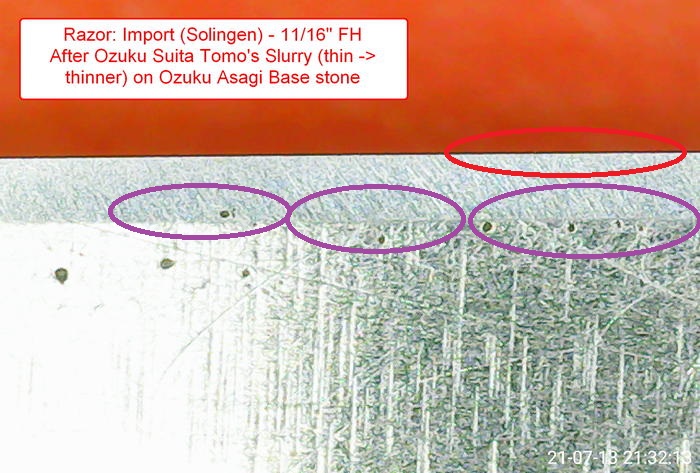
The honing sequence was Naniwa Super 3K - Naniwa Gouken 8K (two rounds) - Ozuku Suita's slurry on Ozuku Asagi base. Check images for more info.
After the initial edge killing, treetop test was positive out from the 3K, and always better after each step of the progression.
Today's shave was very good: close and smooth.
Of corse, I'll leave any evaluation on the images to the more experienced.
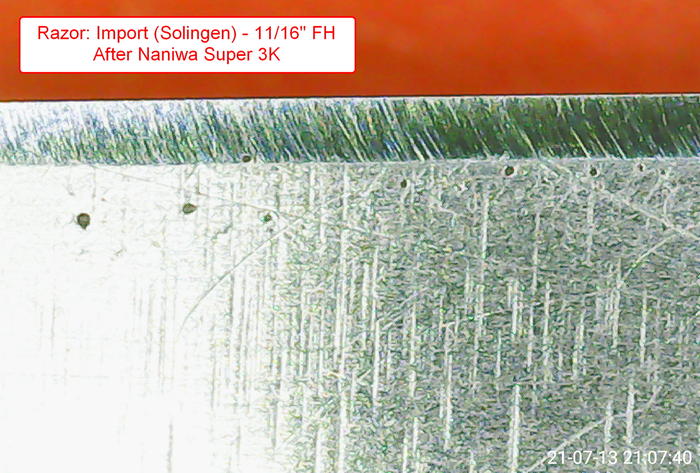
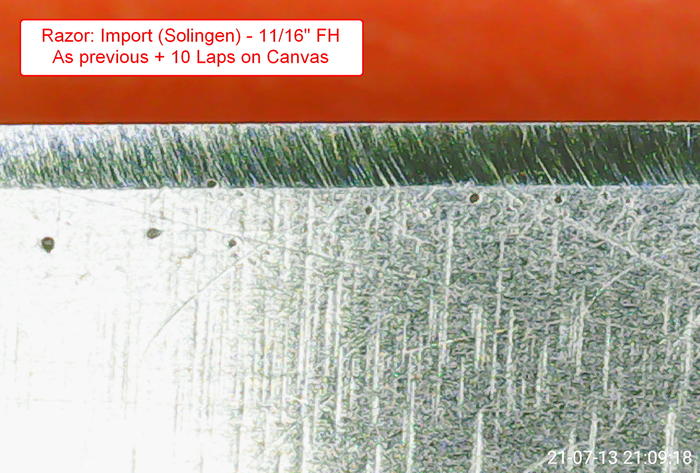
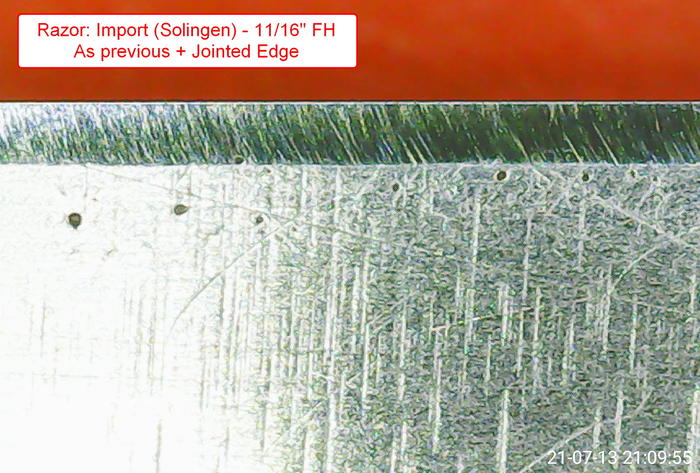
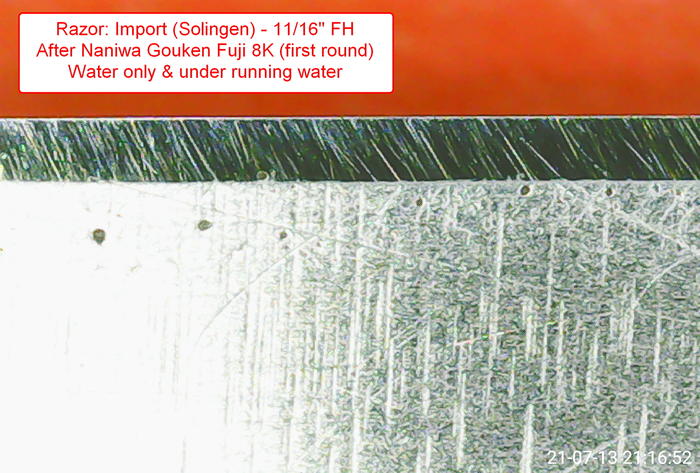
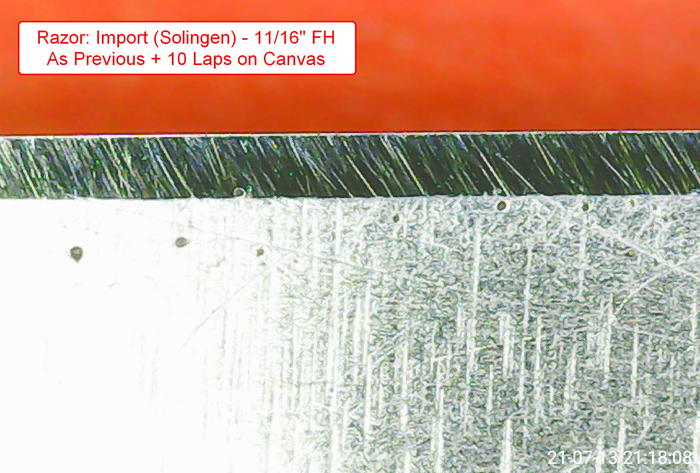
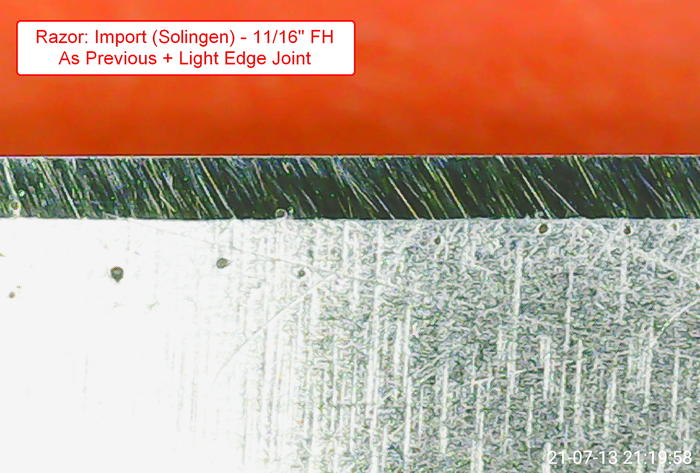
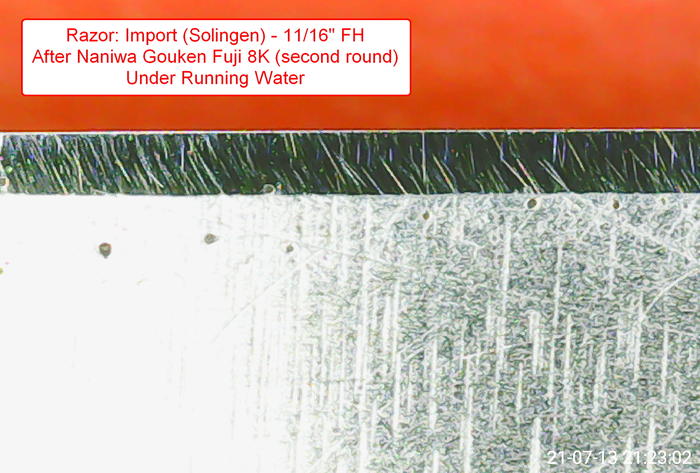
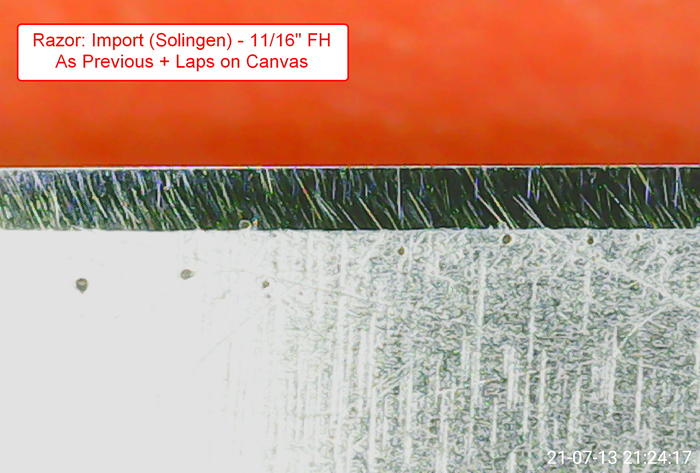
 I know that I don't know (Socrates)
-
07-14-2021, 09:44 PM #176Senior Member


- Join Date
- Apr 2012
- Location
- Diamond Bar, CA
- Posts
- 6,553
Thanked: 3215
You ended up with a nice straight edge, but I can still see 3k stria on the bevel through the kasumi Jnat finished bevel.
So, keep in mind what we are after is the edge, all that follow may not be necessary, or over the top. Ha, over the top!
Here is how I look at these photos and the goal.
If I can perfect a bevel and more importantly the edge as much as possible before starting with a Jnat, then anything that occurs after the Jnat is from the Jnat, nagura or technique and easier to trouble shoot should an issue surface.
We know the 8k Fuji is capable of near mirror, stria less finish.
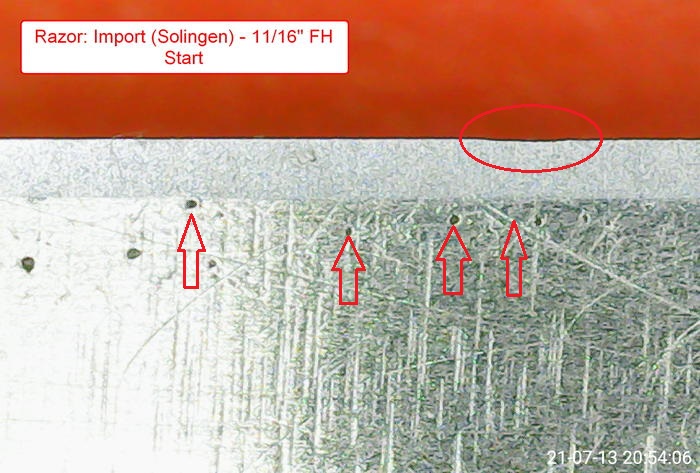
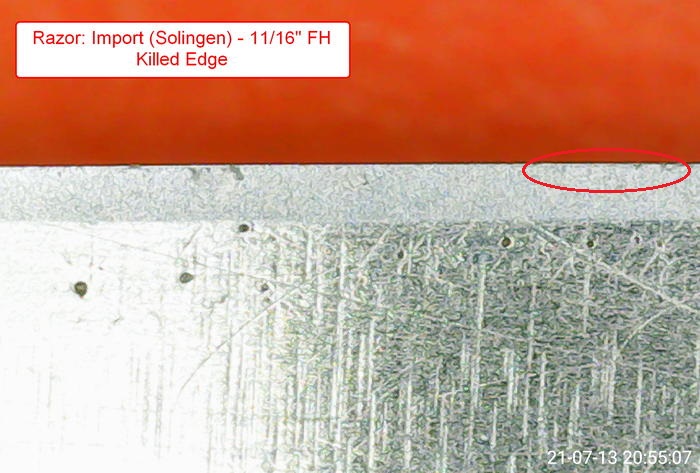
First, I look at the edge, first photo. I see a large shallow indention (red circle). To me that looks like impact damage. Impact damage often goes much deeper than the bottom of the deviation.
The red arrows will be witness marks used to reference the 3k stria.
Photo 2 shows impact damage after jointing.
Photo 3 shows 3k stria,(Blue circles) note the double stria, “railroad tracks” easy to track. These stria do not exist in photo 1, so they are 3k stria. You will notice they are not removed at 8k or even through the Jnat progression.
All this stria should have been removed at 8k. Also note the impact damage is not completely removed, at 3k, 8k or the Jnat progression. It is minimized, but not fully removed.
We polish the bevel to straighten the edge, but in this case, I would have removed all the impact damage by jointing and honing on the 3k, before moving on. You might get lucky and remove it at 8k or the Jnat but ensure success by staying on the 3k until you have a solid 3k edge.
The 8k should remove all the 3k stria (Green circles) especially the deep stria shown in photo 3 and all the related stria above the witness marks.
Note in photo 4 (Green circle) and 5, Jnat edge, (Purple circles) all the 3k stria is still there and while the edge appears straight, there is roughness the edge (flashing) at the original red circle.
In summary spend more time on the 3k to fully correct the edge, then remove all the 3k stria with the 8k. Lay a new Jnat Kasumi finish on a stria less 8k bevel.
I still think you should get a better finish from the 8k. Lay a pencil grid mark on the stone. If flat, it should completely remove the grid in five laps or less on 220 grit paper.
You want to insure that the grit is removing the pencil grid, not the slurry and that the stone is flat. If the stone is never fully flattened, the rough pockets will surface as the rest of the stone wears and scratch the bevel and edge. Also ensure the edges are beveled or rounded.
If the stone is flat, then you are not using enough pressure in the initial laps or doing enough laps to remove all the previous stria.
When dealing with edge damage, running a sharpie on the edge with the lightest amount of pressure will let you feel if the edge is rough or chipped. Learn to use that as a tool when jointing. If you feel a chip, joint it again, sometimes it takes multiple jointing to remove edge damage. Strop before honing.
When teaching new guys to hone in person the most common mistake is not using enough pressure. They have heard the “weight of the blade” mantra and are afraid to use pressure. Also their new stones are never fully flat.
Use enough pressure to fully set the bevel, then joint off the rough edge, use enough pressure to remove the previous grits stria, then joint the edge and reset the edge with light X stroke to fully reset the edge. Once the bevels have been fully set, (bevels flat and meeting), 10-20 lite X strokes will get them meeting fully again.
I believe you understand this and repeat it for any new guys reading this post.
While it may shave well, a little bit more time or pressure on each stone will ensure a pristine long-lasting edge. Once you get the 8k sorted out, this will improve your Jnat edges even further.
Last edited by Euclid440; 07-14-2021 at 09:50 PM.
-
The Following User Says Thank You to Euclid440 For This Useful Post:
Skorpio58 (07-15-2021)
-
07-15-2021, 10:40 AM #177

Wow... how many thinghs to learn each time!

I think my main problem (or, a big problem anyway) is the fact I use the microscope with a smartphone screen. Compared to the one with a 7" built in screen I saw during my recent meeting... is definately worst. The smartphone screen is too small (also if actual smartphones are larger than ever) and (i wear glasses) when honing, I can't see clearly some particulars (e.g. 3K stria after 8K or Jnat... or if indention fully disappeared after edge killing) and so, I can be wrong at judging the results.
In addition, it often becomes difficult to focus, because the slightest movement alters the vision and / or the position of the blade relative to the microscope.
Well ... I have to do with what I have (until I'll buy that model with screen), but it's not easy to be systematic and constant in the results.
As for the 8k ... before I use it I will lap it again and try to achieve a better level of finish. I'll have to stay more on that stone, as I don't think it's a low pressure problem ... because I've never believed those who say "just the weight of the blade". I always apply a good amount of pressure (twisting towards the bevel, to mantain it as narrow as possible). Of course, as I go towards the finish, I tend to lighten it, but never too much. If I make a mistake ... it's for sure from too much pressure and not too little ...
Last edited by Skorpio58; 07-15-2021 at 10:44 AM.
I know that I don't know (Socrates)
-
07-15-2021, 01:18 PM #178Senior Member


- Join Date
- Apr 2012
- Location
- Diamond Bar, CA
- Posts
- 6,553
Thanked: 3215
Yes, looking at micrographs on a cell phone screen would be tough. I have my scope connected to a laptop and much larger screen. I also use a photo editing software to enlarge and zoom into specific areas of interest.
So, all of this “pre-honing” is newish to you, probably because in doing the Jnat slurry test, most of your honing was on the same razor. After a few honing and nagura test the bevels were flat and stria free.
Now you add a new stone, a synthetic stone to the mix and everything changes. This is also a good example of keeping the process as simple as possible and minimize variables.
In this case it is easy to pinpoint the issue at the 8k. I bring up the impact damage as something to be aware of. It may shave just fine but stropping a few times may cause the weak steel at the impact site to chip or crumble. If the shave were harsh, that is the first place I would look.
These hard stones in the 8-12k range are very hard and can require some extra effort to flatten and smooth them, and as said some need to have some of the surface removed before they perform to their full potential.
The 8k is really a key stone in a synthetic progression. If you look at edges in a progression, the edge does not get visibly straight until 8k. It is a kind of tipping point that can make or break a progression when used as a pre-finisher for a Jnat.
Once you get the 8k sorted, it can simplify a Jnat progression to one or two Nagura.
-
08-13-2021, 09:57 AM #179
 Two razors honing.
As I told to Euclid440, I'm very busy these days, so I didn't touched a stone since a long time.
Yesterday had some spare time and decided to "refresh" a couple of blades that, for a reason or another, wasn't using much this year.
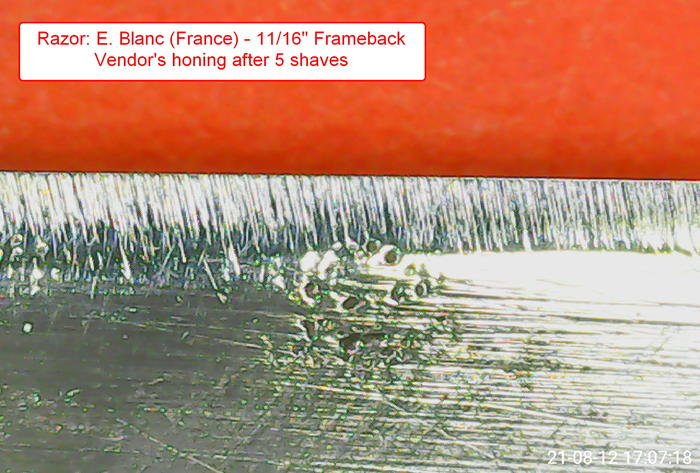
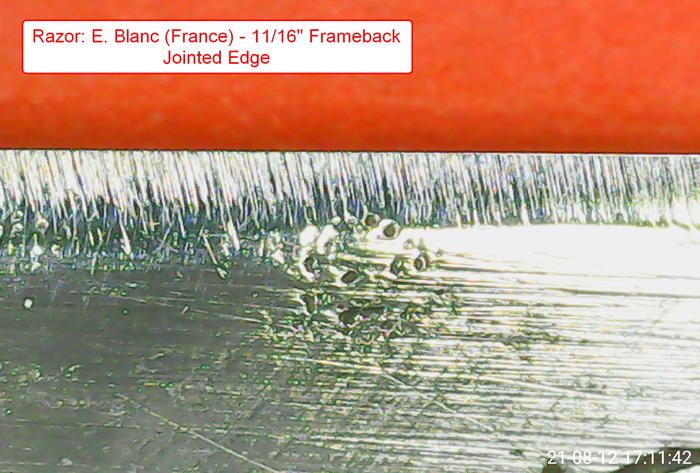
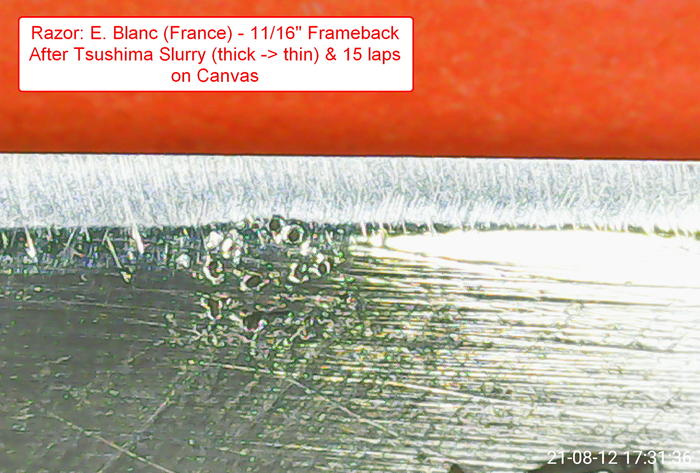
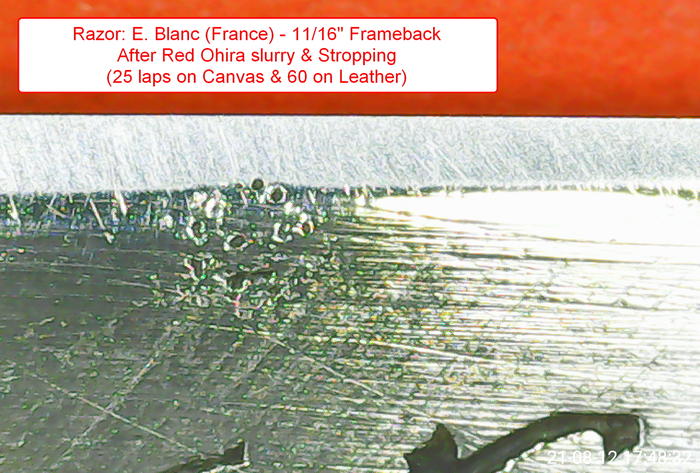
The first one is a French Frameback, proudly stated by the vendor as "honed with my method and no stone and no tape"...
Anyway, it worked for 3/4 shaves but actually definatedly needed some honing.
For this razor I used the Ozuku Asagi as a base stone and worked on it with Tsushima and Red Ohira naguras. The Red Ohira isn't my finest nagura, but gave nice results when shaving on previous tests.
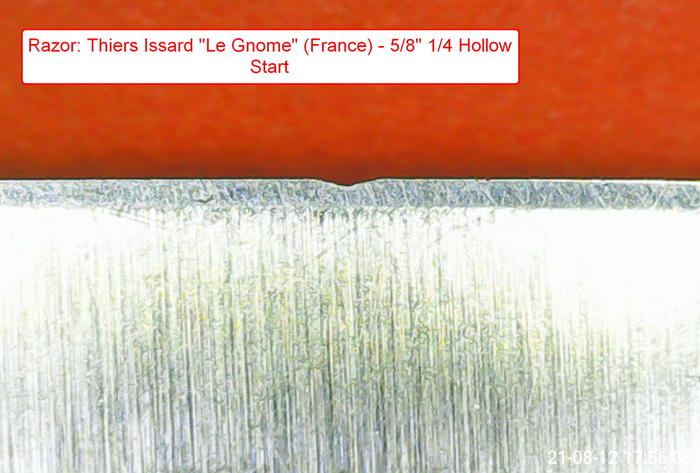
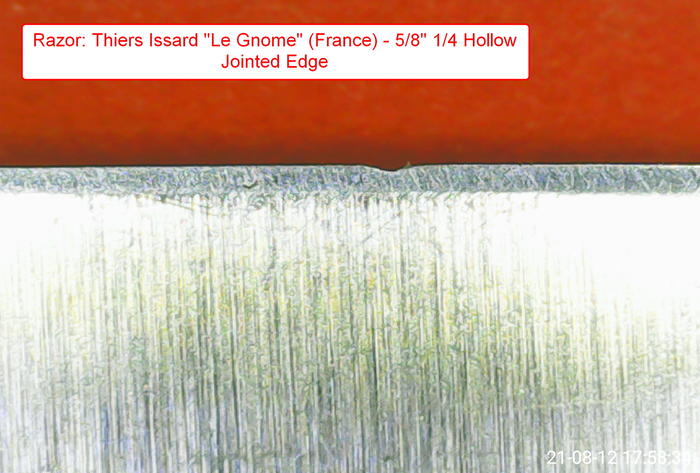
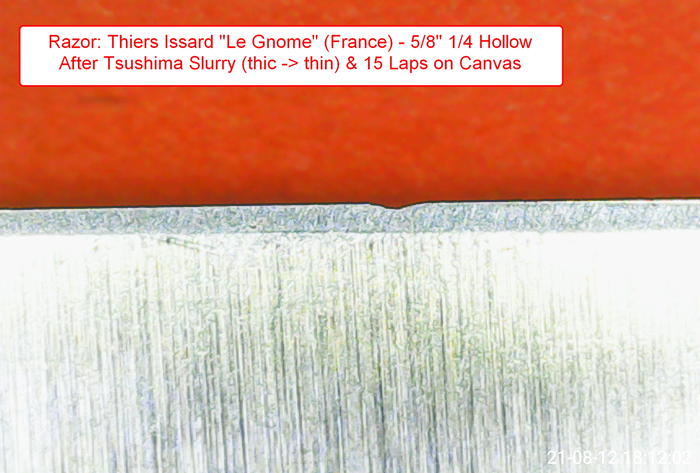
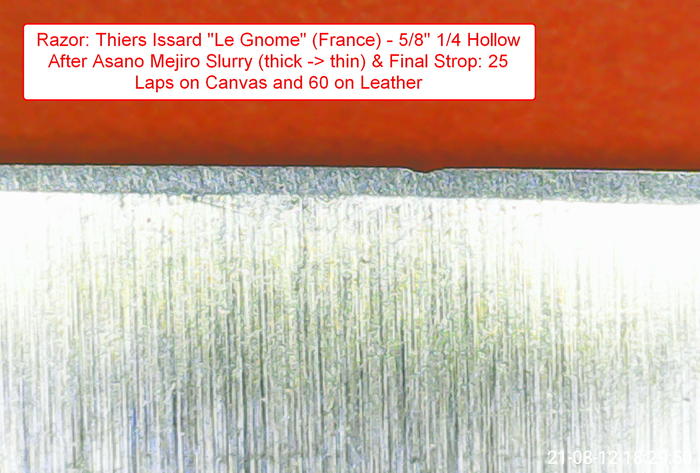
The second razor is a Thiers Issard "Le Gnome", 5/8" 1/4 Hollow I bought aready (well) honed on May 2020 and was my first straight!
After a good number of shaves, I hitted the faucet and made a chip toward the toe of the blade. Some months ago gave a quick pass on my Nakayama Kiita Koppa and diamod slurry, but it wasn't enough to smooth the chip.
Of course, as I saw with microscope, a small micro chip often is practically unnoticeable when shaving, so I tried to smooth it as much as possible, before resetting the bevel.
I used Tsushima & Mejiro on Nakayama Kiita Koppa (1 kapton layer), and smoothed the chip in an appreciable way. Shave will say if it was enough.
Today shaved with the first razor, and Ohira's finish confirmed to be Ok as expected.
E. Blanc
Thiers Issard
 I know that I don't know (Socrates)
-
08-13-2021, 04:33 PM #180Senior Member


- Join Date
- Apr 2012
- Location
- Diamond Bar, CA
- Posts
- 6,553
Thanked: 3215
The frame back looks to have been aggressively but uniformly-honed by the seller, the edge looks straight though not well refined, but a good base to start from.
Because it was not honed with tape originally, we can see a demarcation near the middle of the bevel where much of the deep stria was removed on the front half, by the Tsushima slurry, and where much of the stria is visible on the back half of the bevel where the tape lifted the bevel off the stone fully.
Staying on the Tsushima slurry a bit longer would flatten the bevel completely or removing all the stria with your 8k prior to going to the Jnat would also flatten the bevel and produce a clean flat bevel upon which you could lay a Jnat bevel and edge on.
Your final bevel looks a bit scratchy on the back side, but the front half is smoother, and the edge looks straight. There may be room for refinement with a finer nagura.
Thiers Issard are all over the map in terms of hardness and grind quality with later models. Vintage TI razors were especially well ground and hard. This can play a part in how it will hone.
Edge impact damage goes much deeper than the edge, can easily go to a depth of half the bevel width and travels radially from the impact point.
So, even if you were to remove all the edge to the bottom of the chip, the damage can resurface as micro chipping after a few shaves and stropping.
For that reason, I would have removed all the edge, to at least the bottom of the chip on a diamond plate. A full progression honing would remove more of the edge, to more solid steel.
Here too I would spend a bit more time on the Tsushima slurry, perhaps adding to or making a new fresh slurry to remove all the deep stria and cut a deeper smoother edge.
I have written about how I feel the the 4k is a “transition” stone in a synthetic honing progression. Where we transition from grinding/shaping with 1k and lower grits, to polishing and the 4k should be used to remove all of the deep 1k stria. The more time you spend on the 4k to smooth and polish the bevel the easier time and better finish all the following stones will be able to produce and a stronger, keener edge.
Here too when progressing to a Jnat, the low grit nagura, Botan, Tsushima or even Tenjo are “transition stones” that play a big part is setting up the bevel to produce a clean, strong, straight edge, transitioning to a Jnat kasumi finish.. Which is why I prefer to make the bevel as stria free with a good, hard 8K prior to moving to a Jnat.
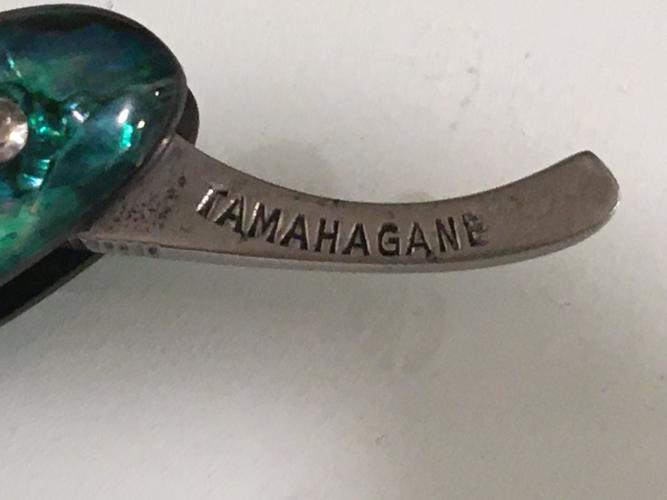
Recently I have been finishing on Koma slurry with impressive results. I have not use Koma for probably about a year, choosing to finish on a hard Asagi tomo, from Tenjo slurry, but was honing a hard Japanese Tamahagane razor that I rescaled and sanded and buffed the bevel off.
The Koma gave the hard Tamahagane steel, a keen aggressive edge that calmed after a few shaving and stropping. I finished several customer razors, of softer steel with the Koma with impressive edges, though can be aggressive.
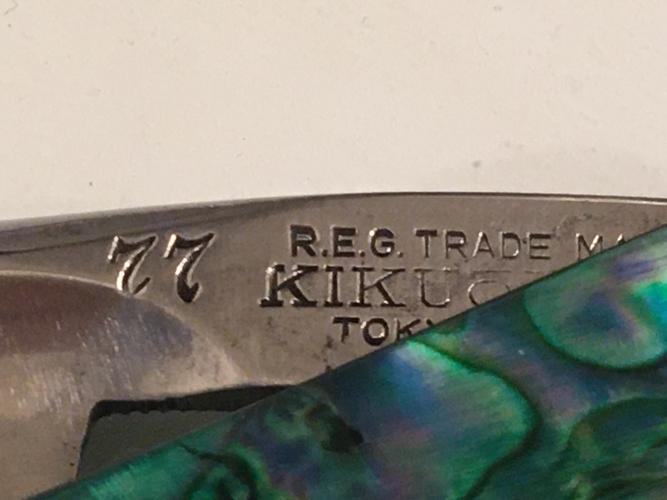
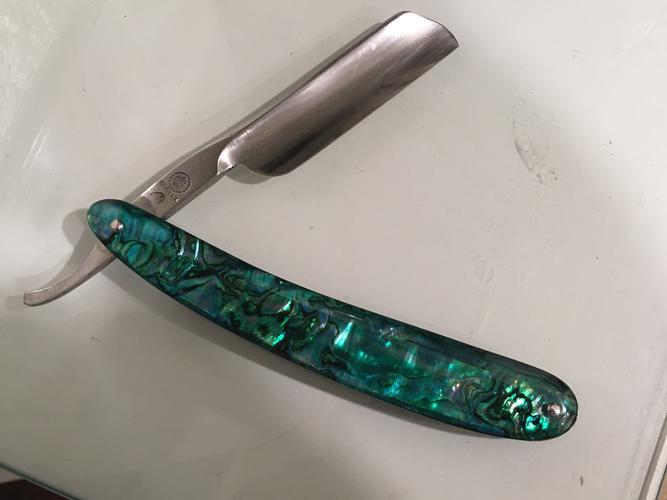
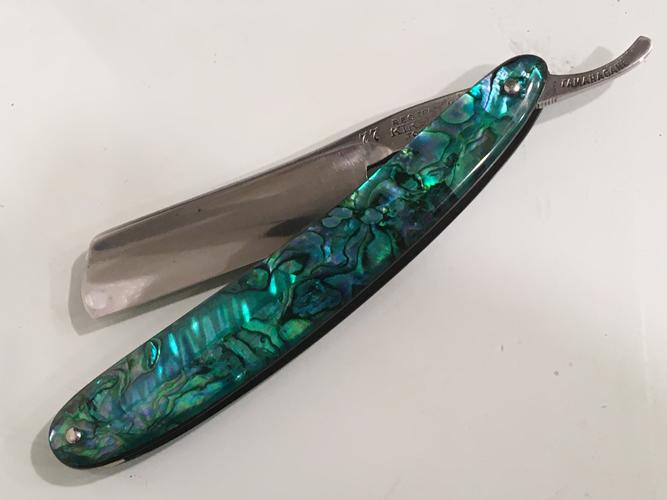
Here is the razor a KIKUOKAN TOKYO 77, I picked up this razor a couple years ago with a broken scale. These vintage razors were scaled in faux ivory celluloid that often off gasses. Most of the razors I have seen have cell rot damage and are thinly ground, so not much steel can be removed, if pitted. Not all Kiku Okan razors are Tamahagane, but all are well ground from good steel.
This one had/has some pitting on the tang, but the blade is clean. Infract this blade had almost no spine wear. I suspect the scale was broken early on and put away to live a life in a sock drawer. I bought it at a great price because of the broken scale.
These razors are of great steel and exceptionally well ground. I was able to put new even bevels on it with just a few laps on a King 1k after sanding and buffing off the old bevels. It honed easily and keenly taking a great edge. I have been shaving with it daily for the past couple weeks and is quickly becoming one of my favorite shavers.
Here is the KIKUOKAN 77 rescaled in green Abalone.
Last edited by Euclid440; 08-13-2021 at 05:25 PM.


 211Likes
 LinkBack URL
 About LinkBacks


 Reply With Quote
