Results 1 to 10 of 185
Thread: Learning Jnats with Microscope
-
02-18-2021, 11:07 AM #1
 Learning Jnats with Microscope
Hi to all SRP guys!
After posting something "random" in another thread (Hone of the day... where I got a great help from Euclid440 ) I decided to start a new one, where to put my experiences with Jnats with the aid of a (cheap) USB Microscope. Nothing new of course, but just the learning curve of a newbie, both at honig and with Jnats. Hope images, experiences and comments will be helpful to other newbies (and myself of course) to understand something more about this engaging topic.
First: I'm new at honing (about six months and 20some razors honed & touched up)... but wanna grow always more.
Second: Microscope doesn't hone. It's just a tool which helps to understand what I'm doing & how the stones work. It doesn't says if an edge is sharpen enough or if the shave will be smooth but, it can act as a visual aid to correlate phisical sensations to what is happening on the bevel and the edge. I.e. when we test (fingers, thumbnail test, tree topping hairs, HHT) we can try to see if what we feel is related (and how) to what we see. We can try to understand if a particular finishing aspect gives us a more or less smooth shave. Needless to say, it use is essential to share what's happening with other people. Actually I'm still working at finding the right background to put the razor. This time I used a dark blue foam pad, but was not much satisfied.
Third: Actually I've 3 small Jnats: Aiiwatani Karasu - Nakayama Kiita Koppa and Ozuku Koppa. All in the low price range, but already better than many other stones (or, at least, that's what my skin says ). Plus some Tomos & Naguras I will test day by day. Microscope will help me to understand how these ones work.
So, let's start with yesterday's honing session. Today it delivered a very, very close shave. It was quite smooth too.
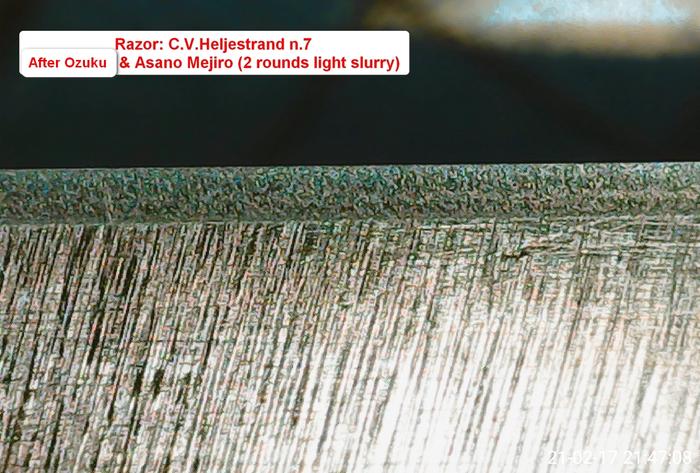
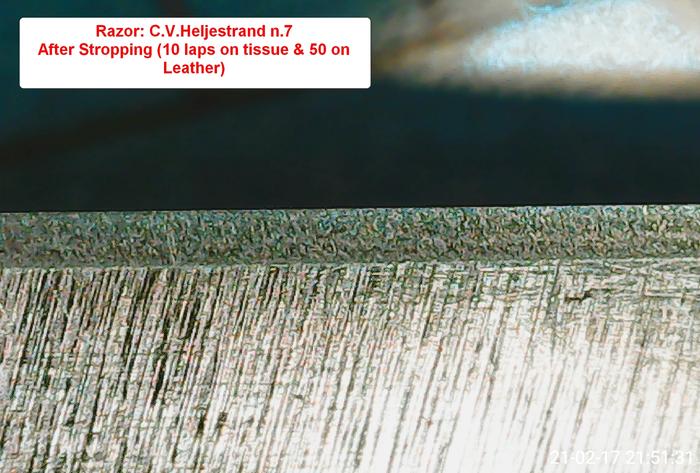
Razor: C.V.Heljestrand n.°7 - Eskilstuna - 5/8" 1/4H. I've honed or touched up it previously, but never got the right balance in keenes/smoothness.
This time I killed the edge and used (with 1 layer of Kapton Tape): King 1K - Naniwa Super 3K - Ozuku Koppa - Asano Mejiro Nagura (first time I used it) - I jointed the edge some times during the various phases.
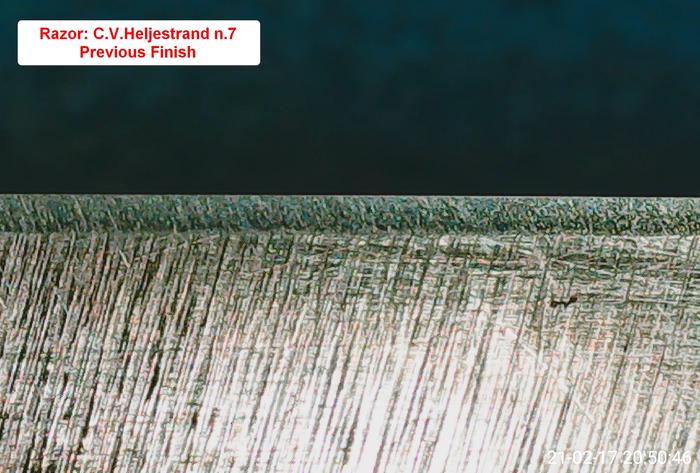
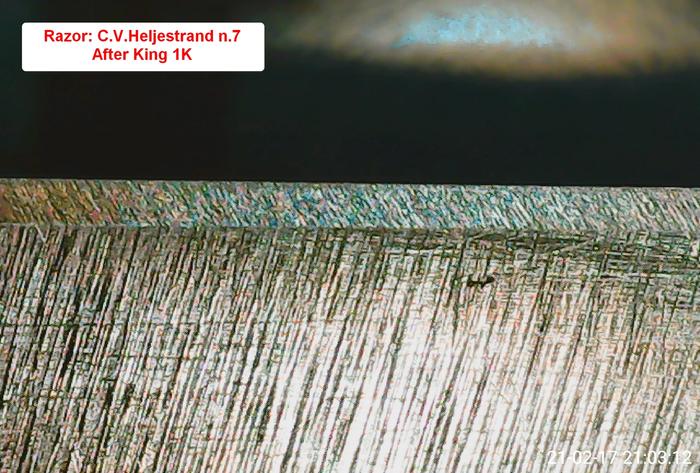
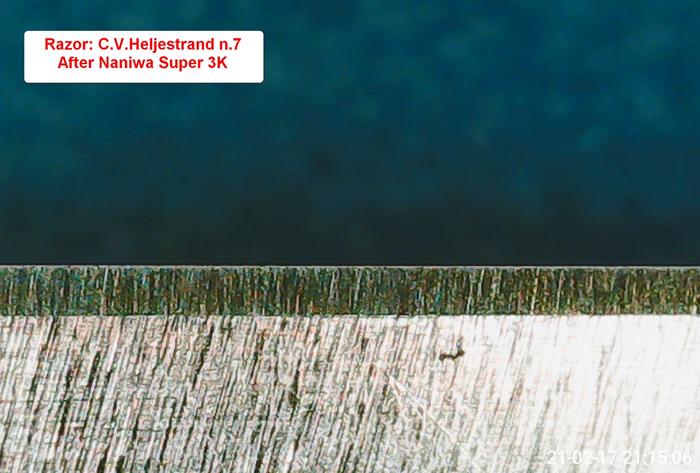
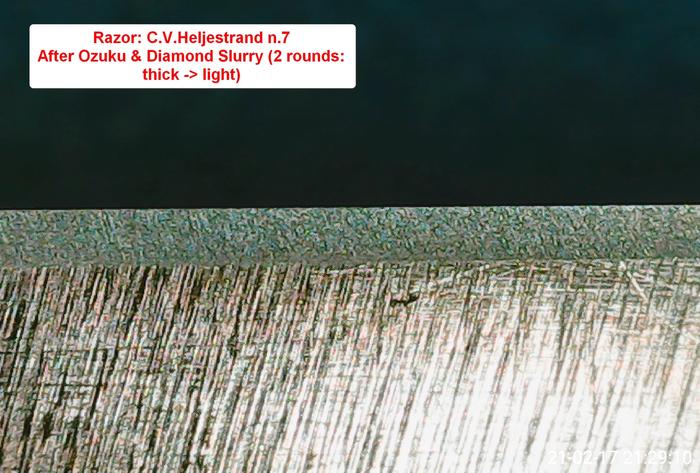
Last edited by Skorpio58; 02-18-2021 at 11:17 AM.
I know that I don't know (Socrates)
-
The Following User Says Thank You to Skorpio58 For This Useful Post:
ischiapp (03-18-2021)
-
02-18-2021, 06:33 PM #2Senior Member

- Join Date
- Sep 2020
- Location
- Austin, TX
- Posts
- 653
Thanked: 56
Good luck.
I had to say something because I don't remember how to subscribe without replying .
If you're wondering I'm probably being sarcastic.
-
02-18-2021, 06:50 PM #3

Great!


Anyway... this is the way! .)
 I know that I don't know (Socrates)
-
The Following 2 Users Say Thank You to Skorpio58 For This Useful Post:
markbignosekelly (02-19-2021), planeden (02-18-2021)
-
02-18-2021, 09:40 PM #4

I will be watching to see how you get along. The jnats never did work well for me but who knows. I may have been doing something wrong. Good luck. I will stick with the GOK 20k.
It's just Sharpening, right?
Jerry...
-
02-18-2021, 10:31 PM #5

Hi! Thanks for your interest.
I've a lot to learn... but one thing I've already understood for sure: there isn't just one way to get what we need (i.e. a good, close & smooth shave). There are too many factors which determine the final result.
Currently, I am fascinated by Jnats ... perhaps because I love Japan in general, and because I am curious about the possibility of working on a single base stone, alternating different Naguras. In this way, the many possible combinations can lead to different technical aspects and to different results. A way like any other to increase my knowledge.
I have some friends who use the GoK 20K and they like it. They also use the small one as Nagura on Jnats. It is not excluded that in the near future I may try it too (budget permitting) I know that I don't know (Socrates)
-
02-18-2021, 11:19 PM #6Senior Member


- Join Date
- Apr 2012
- Location
- Diamond Bar, CA
- Posts
- 6,553
Thanked: 3215
Nice clear micrographs, and a straight edge how did it shave?
Looks like you have got synthetic honing down pretty well and now begins the mystery of slurry.
There are some slight visible 1k stria on the bevel, which may indicate that you could do more laps on 3k and slurry or use a bit more pressure at the beginning of each transition. Not a big thing but could be an indicator for improved technique. The shave is what counts and if the shave is great, errant stria do not matter.
I find that the stone after your bevel setting stone is very important in the stone progression. It removes all the deep stria and sets up the blade for polishing the edge. Folks having edge issues, failing to spend enough time or pressure to remove deep stria, will fight you all the way.
Now that you are getting deeper into Nagura/Slurry make sure that your Nagura are properly prepared.
The goal of using Nagura is three-fold, 1. to smooth the base stone face. 2. create slurry of the base stone and the nagura. (The hardness of the nagura and base stone will determine how much of each is included). And 3. To crush slurry finer, (technique). You will need to experiment.
The nagura stone must be smooth. You can create different starting grits of slurry by using different parts of the stone. More aggressive slurry with a rounded corner and finer slurry with a flattish face. You can also crush/work slurry with a flat face.
Round off all the sharp corners and points on the Nagura. You do not want sharp points that can scratch the base stone or flake off into your slurry, it can scratch the bevel or micro-chip the edge. You can try to crush large grit, but I find it easier to just rinse off and start new if you get scratching on the bevel or it feels gritty.
Keith at Tomo Nagura.com and Alex at the Japan Stone have good video on shaping a Tomo Nagura. I do not cut grooves in Tomo, I prefer to use rounded corners or smaller pieces and avoid stiction. If you are using a large flat piece, then grooves can help with stiction, make sure to bevel any grooves to prevent flaking.
I like to round one corner to about a ˝ in/12mm radius or larger and rock the corner from face to face as you rub the Nagura on the base stone, then crush finer on a flat face of the nagura.
Smooth and round your Nagura and perhaps spend a little more time on each progression to try and remove first all the synthetic stria, then refine the pebble finish finer with Nagura slurry.
Depending on your stone, the base stone Diamond slurry may be finer that your Mejiro or try using a finer or worn diamond plate.
Making and using slurry is like making a stew or soup, any single variable can change the outcome. The trick is to be systematic and change a single variable at a time until you get the results you want. Then make it repeatable. Even once you get repeatable results, it may not work as well on another razor of different, harder, or softer steel. But at least you will have a base line to work from.
From here, start by preparing your Nagura, also wet your Nagura before use, a simple dunk in clean water is all you need. Sealing nagura is optional, I do not. Craft water-based shellac is inexpensive and dries quickly to build multi layers. I do use it on stones. A 2oz bottle goes a long way and can be tinted if you want that look.
-
-
02-19-2021, 10:34 AM #7

Euclid440
Lot of interesting things to think about.
The razor shaved well and very close. Waaaaay better than before. Maybe it could have been a bit more comfortable... but I noticed that when a razor is very close (whatever the razor, or the honer or the hone was) my skin "feels" it a little bit more than usual. Nothing serious, just some random itching in the next hours... but we always run for the best...
Interesting videos. Liked that way of making a sort of "convex" surface to avoid sticking. I'll try to work that way.
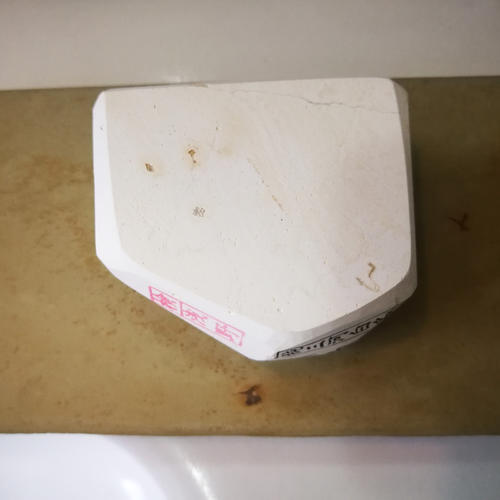
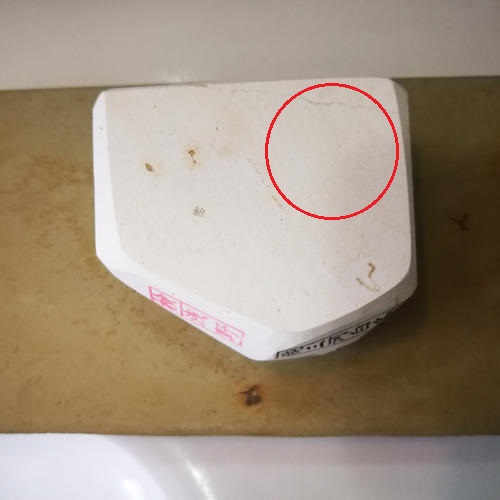
The Mejiro (160 gr. quite big for my base stones ) was already chamfered by the vendor... so I used the side opposite to the kangji directly as it was but... the first time I felt there was something wrong (dunno if it was a flake or an hair on the stone) and... I got a micro chip on the edge toward the heel. So, I washed again the Ozuku, lapped a bit that side of the Nagura on a 400 G diamond plate, and used it with no more problems. (Some images attached to see if I'll have to work on it more).
This is exactly what fascinates me about using Jnats with Naguras.
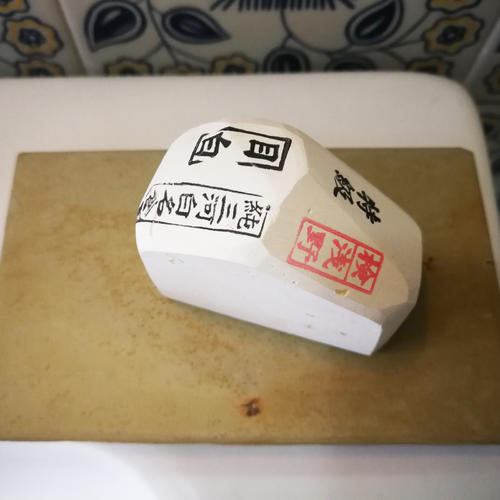
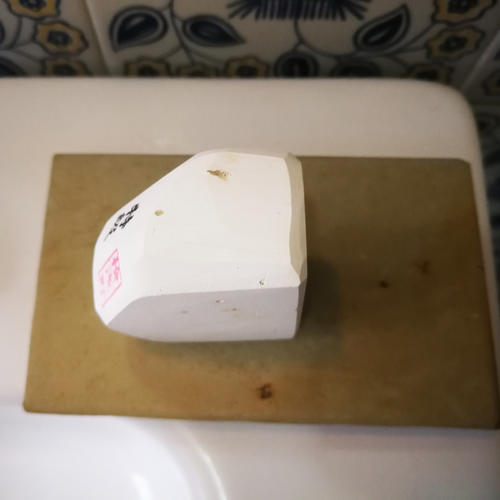
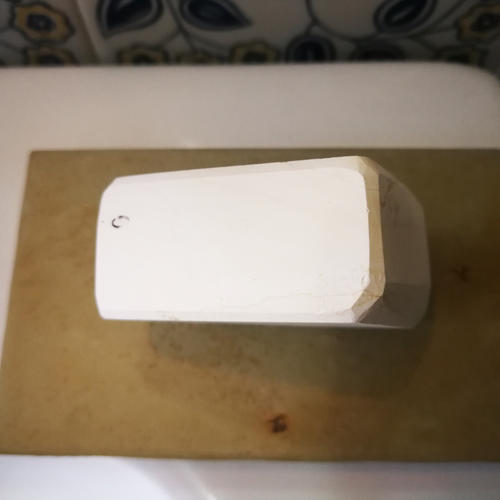
In this image I now notice a thin fracture line and a small chip.
I'll post soon another experiment I made with the Broken razor you already know.Last edited by Skorpio58; 02-19-2021 at 10:37 AM.
I know that I don't know (Socrates)
-
02-19-2021, 02:27 PM #8Senior Member


- Join Date
- Apr 2012
- Location
- Diamond Bar, CA
- Posts
- 6,553
Thanked: 3215
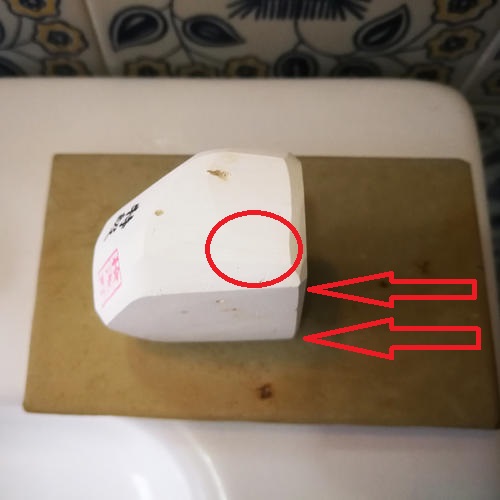
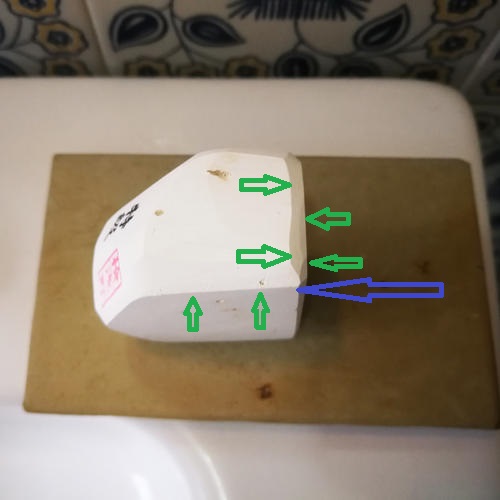
The corners are still a bit sharp. You want the corner you will be using at least to be smooth and more radiused to prevent chipping. You can super glue the crack to prevent further cracking.
I would use the corner/edge where the red arrows are and radius that corner a lot more. I would also radius the corners marked with the green arrows so they are not sharp edges that could flake. Avoid any pointy corners marked with the blue arrow. Do not worry about wasting stone, you will not use up that nagura in multiple lifetimes.
As said earlier, you will need to experiment to find out if your Mejiro is finer than your diamond slurry, and experiment with finer diamond plates. You can buy small 2x3 diamond plates inexpensively $10-15 for a set of 3 or no name brand plates on eBay for less to experiment with. Small hard arks also make good slurry stones, where you will only be raising fine slurry from the base stones.
You can also mix slurry, Diamond and Mejiro or Tomo. Also, different Tomo will react differently with each base stone, some work better with harder stones, some softer tomo.
As your edges get keener you need to adjust your shaving pressure and angle. You are probably still using the same shaving pressure that you were using with relatively dull edges. Try a lower shaving angle with the spine closer to the skin and a lot less pressure.
Stropping before your final finish laps smooth the edge so you get more/better edge contact, (remove any flashing or burr) and try edge trailing final laps for a bit smoother edge.
And adding a layer of tape and doing 3-4 finish laps to create a micro bevel is another option for keenness and comfort.
Also be aware that Mikawa are graded for appearance and “evaluated” and stamped Asano. It does not necessarily mean that one stone is better than another, and unfortunately now days, that any of the stamps are genuine.
They are natural stones that can vary in composition and because Mikawa stones have double or tripled in price, it is easy to have a stamp made and double the value of lesser stones.
Really all that matters is how the stone performs regardless of stamps. So, stamps or grading can mean little.
-
-
02-19-2021, 08:19 PM #9

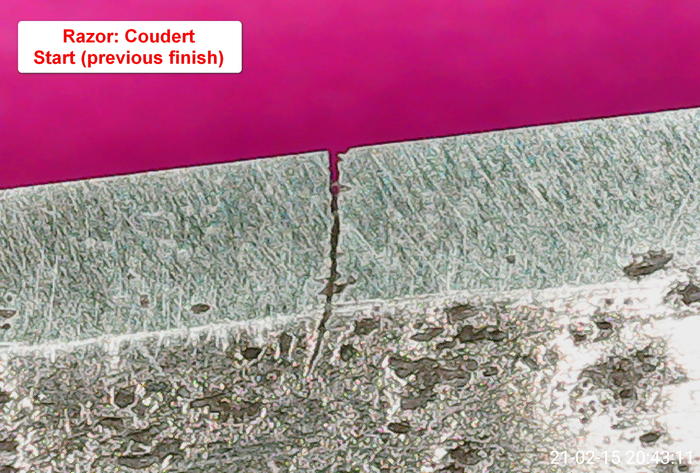
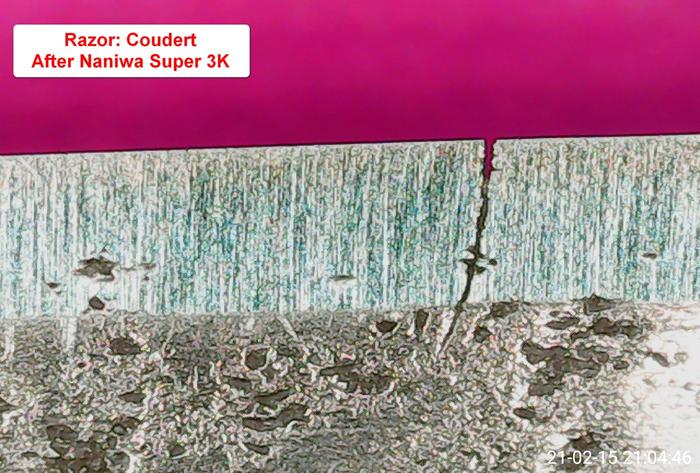
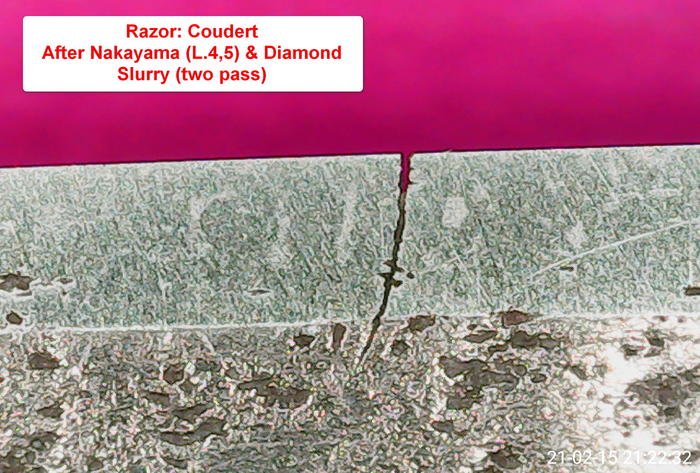
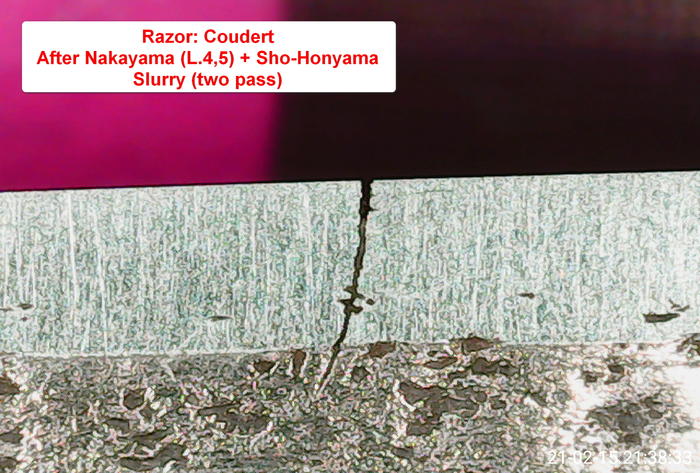
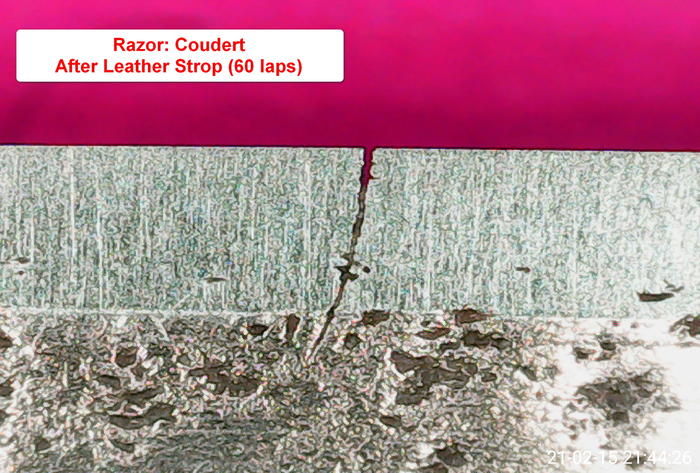
Some days ago I made a post HERE regarding an old French True Frameback (Coudert Dynamic) I worked on with my Ozuku, plus diamond slurry & Sho-Honyama slurry. I discovered with microscope three cracks on the bevel but despite that, I shaved with it. Not a bad shave.
Euclid440 (apart for warning me to use that razor) told me a lot of thinghs regarding either the procedure and the way to better document it.
Given the fact I already worked on it... I wanted to compare my Nakayama to my Ozuku and started from scratch with it.
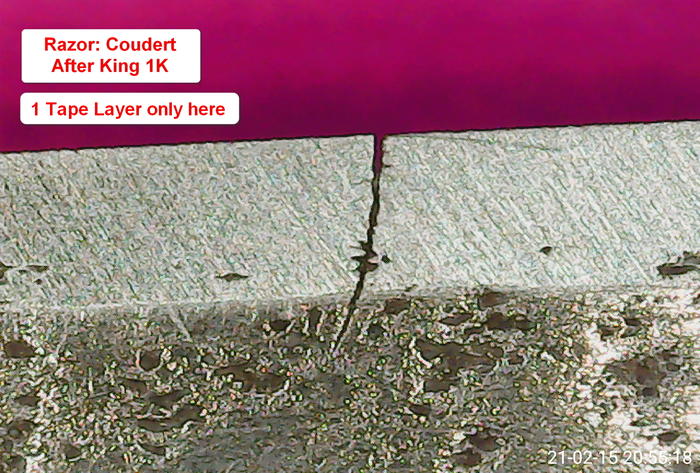
I used a technique (Illustrated by a well-known Italian sharpener HERE) that involves using a layer of tape only on the first stone... and then no tape. I just used 1K & 3K instead of 2K & 5K
I used on Nakayama the same progression I used on the Ozuku i.e. Diamond Thick Slurry -> Diamond Light Slurry - Sho-Honyama's light slurry (two pass) but tried to work better the slurry, as Euclid440 suggested. More, I used a red cardboard as a background for the razor under the microscope.
It seemed to me that the visual results were better than the previous time. Am I wrong?
So (yes... I did it again ) I decided to (carefully) shave once more with it. The shave confirmed my impressions and was much closer and more comfortable than the previous one.
 I know that I don't know (Socrates)
-
02-20-2021, 02:11 AM #10Senior Member


- Join Date
- Apr 2012
- Location
- Diamond Bar, CA
- Posts
- 6,553
Thanked: 3215
Curious, what is the claimed benefit of not using tape through the whole honing process?
Interesting honing video, I too am a big fan of stropping on linen between stones. Also fan of edge parallel honing for removing stria quickly.
It appears your Diamond slurry is finer than the Sho- Honyama. Is that 400 grit diamond plate slurry?
How many laps are you doing per set? If you do the half lap, back and forth stroke, like in the video, make you final laps, single directional, I do pull strokes to even out the final stria pattern on each stone. 10-15 are all you need.
I like the red background, the edge looks very straight.
.


 211Likes
 LinkBack URL
 About LinkBacks


 Reply With Quote

