
Results 101 to 110 of 185
 211Likes
Thread: Learning Jnats with Microscope
 LinkBack URL
 About LinkBacks
-
04-13-2021, 05:50 PM #101Senior Member


- Join Date
- Nov 2020
- Location
- Rome - Italy
- Posts
- 293
Thanked: 11
A very interesting post (and experiments to, at least in part, replicate soon by myself).
I said "in part" as actually I feel more confident when not counting laps, but alternating moviments (and pressures) until I see the slurry starts to ticken and darken too much).
Anyway, if I only I had learned just one thing about honing, is the the fundamental importance of bevel setting. Paraphrasing a well-known Tv spot, we could say: "No (good) bevel, no party"!
So, time spent on the low grit stone(s) is never too much, and improving my technique in that sector, will for sure really boost the whole razor's performance.I know that I don't know (Socrates)
-
04-13-2021, 06:20 PM #102Senior Member


- Join Date
- Apr 2012
- Location
- Diamond Bar, CA
- Posts
- 6,553
Thanked: 3215
“The first one is: was the second round with thick slurry redundant or useless?
The second one: have i been able to reach the final result Euclid expected?
In both cases I'm tempted to answer "yes"... but (of course) I can't be sure.”
When you transition to a higher stone or thinner slurry in the progression, my goal is to first remove or refine the stria or finish on the bevel, in this case to remove deep stria, which will straighten the edge.
After the first round of heavy slurry the bevel looks like it could use more refinement, removing more of the deep stria, but the edge looks straight.
The reason you want to remove the deep stria is you are trying to avoid what happened. The edge chipped out. If deep stria reaches the edge, it can be a weak spot that can chip after shaving and stropping. Stropping can put a lot of stress to and edge.
Also bevels that have pitting make the steel suspect to me. Sometimes it will hone fine even with a pit near the edge, other times they chip like crazy.
So, “was the second round with thick slurry redundant or useless?”
No, not at all. The chipping would make the steel quality suspicious for me, that is a fairly large chip in width to come out of nowhere. There is also some edge damage or flashing to the left of the chip.
You can also use pressure when the slurry is fresh and aggressive, to remove the deep stria from the bevel. More, or less pressure is relative.
Because of the pitting I would have used a more aggressive stone to reset the bevel, reveal any other pitting and remove more steel at the edge to more solid steel. If you do not start from a solid baseline, and it starts to micro-chip, you may have just wasted a lot of time.
Just looking at the first photo of the bevel, I would have reset the bevel with a 1k because of the chipping, deep stria, random stria, and the pitting.
With razors that are new to me or customer razors, I always set the bevel on a 1 or 4K for that reason. Too many times I have been bitten when I try to cut a corner or save a few microns of steel and refresh a razor of unknow provenance.
If it is one of mine, that is another story and I know the honing history.Skorpio58 likes this.
-
The Following User Says Thank You to Euclid440 For This Useful Post:
Skorpio58 (04-13-2021)
-
04-13-2021, 06:46 PM #103Senior Member
- Join Date
- Nov 2020
- Location
- Rome - Italy
- Posts
- 293
Thanked: 11
Lesson learned
Btw. yesterday I started to "finish" also another razor, but stopped as I saw that pitting had to be removed from the bevel.
The only question about that chip is that there wasn't visible pitting near the edge. At least on that point... I know that I don't know (Socrates)
-
04-13-2021, 08:21 PM #104Senior Member
- Join Date
- Apr 2012
- Location
- Diamond Bar, CA
- Posts
- 6,553
Thanked: 3215
A pit is an “indicator” of potentially damaged steel, The pit itself does not need to be near the area where the steel will chip.
It is just a warning bell, that the steel may be damaged. As I said the chip size is unusual. Time will tell if the edge holds.Skorpio58 likes this.
-
04-17-2021, 10:35 AM #105Senior Member
- Join Date
- Nov 2020
- Location
- Rome - Italy
- Posts
- 293
Thanked: 11 A tough challenge ... (almost) won.
Yesterday I had to face a tough challenge.
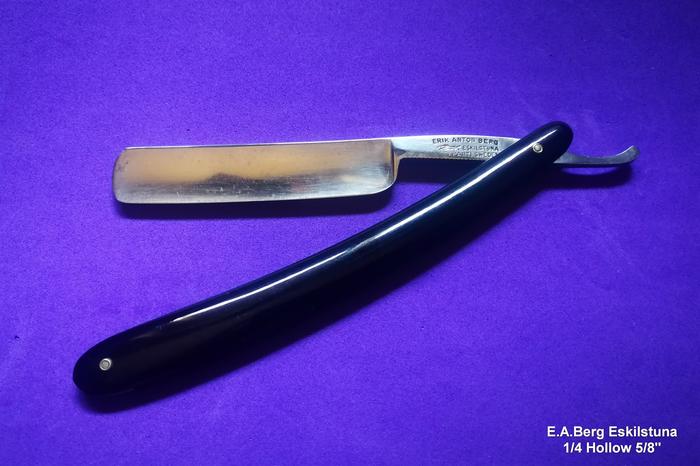
The Razor was a nice E.A.Berg, 5/8" 1/4H which, despite some problems, performed well in the past. As I banged it on the faucet last time I used it, the need was to correct the chips I caused.
The razor (as I said) had some problems:
1) it's a bit warped, so in one side the bevel was (too much) thinner in the centre of the blade than on the Heel & Toe .
2) it has pitting in the same zone, both on the bevel and just below it.
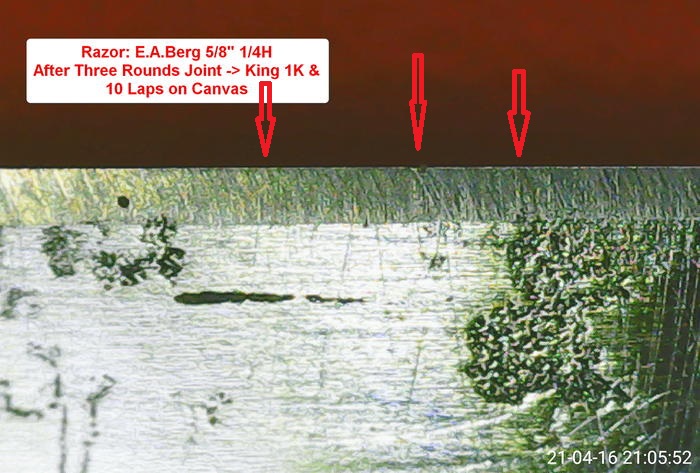
Of course, I decided to hone it from scratch and followed some of Euclid's suggestions regarding the bevel setting on my King 1K. I.e. I killed the edge (5/6 passes on a stone's edge) and made some cycles of full laps edge leading/circles/x-strokes etc. each followed by jointing (2 passes) the edge and stropping 10 laps on Canvas, until the full edge became chips free (apart from some very micro-ones) and passed treetop test.
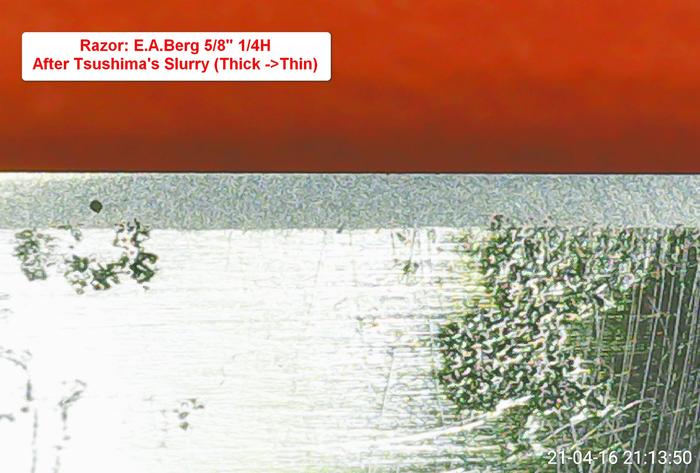
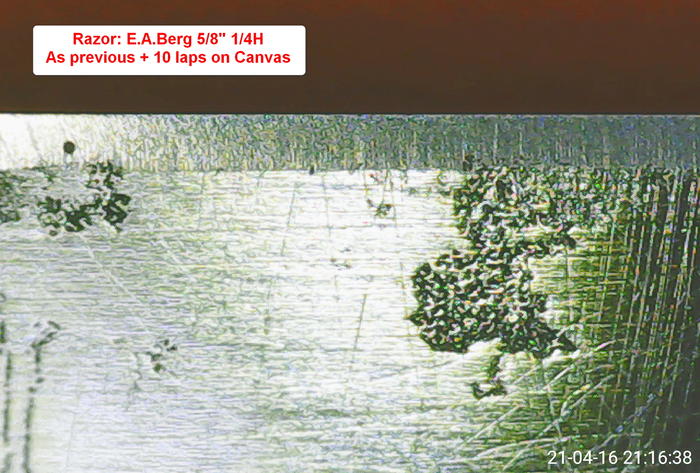
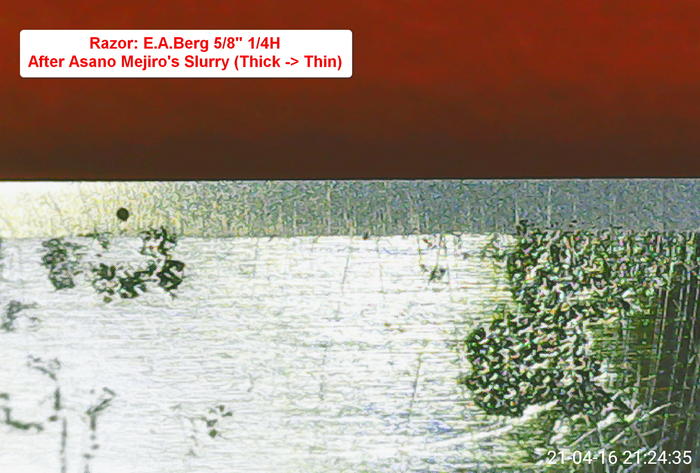
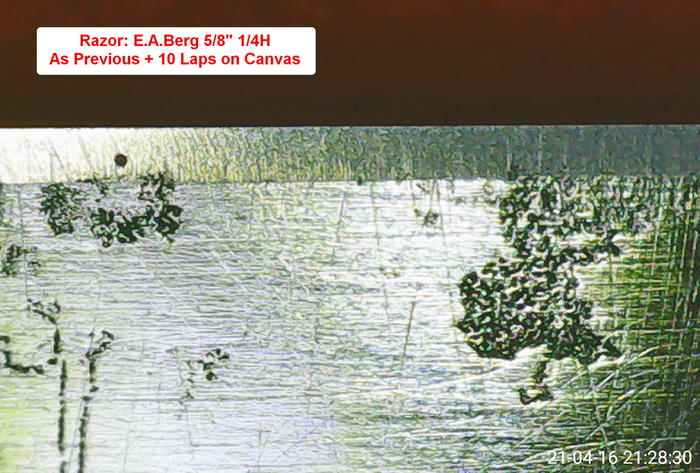
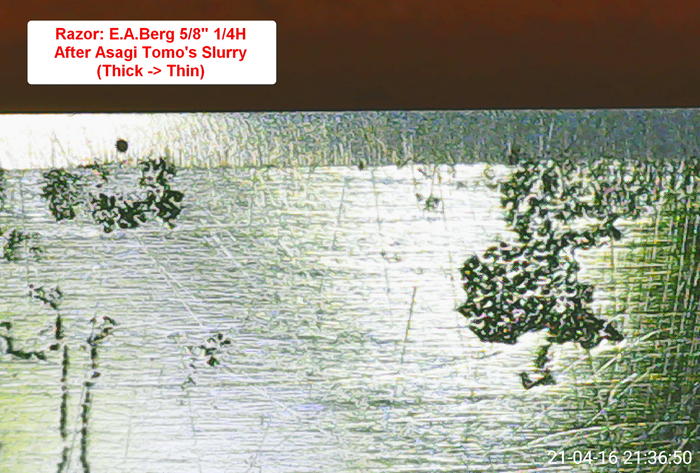
Then I followed my (actual) progression: Ozuku Asagi Koppa (base stone) and slurry from Tsushima Black Nagura -> Asano Mejiro Nagura -> Asagi Tomo. Each followed by 10 laps on Canvas. The blade still passed the treetop test at this point.
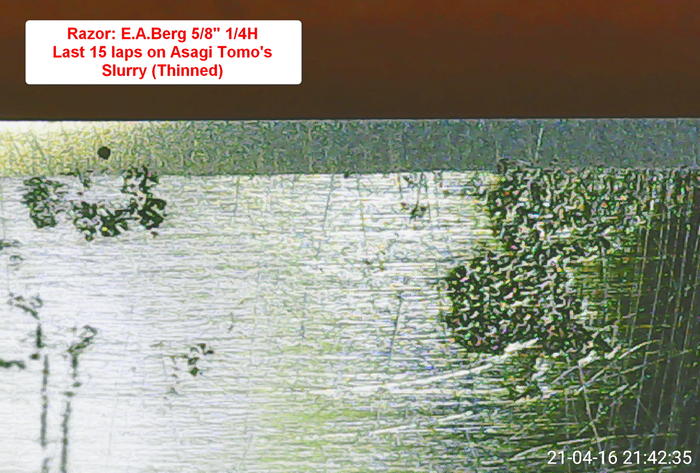
This time, however, I adopted another suggestion from Euclid: I lightly jointed (1 pass on stone) the edge after the Asagi Tomo and then made 15 light laps on it's thinned slurry.
And it was in this last step that I must have made a mistake... as the treetop test was weaker after that. Anyway (I was a bit tired), I made the final stropping and today wanted to test it on shave, but I had to give up almost immediately, because the razor cut very little.
For what I can understand, I corrected the bevel (now its depth is quite homogeneous), eliminated the chips and made (also if not perfect) a discret finish with an at least acceptable edge. So, I should have made the mistake when jointing the edge or during the final 15 laps...
If so... i think i will have to repeat the step with the Asagi Tomo's slurry. This time, however, without repeating the light edge jointing, so as not to further complicate things and see how it goes.
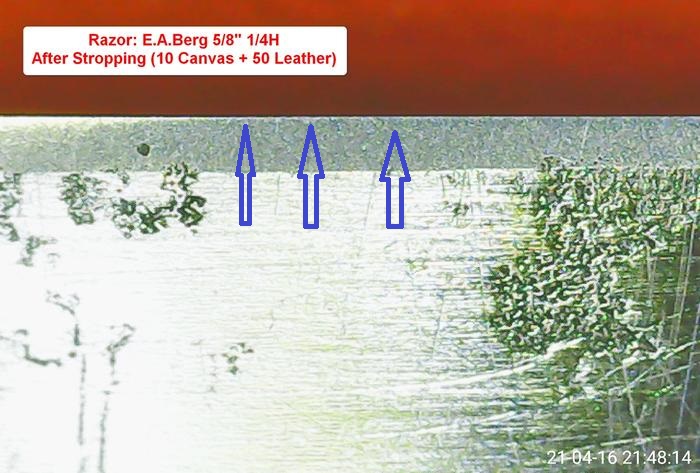
Note: First image is about the most damaged point of the blade, then I got another easier to find reference point.


Last edited by Skorpio58; 04-17-2021 at 11:47 AM.
I know that I don't know (Socrates)
-
04-17-2021, 02:17 PM #106Senior Member
- Join Date
- Apr 2012
- Location
- Diamond Bar, CA
- Posts
- 6,553
Thanked: 3215
EA Berg razors are very hard. Vintage Berg chisels and plane blades command high dollar prices for that reason. Razors are a bit high, but not like his tools.
So, if you joint, it may take more than 15 laps to bring back an edge, but I do not think that is all your issue.
The pitting and the fact that the blade has a warp add other honing issues to the mix.
When honing a blade with a pronounced warp, where you can see that the bevel is not fully contacting the stone, (mid bevel narrower than the heel and toe), the heel and toe are keeping the middle off the stone, (on the concave side).
You must hone the razor in two parts on the concave side. Hone the middle and toe first, by hanging the heel off the stone, at the beginning of the stroke, so the middle is making full contact. Then blend the heel half of the razor using a heel forward X stroke, keeping the heel on the stone until the last third to quarter of the stone, before allowing the heel to drop off the stone. This will blend the heel with the already honed middle and get the edge fully honed.
You will need to be careful when using this technique on the concave side, as most of your strokes will probably be single strokes, and if the steel is hard may require more time and laps than the convex side on bevel setting and Tsushima slurry. When bevel setting you can use some pressure but once the bevels are flat and even, watch your pressure and do more laps on slurry. It is easy to mess up an edge when rolling the bevel off the edge if you use too much pressure.
Make sure your stone edge is rounded or beveled so you do not have any sharp corners or chips. The bevel will be sliding over the edge, so it needs to be clean.
On the convex side you will need a rolling X stroke to fully hone that side on the higher grit slurries. So, when you do your finish laps you will need to continue to do the same and hone each side differently, or at least be aware of the concave side problem. A rolling X stroke may be use as a finish stroke, rolling up on the convex side and rolling down on the concave side. Avoid the temptation to use pressure, this is a finesse stroke on the concave side and will just take more laps than usual.
Here inking the bevel to make sure you are making full bevel contact on the rolling X stroke may be a good idea on the concave side, on the higher grit slurry.
The other issue is the pitting, it looks deep in spots and you may need to remove a bit more edge, I would have bread knifed the edge on a diamond plate, until I got to solid steel, (no pitting on the edge, when looking straight down on the edge with magnification). See the first photo, remove all that edge damage before setting the bevel.
If you are going to be doing this kind of work, investing in a large dual grit diamond plate, (3-400/1000) grit plate is a good investment. It will save you a lot of time and can also be used to lap your stones.
It does not look like the bevel in the center of each photo is fully honed, the edge is fuzzy and does not look straight. See second photo.
You may be close, and just some laps with a rolling X could fully hone the edge. I would drop back down to a bit thick Tsushima slurry and try some rolling X strokes, it may take more than usual to fully hone the edge.
Look straight down on the edge with magnification, if you see shiny reflections, that is where the bevels are not fully meeting. Stropping on linen will tell you if you have weak steel, it will micro chip out. If so, you may need to remove more steel.
Continue to use the Rolling X on your finish laps, rolling down on the convex side, and watch your pressure.
Hard warped razors are challenging.
Last edited by Euclid440; 04-17-2021 at 02:24 PM.
Skorpio58 likes this.
-
The Following User Says Thank You to Euclid440 For This Useful Post:
Skorpio58 (04-17-2021)
-
04-18-2021, 07:24 AM #107Senior Member
- Join Date
- Nov 2020
- Location
- Rome - Italy
- Posts
- 293
Thanked: 11
Euclid,
Lot of interesting considerations & useful suggestions (as usual), but I wanna point out some thinghs (I apologize if I have some problem to clarify my thoughts in a foreign language)
1) The razor shaved well (close & smooth) before I hit it on the faucet, despite being honed by me some months ago.
2) I said a bit warp, but maybe I used a wrong term (?), as I've been able to set an homogenous bevel with little effort this time.
3) Of course I used different stroking methods (included rolling-x and sector honing).
4) I already checked the edge against the light and it didn't show any problem. Did it again today with a Loupe and it's OK.
5) So, dont' think the actual lack of closeness can be due to this problem.
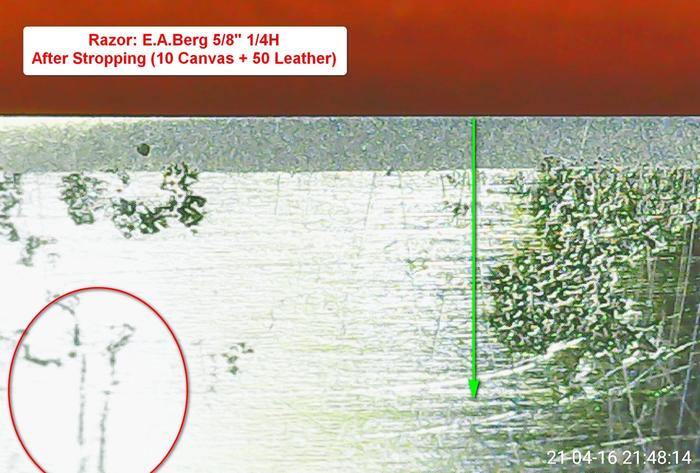
6) Regarding the Pitting, You're right: it should theoretically be removed but (apart it's a small razor and I wanna be conservative) the amount of steel I should remove would be enormous to get a perfect steel and take all the pitting away. (see image below)
7) I shaved with pitting & cracks on the blades (as you know) but the that blades cutted the beard with no problem.
8) The blade passed well the treetop test before I jointed the edge for the last time.
So, as you said, maybe (due to hard swedish steel) 15 laps weren't enough to reset the bevel after the last jointing of the edge.
Or... another possible cause (or both) that comes in my mind is a bad bevel angle. I.e. maybe the angle was at its limit before the last honing session and... resetting the bevel on the 1K shortened the blade just enough to take it out of geometry and form too obtuse an angle to be able to shave properly.
Of course I'll do again ASAP the last step (Asagi Tomo on Ozuku) without jointing (to avoid doing any mistake) and see how it goes.
 I know that I don't know (Socrates)
-
04-18-2021, 01:33 PM #108Senior Member
- Join Date
- Apr 2012
- Location
- Diamond Bar, CA
- Posts
- 6,553
Thanked: 3215
So, it is hard for me to say why the edge is not performing to it’s fullest, I am only seeing a small portion of the blade and only from a side angle.
We see the reflections at the edge, (fuzzy edge) and if the blade has a slight warp, it could be that the fuzzy sections are not fully on the hone. Also, the back of the bevel is not straight, another indicator of a slight warp, (the whole bevel is not flat on the stone).
Most blades have a slight warp, so it is not uncommon, and if a rolling X is use, pressure or the honer drops the heel off the stone unintentionally or intentionally, the edge will get honed, and it can shave well.
You do not need to remove all the pitting just enough to get a clean edge. If you ink the bevels and do a single lap with light pressure on a high grit stone, you will see if the warp is or could be an issue. Any ink on the edge is because of the warp.
While we often check the edge, looking straight down on the edge to see if the bevels are fully meeting. The edge will be dark, and any shiny spots are where they are not meeting.
You can check the edge, looking straight down on the edge after jointing. Here any dark spots are chips or pitting. The whole edge should be shiny because the edge has been milled flat.
When ever I have an issue with a blade, I ink the blade and do a lite lap on a clean stone, just to see where I am making full contact. I also almost always ink the bevel for my first lap, just so I know where problem areas may be.
The more information you have going in the better you can plan and avoid a guessing game.
Another solution/trick that I often use when I have a finish edge problem especially with hard razors, is to finish the razor as best you can, strop the razor, then add a layer of tape and do 3-5 lite laps to add a micro bevel.
That almost always works.Skorpio58 likes this.
-
The Following User Says Thank You to Euclid440 For This Useful Post:
Skorpio58 (04-19-2021)
-
04-19-2021, 09:06 AM #109Senior Member
- Join Date
- Nov 2020
- Location
- Rome - Italy
- Posts
- 293
Thanked: 11
Euclid,
of course, I do not even remotely pretend that most of the problems that occur during sharpening can be understood from a distance of 10K Kilometers.
I just share my experiences about Jnats honing, as a sort of diary were to collect trial & errors. Images can be useful, but limited to some phases and characteristics of sharpening.
It's a way to become more disciplined and get (if possible) suggestions, and reproaches when needed... from more experienced people, as you are. On the other hand, all this can be useful to those who are now approaching sharpening in general and with Jnats in particular.
Despite the aforementioned limitations, I can only be satisfied with what I have learned (both practically and theoretically) in these few months. And this encourages me to continue further along this path, which has amply proved to be the right one.I know that I don't know (Socrates)
-
04-19-2021, 10:04 AM #110Senior Member
- Join Date
- Sep 2020
- Location
- Austin, TX
- Posts
- 653
Thanked: 56
For what is worth, I've always found that joining the edges takes much more to bring back than these guys. But, I imagine everything involved takes me longer than what these guys take. So, it makes sense.
Like you, I dont count my laps, but I reckon it usually takes a few laps more than I have the patience for.
Skorpio58 likes this.If you're wondering I'm probably being sarcastic.


 Reply With Quote