Make sure it's sturdy before refinishing it. Now while this wasn't a High Chair--------------------Quote:
Originally Posted by ejmolitor37
https://www.youtube.com/watch?v=2lvz3v_dtyA
Printable View
Make sure it's sturdy before refinishing it. Now while this wasn't a High Chair--------------------Quote:
Originally Posted by ejmolitor37
https://www.youtube.com/watch?v=2lvz3v_dtyA
Roy while I love that movie it's one of my favorites, for the life of me I don't remember the fart. But none the less it gave me a great belly laugh!
Not sure what's on this thing but it's gumming my paper up bad until I get through the finish. This is going to be hours of sanding, I may change my name to stubby after I sand my fingers off!
Two words for ya. Wine cork :)Quote:
Originally Posted by ejmolitor37
Beautiful high chair, Eric.Quote:
Originally Posted by ejmolitor37
How about a chemical type stripper, like strip eze.
A chemical stripper and a wood handled parts brush should improve your lot. Chemical strippers are MEK and will eat plastics. There are some natural material strippers also. Been a few years so I can't help there. Your chair may have an under layer of "Milk Paint" but hard work will remove it.
wikipedia Milk_paint
tips/how-to-remove-milk-paint/
There was also a "Chalk Paint."
Enjoy your journey!
~Richard
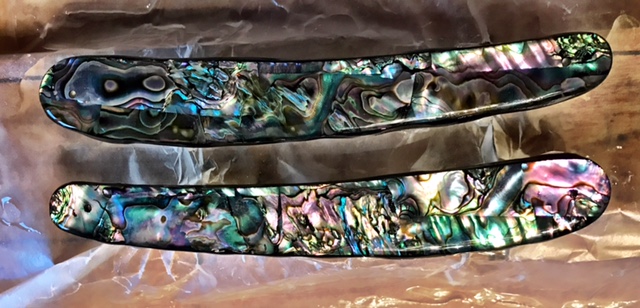
Still going slowly as time allows working on my epoxy over paua veneer on black acrylic scales (my 1st epoxy finish). So I taped the back of the scales, set them up with ds tape on my epoxy station, and went for broke. I cleaned the scales with alcohol and a lint-free cloth, mixed up the resin and hardener thoroughly at exactly 15 ml each in a medicine cup (well, as exactly as I could eyeball the meniscus at the line, anyway). I poured as evenly as I could over each scale, gently used the straw technique to pop the bubbles, and here is the result:
Attachment 271734
As you can see, there was some uneven "globbing" (is that a word?) on the sides. Though the flat top seems even after a couple of hours, a few spots around the edge didn't hold the epoxy well, and again, there are bigger lumps in other spots. I did spend a few minutes while I had workable epoxy to scoop up some drips and try to drip again around the edges to even it up, but is it possible I overdid that? Anyway, I've got far too much time invested in this to scrap it! I know this project can be saved, if I can get the experts to answer a couple of questions:
1. The Flex-Coat seemed kind of thick; any way to thin it in the future? A little acetone maybe?
2. Once it's completely hard after a few days, will epoxy respond to careful sanding and maybe some profiling on a belt grinder? (That's actually something I've gotten pretty good at). Too hard for that?
3. And once I get even edges all the way around, will epoxy respond to polishing up the belts to 2k or so? Obviously, I'll need to build a gloss back up.
Any help here would be appreciated! Once I get that finish straightened out, I plan to contour a flat 25mm malachite bead I ordered from ebay for a wedge (dangerous stuff I understand-will take all precautions!),
Thanks-Aaron
edit: Sorry-Somehow I put this under Roy's post instead of at the end of the thread!
Umm, you are the teacher so if you say globbing, I'm going to say globbing. Because the teacher says it :)
I don't think I had any luck sanding and polishing epoxy as I used the bartop stuff.
Anyone?
I did this one, an Ern Mistletoe razor by using some self-adhering bead strips from Hobby Lobby stuck to some old Novelty Cutlery liners. I set it up on some toothpicks on a block of wood and poured the epoxy over. I tried to sand and contour to no avail, so I got it a smooth as I could and made another light pour over. Cut the drips and trimmed with a razor blade.
Big pain, but came out good.
Attachment 271736Attachment 271737
Yeah, what he said. :roflmao
Looks like you're getting it done my friend
I am not familiar with that product, but I have done some larger epoxy finishing. I used a razor blade like a scraper and flattened my surface, the progressive sanding and polished it. As you get to the edges, which in this case is everything, you need to be careful not to go to thin or you can wind up loosing coverage on the corners.
They are looking quite lovely.