
Results 16,221 to 16,230 of 20602
 91550Likes
Thread: What are you working on?
 LinkBack URL
 About LinkBacks
-
05-12-2019, 09:58 PM #16221Senior Member


- Join Date
- May 2010
- Location
- Upstate South Carolina
- Posts
- 3,308
Thanked: 987 Glad to know I'm not the only one who makes mistakes I later have to go back and correct (usually involving pinning). Live and learn.
 Originally Posted by JellyJar
 There are many roads to sharp.
-
05-12-2019, 10:09 PM #16222Senior Member


- Join Date
- Feb 2013
- Location
- Haida Gwaii, British Columbia, Canada
- Posts
- 14,457
Thanked: 4830
I have corrected some goofed up holes by putting a turning drill bit in and then torquing the scales to elongate the two holes in opposite directions. A little Vaseline on the pin and then fill the slop with CA, with tape on one side to keep it from running away. Once it is set, flip it and do the other side. The CA wont stick to the pin and it corrects fairly easily. If you collars are the right size it will cover the error.
It's not what you know, it's who you take fishing!
-
The Following 3 Users Say Thank You to RezDog For This Useful Post:
Gasman (05-13-2019), JellyJar (05-14-2019), ScoutHikerDad (05-12-2019)
-
05-12-2019, 11:37 PM #16223Senior Member
- Join Date
- Oct 2010
- Posts
- 26,211
Thanked: 8626
Rezdog speaks the truth.
Something to think about is the bottom pin may be bent causing this.
Looks like the pin-hole and the top are both low on the right side of the photo.
-
05-12-2019, 11:59 PM #16224The Great & Powerful Oz


- Join Date
- May 2008
- Location
- Bodalla, NSW
- Posts
- 15,638
Thanked: 3751
Yeah, do a few hundred old Sheffields with horn scales & see how many of the holes actually line up Originally Posted by JellyJar

With the size of the pivot holes they used to punch there's a lot of wiggle room.The white gleam of swords, not the black ink of books, clears doubts and uncertainties and bleak outlooks.
-
05-13-2019, 04:59 AM #16225Skeptical Member


- Join Date
- Nov 2016
- Location
- Colorado Springs
- Posts
- 10,559
Thanked: 2197
I also cut most my pin stock down to useable size. But I keep one about 6 inches and its put in a special place so it doesn't get bent. I use it just for this reason. Testing. I'm still fixing off-set holes from when I first got into this hobby. Thanks for the info Rez. A good one to know.
It's just Sharpening, right?
Jerry...
-
05-13-2019, 05:01 AM #16226Senior Member
- Join Date
- Feb 2013
- Location
- Haida Gwaii, British Columbia, Canada
- Posts
- 14,457
Thanked: 4830
I’m pretty sure that one originally came from Richard.
It's not what you know, it's who you take fishing!
-
05-13-2019, 06:22 AM #16227Skeptical Member
- Join Date
- Nov 2016
- Location
- Colorado Springs
- Posts
- 10,559
Thanked: 2197
A little something I put together tonight. Geneva Cutlery. The blade and scales were/are a little worn but they fit so nicely together I just had to pin them up.
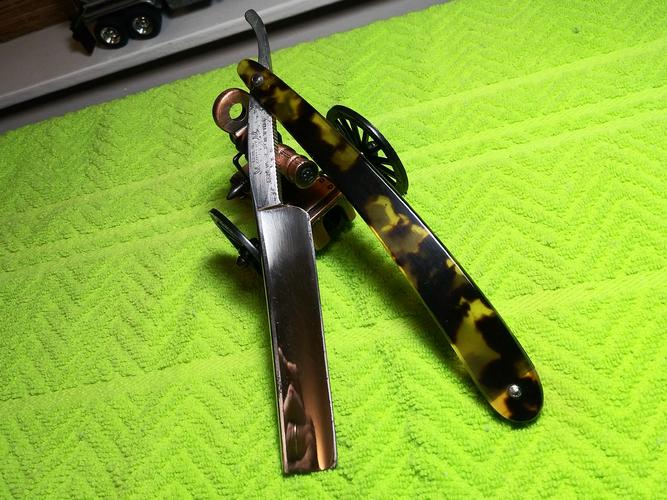
A very close fit!
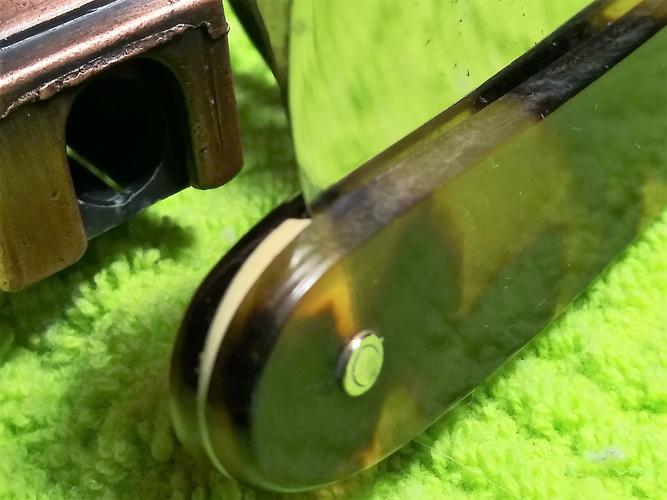
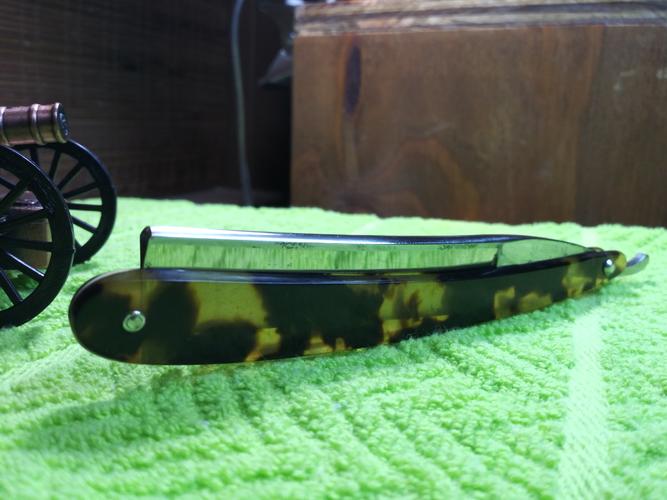
Last edited by Gasman; 05-13-2019 at 06:28 AM.
It's just Sharpening, right?
Jerry...
-
05-14-2019, 03:03 AM #16228Senior Member

- Join Date
- Feb 2019
- Location
- Salida, CA
- Posts
- 600
Thanked: 94
Good tip, take half out of each side. I'll try that in the future. Originally Posted by RezDog
O'Toole's commentary on Murphy's Law: Murphy was an optimist.
-
05-14-2019, 03:15 AM #16229Senior Member
- Join Date
- Feb 2019
- Location
- Salida, CA
- Posts
- 600
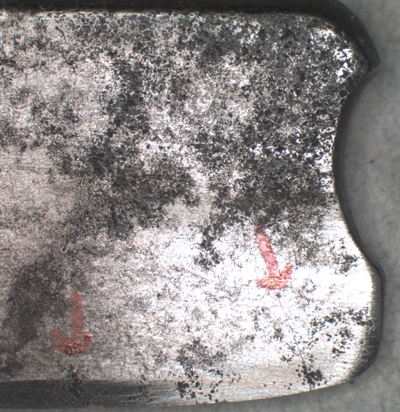
Thanked: 94 My Frederick Reynolds shows its ugly
Had some time while some finish was drying so I pulled out my Frederick to see if it would take a bevel. Started with two layers of tape and went to three as the bevel was looking quite wide. Some of the smaller chips disappeared, but I was noticing a fair amount of pitting at the edge and then a crack showed it's ugly little face at the toe.
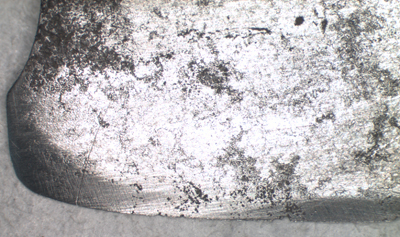
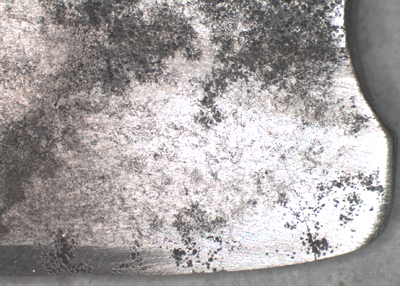
I think this could be saved with a bit of shortening into a spanish point but the pits have me most concerned there's several areas similar to the red arrow farthest from the tip. I'm not in a hurry on this one so maybe some high angle honing? Bread-knife? Just keep going with three layers and see where I wind up? I'm not going to mess with the tip until I know the edge is usable. Am I wasting my time? Appreciate your advice.
 O'Toole's commentary on Murphy's Law: Murphy was an optimist.
-
05-14-2019, 04:17 AM #16230Senior Member
- Join Date
- Feb 2013
- Location
- Haida Gwaii, British Columbia, Canada
- Posts
- 14,457
Thanked: 4830
I have seen some amazing things with regrinds, but few people have the ability to get that much off, and keep a blade straight doing it by hand. It looks like it is beyond what I can do by hand. You may want to save that one for if you get a belt grinder or give it to someone for them to use for regrinding practice. It looks like there is a lot of ugliness and it looks like it goes deep. It may not even make a regrind. I have not reground that many blades so I am no expert.
MikeT likes this.It's not what you know, it's who you take fishing!
-
The Following User Says Thank You to RezDog For This Useful Post:
JellyJar (05-15-2019)
 I hadn't noticed it before with the shorter micro bolts and pin stock. So I filled the hole and re-drilled, still a bit to the right but the blade doesn't need guiding and doesn't hit the scale.


 Reply With Quote