
Results 3,451 to 3,460 of 3718
 23400Likes
Thread: Hone of the Day
 LinkBack URL
 About LinkBacks
-
01-15-2021, 09:52 AM #3451Senior Member


- Join Date
- Nov 2020
- Location
- Rome - Italy
- Posts
- 293
Thanked: 11 The Ugly Duckling
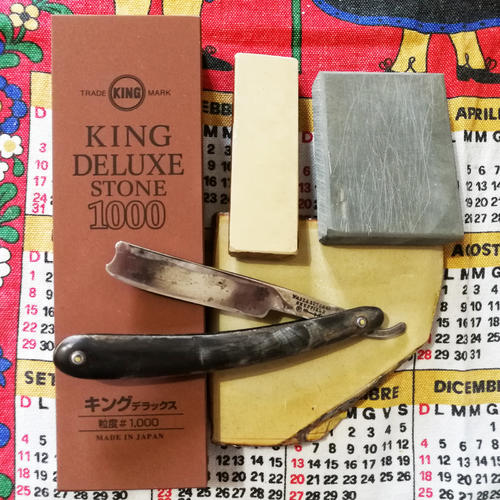
This is my first Wade & Butcher. I got it for few bucks but it was very ugly and very hard to hone. Anyway, after a couple hours of patient work I managed to get it honed. Not so beautiful to see but it worked and today delivered a nice shave.
I used 1 layer of Tape on King 1k to set the bevel -> Nakayama Kiita Koppa first with Shobudany's Slurry, then with Sho-Honyama Ghost Slurry - Finished on clean WaterLast edited by Skorpio58; 01-15-2021 at 12:35 PM.
I know that I don't know (Socrates)
-
01-16-2021, 09:49 AM #3452Senior Member


- Join Date
- May 2011
- Location
- Merthyr Tydfil South Wales UK.
- Posts
- 5,601
Thanked: 1413
Two very nice vintage blades, nice score James.
 a very simple walkthrough progression starting with the 1K Chosera 3K, 5K, 8K, 12K, 20K.
Wherever youre going never take an idiot with you, you can always find one when you get there.
a very simple walkthrough progression starting with the 1K Chosera 3K, 5K, 8K, 12K, 20K.
Wherever youre going never take an idiot with you, you can always find one when you get there.
-
01-16-2021, 06:24 PM #3453Senior Member

- Join Date
- Apr 2012
- Location
- Diamond Bar, CA
- Posts
- 6,553
Thanked: 3215
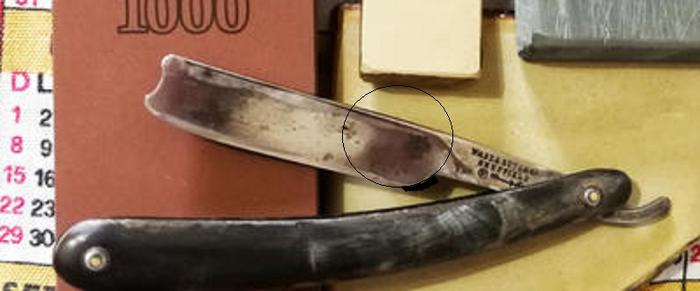
Skropio, your razor has lost a lot of width and moved the heel corner back. While there is no stabilizer, you are honing on the tang. If you hone with tape you are compounding the heel issue.
If you re-shape the heel as shown, it will move the corner up by about a quarter inch and away from any chance of riding on the tang.
You will also need at least 2 layers of tape to make up for lost spine width. It will make it easier to hone and make a stronger edge.
I would sand the whole blade with 600 for a nice satin finish and remove much of the wonky wear, then you could better see where you are making contact, you can sand up to 2k later for a bright finish, with any good metal polish, from there.
Jointing, then setting a new bevel on the 1k with 2 layers of tape will speed you bevel set and make a stronger bevel. You can try 3 layers but start with 2. 3 layers gets squishy and can be challenging.
Try the Kita with just Diamond slurry, adding slurry until you have removed the 1k stria. Use the (Ax Method, Alex Gilmore) to remove the 1k stria.
Then make new slurry and thin to finish. You may need to remove the edge by lightly jointing a couple times until you remove enough of the unstable edge and get to strong steel.
Once you can get consistent good edges from the Kita/diamond slurry, then experiment by adding different Tomo.
-
The Following User Says Thank You to Euclid440 For This Useful Post:
Skorpio58 (01-16-2021)
-
01-16-2021, 06:58 PM #3454Senior Member
- Join Date
- Nov 2020
- Location
- Rome - Italy
- Posts
- 293
Thanked: 11
Thanks for your suggestions Euclid440!
I'll do the way you wrote. On a first approach I tought 2 layers of tape would lead toward a too big bevel angle (>20 degrees), so I first tested with just one layer.
Definately the heel needs a reshape. How you suggest to do?
Regarding honing... I was just testing the Ax2 method, but I didn't want to use a diamond plate on a JNS, as many says it could damage the surface (btw. I know this is a controversial topic )
)
Anyway, I can't complain (for now) about the result achieved with my naguras.
Last edited by Skorpio58; 01-16-2021 at 10:17 PM.
celticcrusader likes this.I know that I don't know (Socrates)
-
01-17-2021, 06:25 PM #3455Senior Member
- Join Date
- Apr 2012
- Location
- Diamond Bar, CA
- Posts
- 6,553
Thanked: 3215
Heel correction is remarkably simple and quick to perform, it should be done as part of preparing a razor for honing. If done routinely it is just a couple of strokes on a diamond plate or low grit hone.
I correct heels on probably 90 percent of razors I hone.
Here is an old post on (Heel Correction/Repair). I made this post using a diamond plate, as that is what is easily available to most, I use a diamond file with the razor edge up, the results are exactly the same.
The knock on Diamond slurry has long ago been debunked. Diamond slurry is a great way to learn your base stones capability. The trick to all honing is consistency. Consistency comes from understanding the process and reducing/eliminating variables. If you use a 1k stone and Diamond slurry from the base stone, how many variables are there?
Alex Gilmore is a long time, well respected Japanese Natural stone dealer. Look at his videos on Japan Stone and his honing methods to see how simple he makes the honing process on Jnats. What counts are results.
True using a diamond plate will wear a stone faster than using a Tomo, but the stone will still last multiple lifetimes, and you really do not need as much slurry as most people make for honing with Jnats, again less is more.
Here is his improved Ax 2 method.
()
-
The Following User Says Thank You to Euclid440 For This Useful Post:
Skorpio58 (01-17-2021)
-
01-17-2021, 06:43 PM #3456Senior Member
- Join Date
- Nov 2020
- Location
- Rome - Italy
- Posts
- 293
Thanked: 11
Thanks again for you suggestions.
I know well Alex's videos, and bought tke King 1K (and an USB microscope too) just because I've seen him using it on his videos...
Looking at these ones made me finally understood what really happens during the different phases of honing.
I saw your thread about the heel modify and did it on the W&B razor this afternoon. Maybe after dinner I'll hone again it... And I'm going to check the slurry with the diamond plate on my JNats...
I know that I don't know (Socrates)
-
01-17-2021, 06:50 PM #3457Senior Member
- Join Date
- Apr 2012
- Location
- Diamond Bar, CA
- Posts
- 6,553
Thanked: 3215
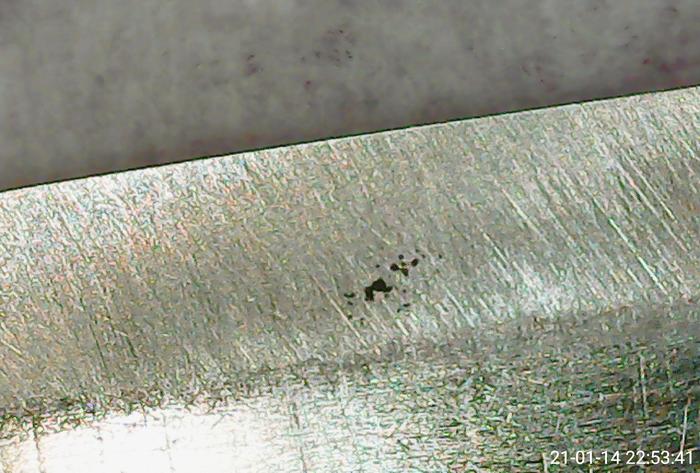
Skorpio, you edge looks good and straight, but if you remove all the deep stria the edge will be more improved, straighter and shave smoother.
Diamond slurry will quickly remove all the stria, note much of your stria goes all the way down to the edge, and will cause micro striations.
If you load your photo into a photo editing program and zoom in, you will see where the stria goes all the way to the edge, there is a microchip.
If you think you are getting good edges now, a year from now you will wonder how you shaved with these edges.
Once you are getting good shaving consistent edges, then experiment with other tomo, slurry thickness, refreshing, number of laps and stroke technique.
You do not need to remove all stria on a bevel, just the ones that reach the edge.
-
01-18-2021, 12:31 PM #3458Senior Member
- Join Date
- Nov 2020
- Location
- Rome - Italy
- Posts
- 293
Thanked: 11
Euclid440 Thanks once again! Originally Posted by Euclid440

I was enough happy with the results... being the first time I used a microscope... I'll have to learn much more for sure.
E.g. still don't understand how to set the bevel according to AX method. I.E. after 21 strokes on 1K and a good stria pattern... have I to check if the bevel already cuts (treetops, thumbnail test etc.) or I must go directly to the JNS & Diamond Slurry?I know that I don't know (Socrates)
-
01-18-2021, 02:56 PM #3459
Hey Marty,
That’s my kiita in the video, one of the very first jnats that I bought almost 10 years ago! I still have it.
Cheers, SteveMy doorstop is a Nakayama
-
01-18-2021, 07:16 PM #3460Senior Member
- Join Date
- Apr 2012
- Location
- Diamond Bar, CA
- Posts
- 6,553
Thanked: 3215
The razors that Alex is working on are probably not problem razors, they look to have decent edges already.
But with a diminishing lap count, (10.5,2,1), the process for checking for a fully set bevel is the same you would use for any honing stroke.
First look at the bevel to ensure that the bevel setting stria go all the way to the edge, from the heel to the toe. Then look straight down on the edge with low magnification 10-40X and a strong light behind you.
If you see reflections at the edge, that is where the bevels are not meeting. If needed, simply do another set, until you are honing to the edge fully and the bevels are meeting, no shiny reflections.
A visual test is much more accurate, because you are looking at the whole edge, with hair test, you are testing only a micron at a time. If you are honing to the edge and the bevels are meeting, it will cut hair.
If it a razor that I have worked on, Buffed or edge repair. It is better to do more sets, than increase the original lap count.
If you do say 20 or 30 initial laps you run the risk of building a large burr. It is not the end of the world if you do, just joint the edge straight with one or two strokes on the edge of the stone and start another set. Jointing will remove a small amount of week steel getting you to solid steel and make the edge straight, then you just need to make the bevels meet.
If you do not make a large burr, with the initial multiple laps, the diminishing lap count will cut off any burr that begins to form when you flip.
It is basically a Japanese knife honing technique, but when honing knives, the goal is to forma burr on one side, then break or hone the burr off when you flip sides.
That is the difference between honing a knife and a razor, with a razor we try not to make a burr, because when it breaks off you have a micro jagged edge, a good thing for a knife, hard on the skin for shaving.
-
The Following User Says Thank You to Euclid440 For This Useful Post:
STF (01-18-2021)


 Reply With Quote