
Results 3,471 to 3,480 of 3715
 23394Likes
Thread: Hone of the Day
 LinkBack URL
 About LinkBacks
-
01-26-2021, 09:17 PM #3471Senior Member


- Join Date
- Apr 2012
- Location
- Diamond Bar, CA
- Posts
- 6,553
Thanked: 3215
I was thinking to use a Naniwa Super 3K after the 1K (instead of using the slate with water) do you think it could be useful?
Yes, the finer you get the bevel stria and edge straight the easier it is to finish on a Jnat.
But most Jnats should be able to remove 1k stria with Diamond slurry. I often go to a Jnat, from a near mirror 8k. That way all the stria is Jnat and the edge is already super straight. The Jnat is just a finisher and I quickly get a Kasumi, hazy finish, and very straight edge.
Diamond slurry works well to remove deep bevel set stria, but because it is removing a lot of metal that stria will be contaminated and will not break down as fine as clean fresh slurry.
So, you can make diamond slurry and remove the deep stria, then wash the stone and razor and make a new diamond slurry and break that slurry down to fine polishing slurry.
I use circles to remove deep stria or to work a slurry to break it down faster. Circles are more aggressive for removing metal because you are attacking the steel from multiple angles in stead of just a back-and-forth motion.
You can work Diamond slurry very thin but, it is just the grit from the base stone. If you use a Tomo slurry, you are using the base stone and the Tomo grit. If the tomo is finer you may get a finer slurry. But if the Tomo is courser or does not break down at the same rate as the base, it will be a courser slurry. You just have to experiment.
It is not as simple as that, because there are other factors, pressure, technique, how much slurry you start with and how you thin the slurry for a few, and the razor steel, but it is a good start.
Another trick to try, when you are thinning your slurry is to remove some slurry from the stone, scoop it up with the razor, then with a finger squeegee it off into a container, I use ceramic soy sauce dishes. So later if you need more clean slurry you can add slurry that is already broken down to the stone it needed.
Experiment with both techniques, 1k Diamond slurry and 1k, synthetic pre polish and Jnat finish. Document your results with micrograph photos and test shave and see what works best for the razors you have.
The steel of your razors also plays a part in which method works best for the razor. Develop your own bag of tricks.
The good thing is you are honing all the way to the edge, getting fully set bevel and nice even stria patterns at each stage. That is the hardest thing for new honers to grasp. You cannot refine an edge that does not exist.
-
The Following User Says Thank You to Euclid440 For This Useful Post:
Skorpio58 (01-26-2021)
-
01-27-2021, 10:12 AM #3472Senior Member

- Join Date
- May 2011
- Location
- Merthyr Tydfil South Wales UK.
- Posts
- 5,601
Thanked: 1413
Two visiting the stones today in from Japan yesterday, both of them went back to ground zero, both needed a full progression on the stones, one of them is going to one of our own members Casper, the Kanenaga, I decided to take a punt on the other a Kunishinge special selection kamisori razor.
 Wherever youre going never take an idiot with you, you can always find one when you get there.
-
01-27-2021, 10:56 AM #3473Senior Member


- Join Date
- Mar 2015
- Location
- Akron, Ohio
- Posts
- 12,106
Thanked: 4313
So you actually had to a little more honing than usual, Jamie.
 celticcrusader and RezDog like this.Mike
-
The Following User Says Thank You to outback For This Useful Post:
celticcrusader (01-27-2021)
-
01-28-2021, 01:08 PM #3474Senior Member

- Join Date
- Jul 2013
- Location
- Ischia, Naples, Italy
- Posts
- 1,960
Thanked: 132 Hone 20210128 Tafuri
Today the Tafuri had a walk on ...
Belgian Blue
Princesa
Coticule
Ozuku
Where there is a great desire there can be no great difficulty - Niccolò Machiavelli & Me
Greeting from Ischia. Pierpaolo @ ischiapp.blogspot.com
-
01-28-2021, 05:13 PM #3475Senior Member

- Join Date
- Nov 2020
- Location
- Rome - Italy
- Posts
- 293
Thanked: 11
Another "Honing Evening Report"

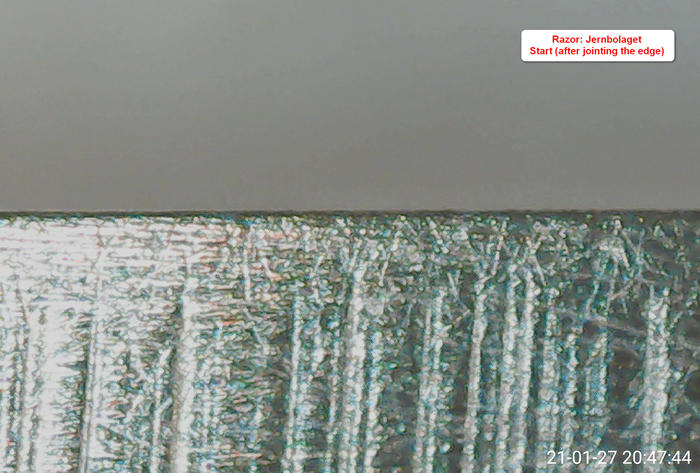
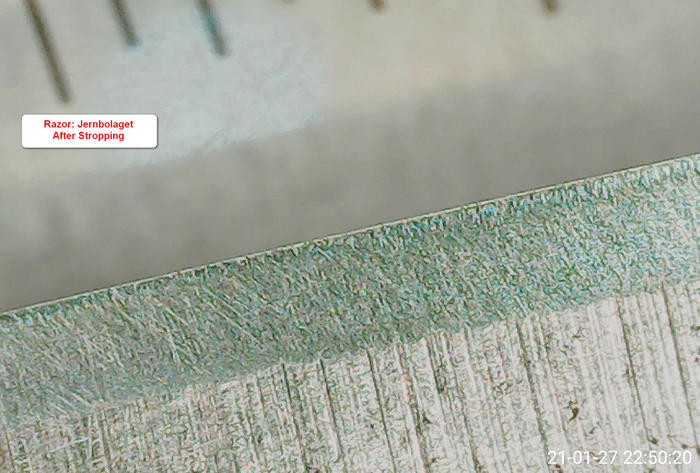
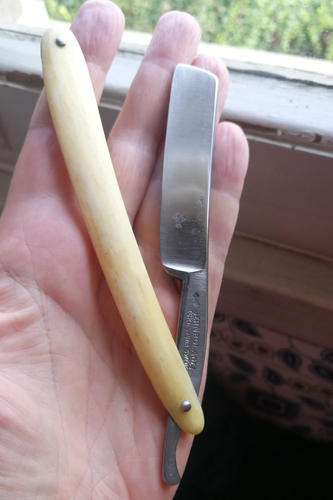
Yesterday I honed a "new" Razor: Jernbolaget Eskilstuna - 11/16" - NW
Unfortunately I made some mistakes when shooting images with the microscope, so... I couldn't fully document every step. Had also problem with light reflections so, it's been hard (for me) understand well some images.
The razor too had some problem as it touched more on the center than on the Heel & Toe. Made a slight reshape on the heel and used some section honing to get a (quite) consistent bevel from heel to toe...
Anyway, the sequence I used was:
1 Tape Layer
King 1k - Naniwa Super 3K - Italian Slate + Sho-Honyama's Slurry (in diluition) - Nakayama Kiita Koppa (Lev. 4,5) + Diamond Slurry (in diluition) - Stropping on leather (50 laps). I jointed the edge several times.
Tomorrow will test on shave.
BTW: if I'm boring you guys... let me know and I'll stop immediately!

Missing: Slate's step...

 I know that I don't know (Socrates)
-
01-28-2021, 09:08 PM #3476Senior Member
- Join Date
- Apr 2012
- Location
- Diamond Bar, CA
- Posts
- 6,553
Thanked: 3215
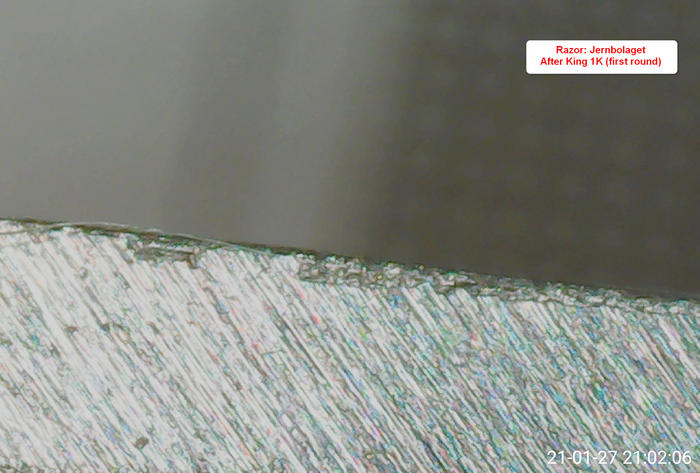
So, a couple of tips for documenting with micrographs. Pick a spot and try to photograph the same spot, so you have something to compare to.
I pick a defect, like a edge chip or mark on the bevel or belly of the razor, then mark a line from the belly to the edge with a sharpie, do the same for the other side at the same spot. Colored ink is easier to see with the naked eye. The mark allows you to quickly index the photo each time. It also keeps your lighting more consistent.
Alternate the direction of your finish laps on each stone. For example, straight strokes for 1k, diagonal stroke for the 3k. This way it is easy to distinguish which stria are which. It looks like you did, but not sure, diagonal 1k straight 3k.
The stria at the edge in the photo, (circle) below appears larger than the 1k stria (arrow).
Learn the rolling X stroke, that is how you hone a warped razor where you are not making full contact in the middle. One side is concave the other is convex. If you drop the heel off the stone on the concave side and use a rolling x you will hone the middle and the whole edge
.
Lift the heel on the convex side, how much you dip, or lift is determined by how warped the razor is. Some colored sharpie ink on the bevel will quickly tell you if you are making full contact. It really is very little, sometimes just thinking about rolling the razor is enough, your hands do the rest. Ink!
I finish with rolling X strokes on all razors to blend the edge and to ensure that the heel and toe are fully honed. Honing the heel and toe are pet peeves of mine, as I use them both when shaving. I ensure that they are fully honed on all razors so I may spend a bit more time on them. Finishing X strokes blends them and also works your slurry for a finer finish. 20-40 laps are usual.
You should practice removing all the 1k stria with the Diamond slurry, you really only need to remove it at the edge, but when learning it is good practice and it may make your edge stronger by making the bevel flatter.
Your heel could use some correction, moving the edge corner forward will keep you off the stabilizer and keep the razor flatter on the stone. Some colored sharpie ink on the tang and the stabilizer will quickly tell you if you are hitting them. It does not take much to lift the whole heel half of the razor off the stone.
Forget plain water, few stones can finish on plain water, a thin slurry often give a much straighter edge.
I do not mind commenting on the post in this forum, but you might consider starting a new separate thread, so it will be searchable for other new honers to refer to.
One thing to remember is you are not the only one that has these same issues or is trying to understand what they are seeing in a micrograph or loupe.
While I have had running commentary on other honing threads, I have never done one from a 1k bevel set to a Jnat finish. I can be beneficial to others making the same transition. With Jnats there are a lot of variables with slurry and technique, my suggestion are just how I would approach it,

-
-
01-30-2021, 11:35 AM #3477Senior Member
- Join Date
- Nov 2020
- Location
- Rome - Italy
- Posts
- 293
Thanked: 11
Lot of thinghs to learn (as usual)!
Something like "My honing journal" or so? Originally Posted by Euclid440
 I know that I don't know (Socrates)
-
01-30-2021, 02:18 PM #3478Senior Member
- Join Date
- Apr 2012
- Location
- Diamond Bar, CA
- Posts
- 6,553
Thanked: 3215
The name does not matter that much but something searchable that is relevant to what you are trying to accomplish. Like, Help with 1k bevel set to Jnat finish.
Here is an old thread that we did years ago with a new honer PCM on a full progression on Synthetic stones. This thread has helped a lot of guys, mostly because PCM was a new honer who followed instruction to the letter, and he took great micrographs of the entire process from start to finish. (Second Try at Honing).
His big issue was the bevel set on a beat-up razor. Once we got the bevels fully set it was pretty smooth. PCM took some great photos of the edge, (straight down on the edge) as well as side photos of the bevels, so we were able to help him see how to tell when the bevels were meeting.
These photos are invaluable to new honers trying to figure out when a bevel is fully set. That alone makes this post a big help to new honers, because that is what they will see through their loups.
Not that you have that issue, but you do need to refine the bevels and remove the deep 1k stria. With a Jnat do not be afraid to use a bit of pressure on new Diamond slurry in the beginning, A set of Circles also work well to remove deep stria, begin to establish a Kasumi bevel, and make the edge much straighter.
As the stria disappears lighten up on the pressure. Pressure will also crush your slurry and refine it quicker.
Second Try at Honing.
-
The Following User Says Thank You to Euclid440 For This Useful Post:
Skorpio58 (01-30-2021)
-
01-30-2021, 10:41 PM #3479Senior Member
- Join Date
- Sep 2020
- Location
- Austin, TX
- Posts
- 653
Thanked: 56
I'm a testimonial that those threads were very helpful. I should probably read it again now that I've gotten farther along as I've probably forgotten some things I'm working through now.
Edit: did that make sense? Basically, there is more in there than I could absorb in one go. So, while I'm experimenting on my own, some of what I'm trying may be on there and I forgot.Last edited by planeden; 01-30-2021 at 10:43 PM.
If you're wondering I'm probably being sarcastic.
-
02-03-2021, 05:19 PM #3480Senior Member

- Join Date
- Nov 2014
- Posts
- 942
Thanked: 171
I have a nice Friedr Herder that I honed with a Naniwa professional 1K -> 3K -> 5K -> Coti -> BBW progression
Good progression, first time using the professional line of the Naniwas. I dig the 1 3 5 progression
for my personal taste, BBW > Coticule
Shave feels a bit ""crisp"" coming off my BBW, but it's very smooth and super skin friendly, nicks and cuts have been severely reduced with the BBW and I can't even tell I shaved afterwards, there's something about the BBW that beats the Coticule for me, every time.
It's also very very keen while also being very smooth and skin friendly. Something I can't squeeze out of my Coticules.
There's probably a good reason why some elder gentlemen told me the real magic is in the BBW side. I believe them. The natural combo Coti/BBWs I inherited shown heavily used BBW sides.
I strongly reject the notion where some people mention that the fellas of old didn't use the BBW, and that it was only there for backing. The use of Cotis also seems much too complex for a pure finisher and I've certainly never seen a vintage one with a slurry stone, either.Last edited by TristanLudlow; 02-03-2021 at 05:25 PM.


 Reply With Quote
