
Results 21 to 30 of 155
 47Likes
Thread: Is this microchipping...
 LinkBack URL
 About LinkBacks
-
12-29-2015, 12:37 PM #21Senior Member


- Join Date
- Dec 2014
- Location
- Southern NH
- Posts
- 562
Thanked: 41
 Originally Posted by Euclid440

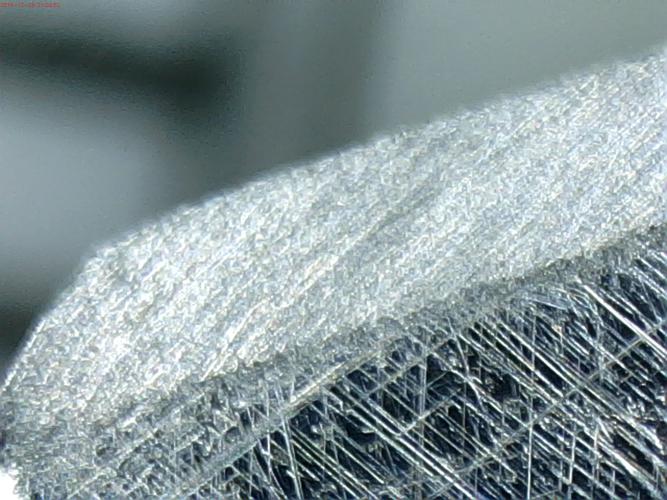
Here are detailed shots on each end of the edge, on each side (hopefully with a little better lighting - tough with the LEDs built into the microscope):
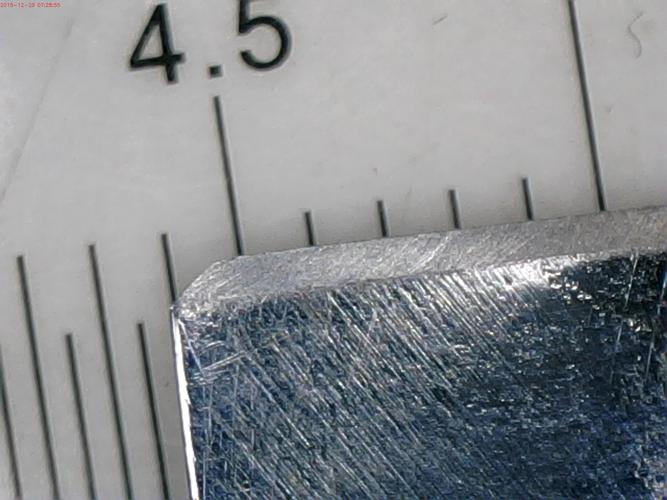
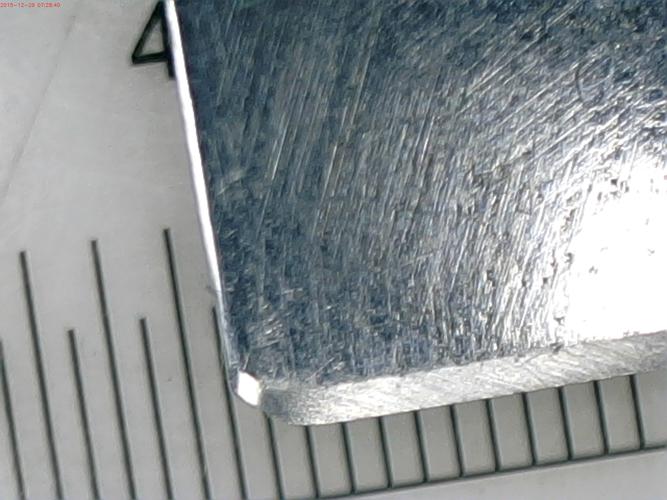
I don't really see any issue at the toe of the blade on either side, at least not near the edge. On the heel, on the right side (only), there is about 7mm, from the beginning of the straight part towards the center of the blade, whee I see a problem (3rd picture). I'll hone more and see if I can work that out better.
BTW, I have no intention of rushing this. I have three other blades to use in the meantime, so I'm trying to do this one well. Hence the postings here looking for suggestions (knowing I'll get 4 suggestions from every 3 people Regards,
PCM
-
12-29-2015, 12:45 PM #22Senior Member
- Join Date
- Dec 2014
- Location
- Southern NH
- Posts
- 562
Thanked: 41
Well, I haven't ever done a TNT, so I'm afraid I can't judge with that test. With the TPT (going perpendicular to the edge, at an angle - hopefully that is right - I've read multiple interpretations on this test), there seems to be a slight less sharpness at the heel, but it is barely perceptible (to me). In previous honing of another blade, I could really tell that it wasn't sharp, but with this blade it is very similar along the whole length of the blade. Originally Posted by BeJay
I'll do more strokes tonight, with some pressure on that heel to see if I can work this out. I'll keep in mind your point that I may need to remove steel from the whole edge - seems like a good point to me.Regards,
PCM
-
12-29-2015, 12:48 PM #23Senior Member
- Join Date
- Dec 2014
- Location
- Southern NH
- Posts
- 562
Thanked: 41
Thanks everyone for the comments and suggestions! I know there's some varying suggestions, and I'll try to incorporate several of them and see what works for me and this razor.
I'll give another go tonight and post some shots.
THANKS!!!!Regards,
PCM
-
12-29-2015, 01:25 PM #24Senior Member


- Join Date
- Jan 2013
- Location
- Communist State of California
- Posts
- 1,461
Thanked: 463
This is the perfect opportunity to experiment and learn the TNT. Even if it doesn't definitively tell you if your done, this is a good chance to get a feel for it. It's probably safe to say that most of the bevel is set and that the heel is not set. Read up on the TNT and try it. You'll see that most of the blade will have a little drag and feel silky smooth(bevel set). The heel will feel rough without that subtle drag(bevel not set). Give it a try, and keep doing it every 40 strokes or so until it all feels the same(bevel set). Then give it 10-15 more light strokes and move on to your next stone. A stubborn bevel can take hundreds of strokes. That's why a lot of guys do circles or back and fourth strokes to speed things up. Originally Posted by pcm
-
The Following User Says Thank You to BeJay For This Useful Post:
pcm (12-30-2015)
-
12-29-2015, 03:44 PM #25Senior Member


- Join Date
- Apr 2012
- Location
- Diamond Bar, CA
- Posts
- 6,553
Thanked: 3215
Because you have an uneven spine with a lot of wear and matching bevel, a heel forward rolling X stroke will hone both heel and spine. With the TNT you are looking for rough spots on the edge.
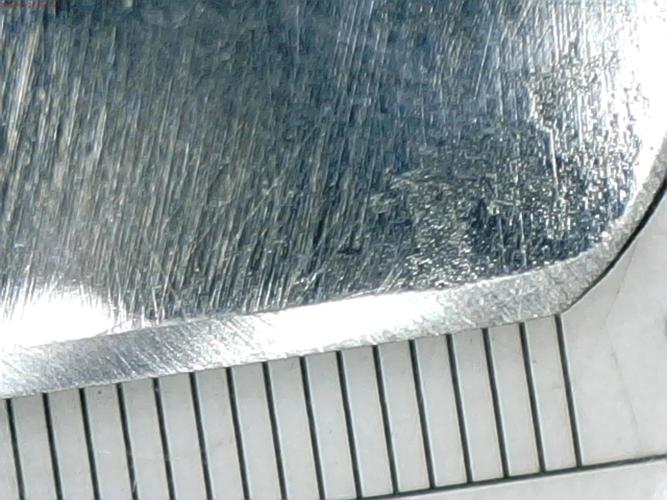
It looks like you are not reaching all the way to the edge on both. The 1st photo shows an uneven stria pattern on the toe, heel photos do as well, but not as much.
A sharpie will do much the same thing as the TNT, with the added benefit of inking the edge and a couple thousands of each side of the bevel. Take the sharpie and lightly drag the sharpie from heel to toe with just the weight of the pen on the edge. You will feel any unevenness on the edge, these are the spots you want to concentrate on.
Now do one lap and look at the edge. Do not wipe the bevel. Any area that ink is not removed at the edge, are where you want to focus on.
Yes, we all have our preferences and “test” that work for us, you have to find what works for you. The bottom line is the more time you spend ensuring the bevel is completely set, the easier the polishing will be. So don’t move up in grit, until you are absolutely sure the bevels are meeting completely, whatever test you use.
Jointing the edge and resetting the edge to gets you to good steel with a straight edge, (the ultimate goal), but you can do the same thing by just honing. For me that is hit and miss, and I would rather have a straight edge first with good steel, then hone to that edge.
On edges that are already flat, it is easier to set the edge on a 4k and avoid deep stria of the 1k, you can always drop down to a more aggressive stone if needed. Once the bevels are flat and reasonably in line at the proper angle, getting them to meet does not take too many laps.
You are very close. Because of the spine wear, I would use 2 layers of tape to increase the angle and hone to the edge and easily have set the bevel on the 4k.
-
The Following User Says Thank You to Euclid440 For This Useful Post:
pcm (12-30-2015)
-
12-30-2015, 02:07 AM #26Senior Member
- Join Date
- Dec 2014
- Location
- Southern NH
- Posts
- 562
Thanked: 41
I didn't see this until I had done quite a bit more. I tried the TNT and didn't really perceive a difference along the edge. It may have been because I've worked on it more. Originally Posted by BeJay
Regards,
PCM
-
12-30-2015, 02:13 AM #27Senior Member
- Join Date
- Dec 2014
- Location
- Southern NH
- Posts
- 562
Thanked: 41
I inked both sides and did one pass and it removed all the ink AFAICT (this is after honing with pressure on the edge at the heel, and a bit on the toe). Thanks for the explanation on why you joint the edge. Originally Posted by Euclid440
I still had one layer of tape on (I read this after I had honed some tonight, ). Here's what the edge looks like at toe, middle, and heel on both sides and higher magnification (hard to keep in focus) at heel and toe:

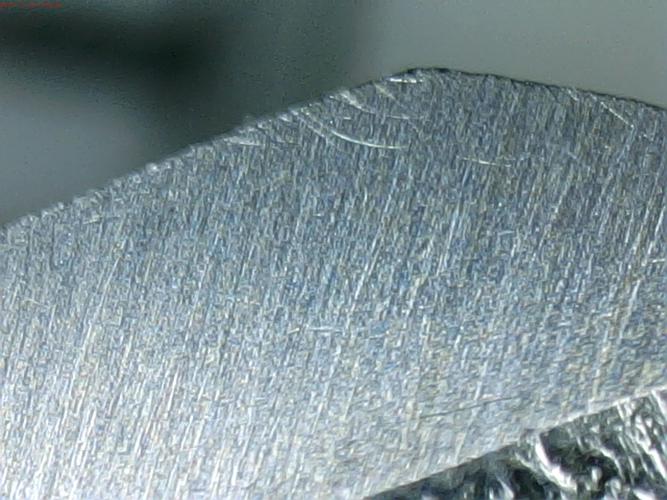
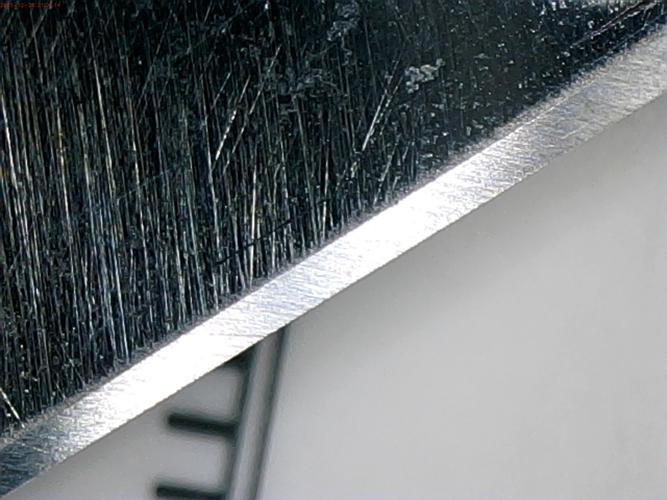
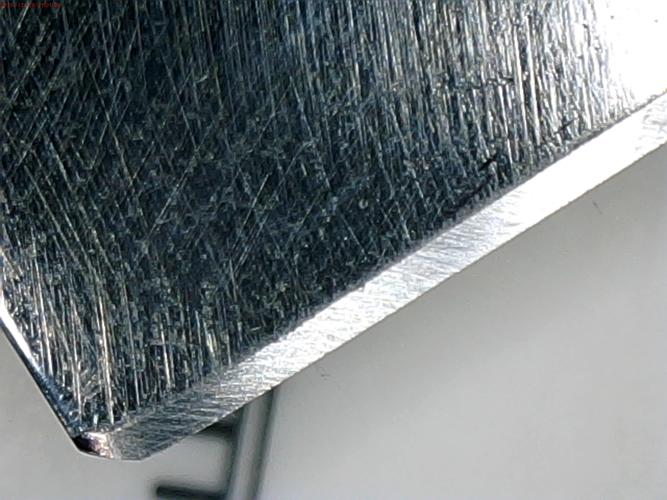
It really looks good to me. Will be curious as to what people think...Regards,
PCM
-
12-30-2015, 04:56 AM #28Senior Member
- Join Date
- Apr 2012
- Location
- Diamond Bar, CA
- Posts
- 6,553
Thanked: 3215
Looks better, the heel may end up with a sharp corner, which should have been reshaped, now you may end up going back and resetting the heel once shaped.
Move up and see what happens.
-
The Following User Says Thank You to Euclid440 For This Useful Post:
pcm (12-30-2015)
-
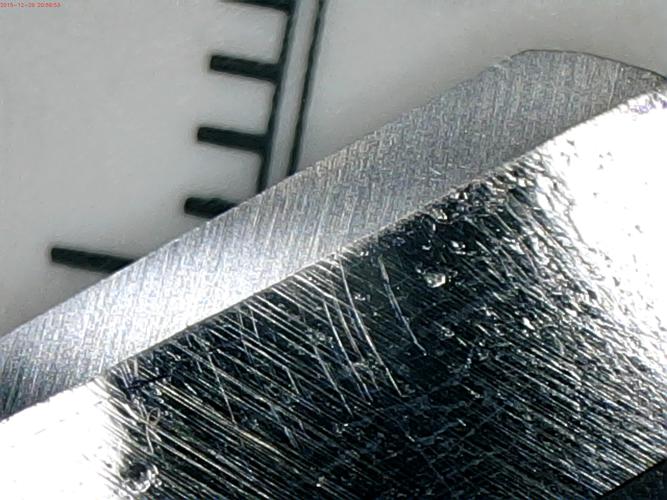
12-30-2015, 12:18 PM #29Senior Member
- Join Date
- Dec 2014
- Location
- Southern NH
- Posts
- 562
Thanked: 41
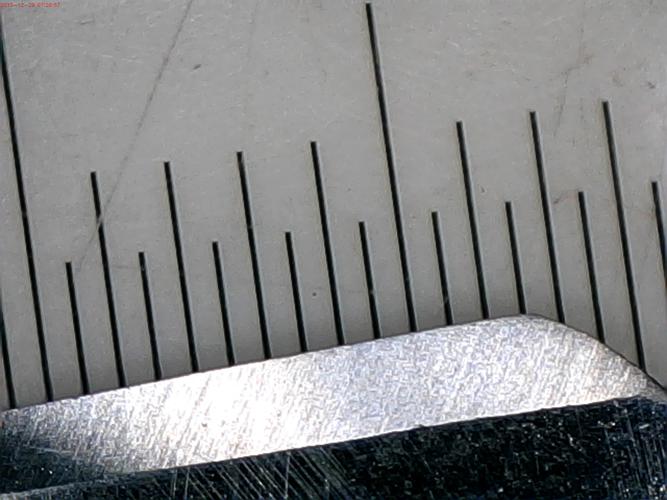
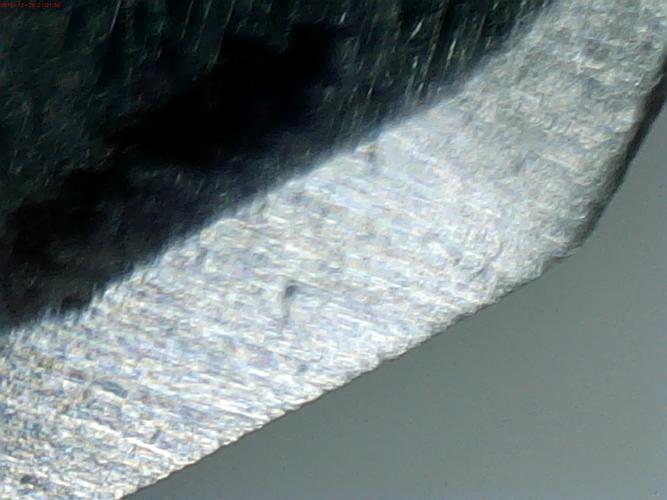
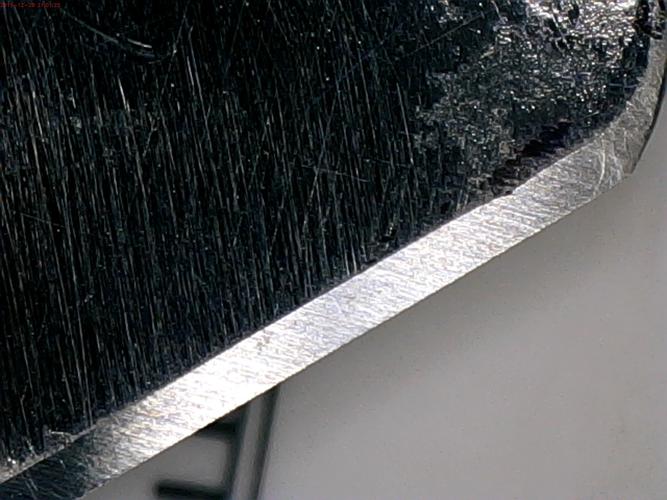
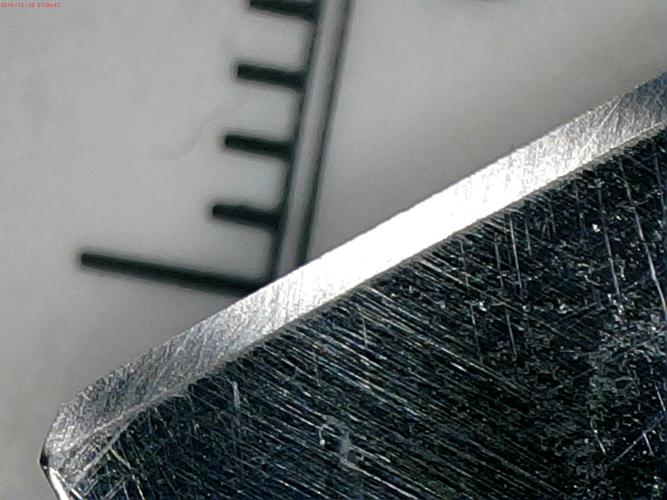
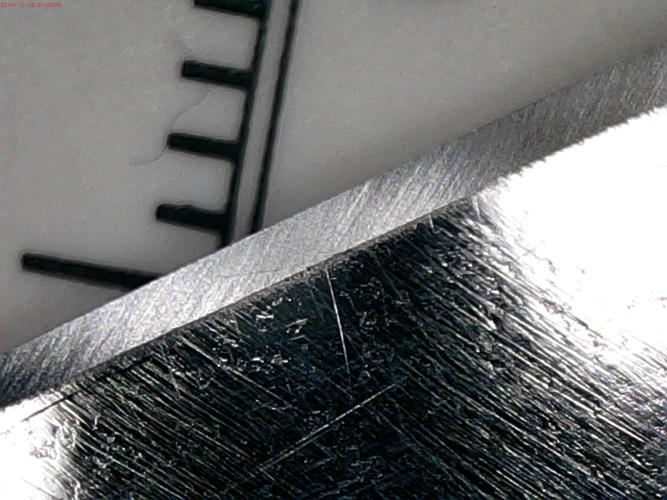
Here are shots (at high magnification) of the edge at three points:


BTW: the two spots at the heel (last shot) were skin flakes I think - I wiped it and they are gone.Regards,
PCM
-
12-30-2015, 05:05 PM #30Senior Member
- Join Date
- Apr 2012
- Location
- Diamond Bar, CA
- Posts
- 6,553
Thanked: 3215
Looks good, polish on the 4k and remove all the 1k stria, the edge will start to straighten out. Some circles 20 or so will jump start the stria removal because of cross grain honing, then smooth out and lay down a uniform 4k pattern with X strokes.
Keep an eye on the toe and heel.
-
The Following User Says Thank You to Euclid440 For This Useful Post:
pcm (12-30-2015)


 Reply With Quote