
Results 81 to 90 of 156
 616Likes
 LinkBack URL
 About LinkBacks
-
08-20-2015, 02:28 PM #81Know thyself


- Join Date
- Feb 2008
- Location
- New York
- Posts
- 11,930
Thanked: 2559
I haven't tried it and don't have a scope like that; just thinking out loud. It very well might not actually work.
-
02-03-2016, 07:24 PM #82'with that said'


- Join Date
- Aug 2010
- Location
- Walla Walla in WA State USA
- Posts
- 11,260
Thanked: 4238
I stumbled upon these videos and it makes sense. I know that winter's not over and thought that for those who are still getting a lot of snow that it might be worthwhile to give it a go.

Our house is as Neil left it- an Aladdins cave of 'stuff'.
Kim X
-
02-05-2016, 01:34 AM #83'with that said'
- Join Date
- Aug 2010
- Location
- Walla Walla in WA State USA
- Posts
- 11,260
Thanked: 4238
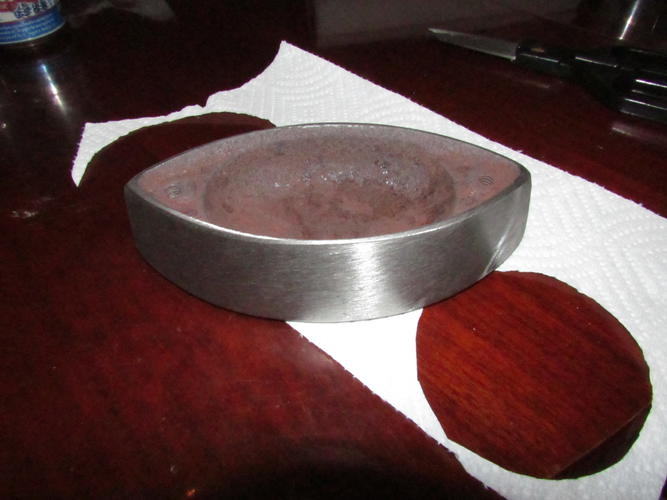
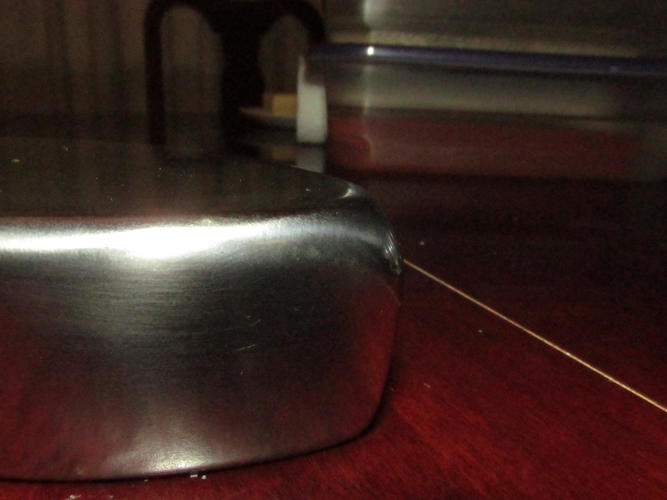
Geezer posted about using a vintage 'Sad Iron' as a pinning station.
http://straightrazorpalace.com/works...ml#post1595792
Well I happened to have one so I decided to have a go with it.
I apologize for no Before Pics but here's where I came to my senses. I'd used a 80 grit belt on my bench top sander then a 120 grit. In hindsight I'd have just started with the 120 as the 80 grit scratches were a bitch to remove; I did use only the 120 grit on the face of the iron.
I drilled a 5/64th" hole through one hole;
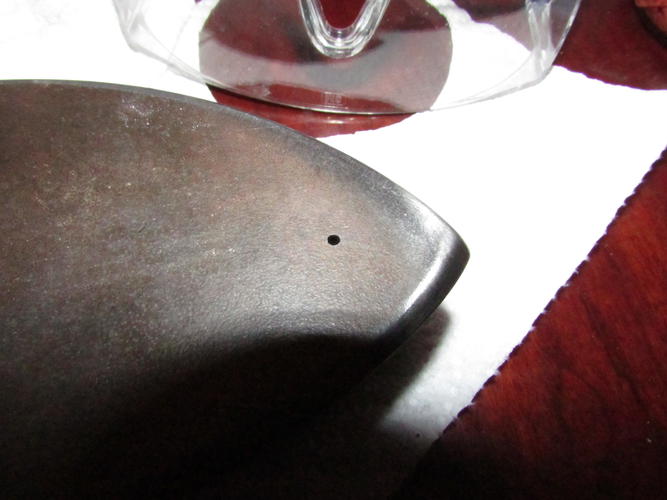
I then used one of my dad's old centering pieces for his lathe in my drill press to counter sink the drilled hole;

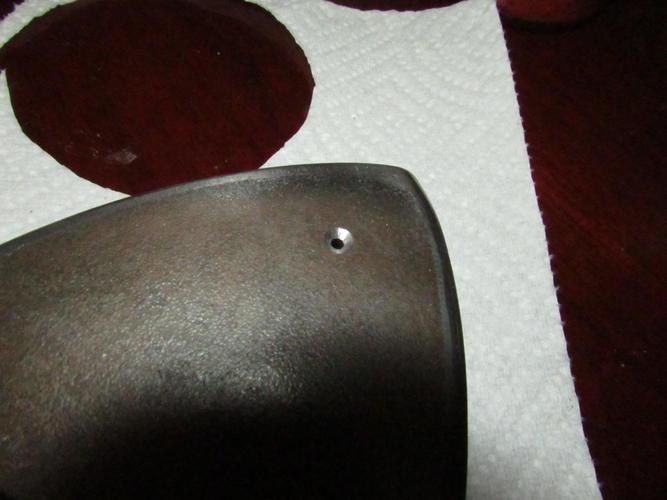
I also used that tool to create a couple of 'depressions' in the face.
I did all of the tool work Before I started to polish up the work surface! I figured that once I started using sandpaper on a hand held sander then going to my buffer that All of the holes would be 'Smoothed Over' and I was correct;
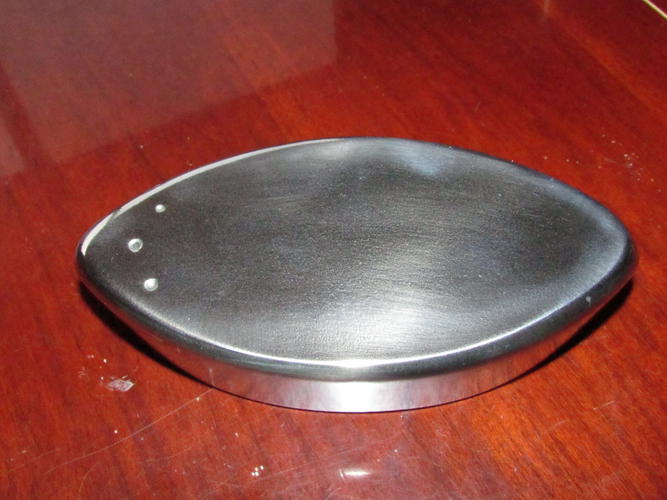
I'm looking forward to seeing how well it will work. Cast Iron will never take the polished finish that steel will (at least in my experience).
Now for a Disclaimer:
WARNING! CAST IRON IS A DIRTY METAL!!!
Please be aware that working/sanding/grinding cast iron will make Black Dust/Lots of Black Dust! Even with hand sanding! Wear proper respiration protection.
Also be ready to toss everything that you were wearing in the washer as that dust gets EVERYWHERE!!!!!!
I hope that this has been helpful.
EDIT:
Damn it! I forgot to show how I'd ground, rounded and polished the edges to blend the sides into the flat so that a razor wouldn't be damaged. I also forgot to include the link to were Geezer Originally Posted his Idea!
Please Forgive Me!
Last edited by cudarunner; 02-05-2016 at 02:40 AM.
Our house is as Neil left it- an Aladdins cave of 'stuff'.
Kim X
-
The Following 3 Users Say Thank You to cudarunner For This Useful Post:
Geezer (02-05-2016), MikeB52 (02-05-2016), randydance062449 (02-05-2016)
-
02-05-2016, 02:39 PM #84
A job done to perfection!! Step by step and a nice final product! Thank you!
 Originally Posted by cudarunner

~Richard
PS. I have done some Googling and found that the hardness of these and other items like "all cast" anvils was probably made by casting against a chill. That is a piece of material much colder than the melt in which case the quick cooling causes the internal grain to be closer and harder.cudarunner likes this.Be yourself; everyone else is already taken.
- Oscar Wilde
-
The Following User Says Thank You to Geezer For This Useful Post:
cudarunner (02-05-2016)
-
02-05-2016, 03:30 PM #85Senior Member

- Join Date
- Feb 2012
- Location
- West Midlands, UK
- Posts
- 1,263
Thanked: 360
I'd never come across the expression sad iron - but now I know that it's another name for a flat iron - I understand. I remember my mother using one when I was young - it was heated on a gas burner and we had a couple of sole plates (made of tin I assume) to slip over the iron plate and avoid burn marks.
Geezer likes this.My service is good, fast and cheap. Select any two and discount the third.
-
02-09-2016, 10:29 PM #86'with that said'
- Join Date
- Aug 2010
- Location
- Walla Walla in WA State USA
- Posts
- 11,260
Thanked: 4238
Those that know me and know me well realize that I live in an apartment/well actually a duplex with a garage but the garage is filled with all of my 'stuff' there's barely enough room for my 'little' buffing station.
I do my honing at the counter top next to the sink in the kitchenette and I do all of the pinning at my multi-usage dinning room table.
I hope all get the point that space is precious Since I don't have a lot of room I have been using this to hold my pinning supplies. The steel and now cast iron pinning blocks are just kept on the floor out of the way.
Anyway here's the 'Kit';
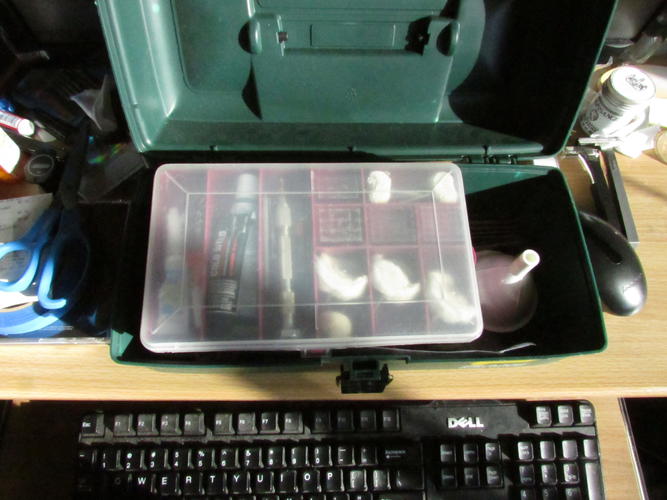
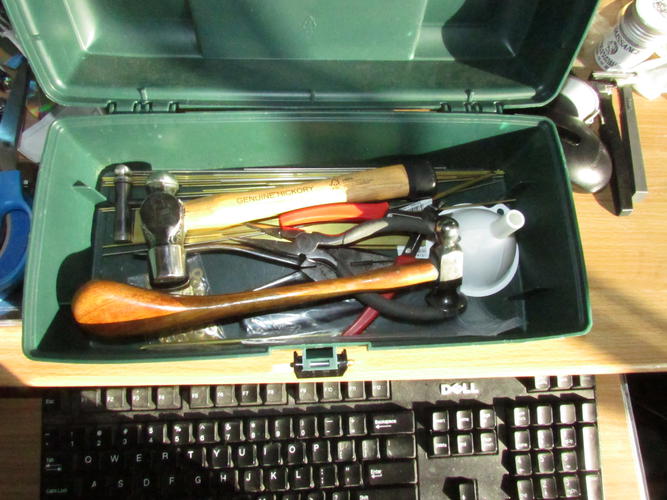
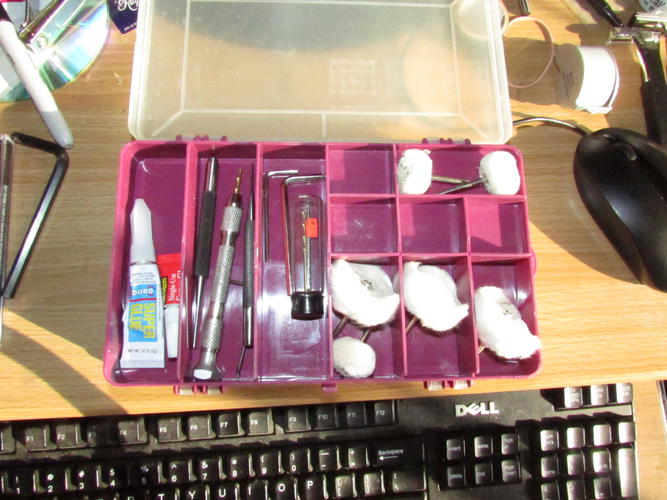
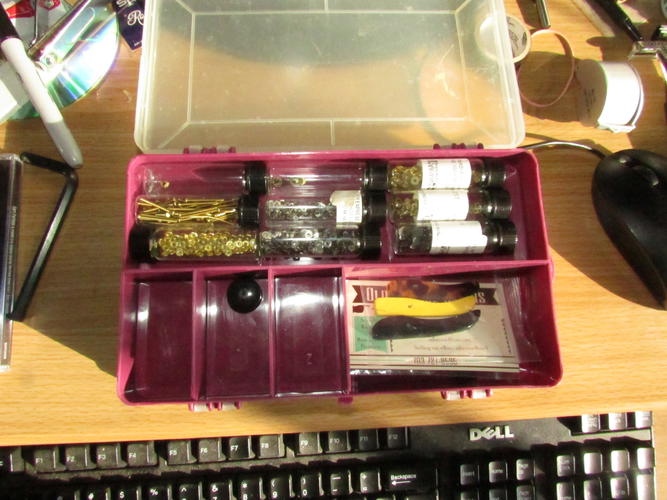
I just used a couple of old inexpensive fishing boxes and made my little kit. Holds enough supplies for me and it's small enough for here at the Boars Nest.
 Our house is as Neil left it- an Aladdins cave of 'stuff'.
Kim X
-
The Following User Says Thank You to cudarunner For This Useful Post:
Geezer (02-09-2016)
-
02-12-2016, 01:00 AM #87Senior Member

- Join Date
- Nov 2015
- Location
- Chicago
- Posts
- 227
Thanked: 57
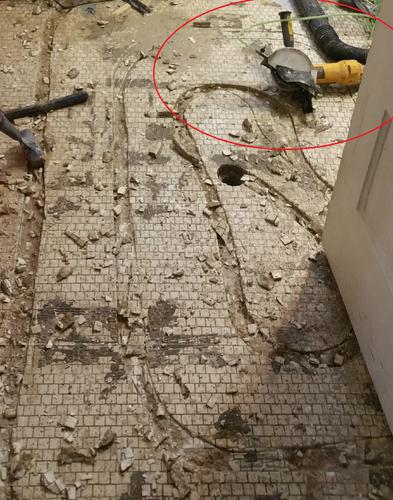
Okay. here's one of mine. My home was built in 1885. A first floor bathroom, Cast iron clawfoot had lead in the porcelain enamel that was leeching out and that wasn't going to do for baths for my son- so I ripped it all out. I have hydronic heating, and wanted to save space by deleting the radiator in this bathroom, and yet- the floor is 6 inches of concrete and the hardest tiles you've never seen laid directly into the cement bed. (They make porcelain look like pergo) So to trench through them (the concrete beneath is easy by comparison- especially as it's not Portland but rather the much better and softer Lime cement) and lay pex al pex in a radiant loop for in floor heat I had to get crafty. So I took a cheap dewalt 15 amp 7" grinder and tig welded a stainless steel blade shroud and foot, and fabricated a volume control valve and jet ways inside the shroud to deliver water to the blade and made a water cooled concrete/ tile grinder. No dust in the house and got the trenches.
 Japanese-Whetstones and physics it's all just a sea of particles. "If I could remember the names of all these particles, I'd be a botanist." - Enrico Fermi
-
The Following User Says Thank You to jnats For This Useful Post:
Euclid440 (02-12-2016)
-
02-12-2016, 01:25 AM #88Str8Faced Gent.


- Join Date
- Aug 2013
- Location
- Orangeville, Ontario
- Posts
- 8,466
- Blog Entries
- 1
Thanked: 4207
Nice wet saw mate!
Good thinking and creativity
"Depression is just anger,, without the enthusiasm."
Steven Wright
https://mobro.co/michaelbolton65?mc=5
-
02-12-2016, 03:03 AM #89Senior Member
- Join Date
- Nov 2015
- Location
- Chicago
- Posts
- 227
Thanked: 57
Thank you, sir.
Japanese-Whetstones and physics it's all just a sea of particles. "If I could remember the names of all these particles, I'd be a botanist." - Enrico Fermi
-
05-11-2016, 12:26 AM #90'with that said'
- Join Date
- Aug 2010
- Location
- Walla Walla in WA State USA
- Posts
- 11,260
Thanked: 4238
Yesterday I spent my kids inheritance on my combination Retirement/Birthday to Myself which is a motorcycle. Don't worry they can sell it after I'm dead to pay for the funeral and hopefully there will be a little left over for them.

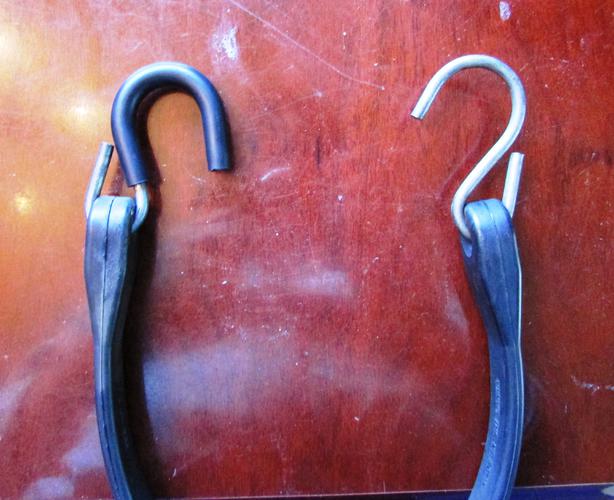
Anyway it has lots of chrome including a rack at the back and since on occasion I might what to ride to the store and pick up some barley pops or if I took a trip it would be nice to have some elastic hold down straps. However I didn't want to take a chance and scratch the chrome. But the only ones I've seen have the metal just painted with a little rubber 'thingy' to cover the end so I made my own with common heavy duty rubber hold down straps.
I used common automotive vacuum hose then put plenty of liquid dish soap in very hot water then placed the hose and allowed the rubber to become pliable. I then put a light coat of the liquid dish soap on the metal 'hook'.
While I wouldn't say it was 'easy' it wasn't 'hard' however as the hose progressed to where I felt it should be to protect the chrome I found that I need to use more than just 'finger tools' so I applied some electrical tape to the jaws of a pair of pliers.
Here's how I modified the hold downs:
One with a rubber cushion and the stock metal:
The completed modification:
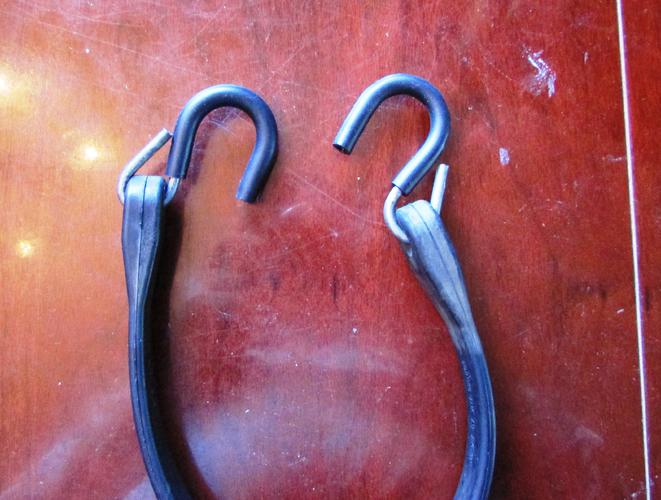
I left about a 1/4" 'extension' at the end to try to make sure that the metal end didn't 'bite' anything.
Thanks for looking!
Our house is as Neil left it- an Aladdins cave of 'stuff'.
Kim X


 Reply With Quote
