
Results 71 to 80 of 92
 178Likes
 LinkBack URL
 About LinkBacks
-
04-24-2018, 12:36 PM #71Senior Member


- Join Date
- Feb 2015
- Location
- Duluth, GA - Atlanta OTP North
- Posts
- 2,546
- Blog Entries
- 1
Thanked: 315 Now I need to learn the difference so I can find one!
 Originally Posted by Voidmonster
 Voidmonster likes this.- Joshua
-
04-24-2018, 01:27 PM #72Senior Member
- Join Date
- Feb 2015
- Location
- Duluth, GA - Atlanta OTP North
- Posts
- 2,546
- Blog Entries
- 1
Thanked: 315
... Originally Posted by 32t
 - Joshua
-
04-27-2018, 05:22 PM #73Captain ARAD.


- Join Date
- May 2011
- Location
- Pacifica, CA
- Posts
- 2,474
Thanked: 2227
Another update.
I’ve now made a better mold and used clay to sparkle over the scratches in the original scales. I also got a new epoxy, SmoothOn Epoxacast 690.
It’s also sloooow, but it’s fully cured in 24 hours, and came with much more detailed instructions on use. The one unknown now is whether the dye I was using for EasyCast will work. I have some doubts, since it reacted weirdly when I mixed it in, but we’ll see.
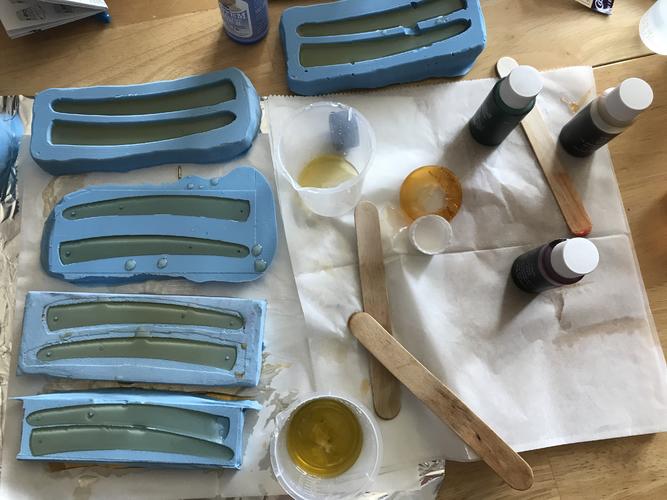
The castings I made with the stuff from TAP plastics hasn’t cured to anything harder than rubbery, and worse, the quality of th cure seems to be dependent on how much dye went in.
So here we are. First material is a no-go. Testing second now, I’m a lot more hopeful on this one, since SmoothOn is geared to industry and has a bigger investment in making their stuff work.
On the plus side, the silicone molds I’ve been making have worked great!-Zak Jarvis. Writer. Artist. Bon vivant.
-
04-27-2018, 07:37 PM #74Senior Member
- Join Date
- Feb 2015
- Location
- Duluth, GA - Atlanta OTP North
- Posts
- 2,546
- Blog Entries
- 1
Thanked: 315
Thanks for the update. I'm really interested in learning to replicate this process once it is perfected.
How are you ensuring the insides of the scales are flat and the molds you make are even and the correct depth? That was one thing I've been curious about.
With the right medium this looks like a very promising process!- Joshua
-
04-27-2018, 08:49 PM #75Captain ARAD.
- Join Date
- May 2011
- Location
- Pacifica, CA
- Posts
- 2,474
Thanked: 2227
With the first batch of stuff, I didn’t pay too much attention to getting everything flat since it was much more about just testing the material. Originally Posted by JP5
However, with the last batch of molds I’ve made, I’ve put some work into doing that
On the first one, I used carpet tape to affix the old scales to a flat piece of metal. That did a nice job of taking care of flatness and thickness, since the depth of the mold was only as deep as the original scales.
With the second, I raised them up a little bit using clay so I didn’t have to worry as much about overpour, since the stuff I’m using can be sanded. I will probably make yet another mold that brings the scales back down close to the flat plate though, with a lip for thickness reference.
I’ve done some digging around and I might possibly have to use a different material entirely (IE, not an epoxy). The sticking point seems to be the transparency. There are loads of options for opaque materials.
That said, there’s also a resin that cures pretty fast and by default is a pale straw-yellow. That’s likely to be my next stop, but I’m rapidly running out of materials I can use without ventilation or a pressure pot.-Zak Jarvis. Writer. Artist. Bon vivant.
-
The Following User Says Thank You to Voidmonster For This Useful Post:
JP5 (04-27-2018)
-
04-27-2018, 08:58 PM #76Senior Member
- Join Date
- Feb 2015
- Location
- Duluth, GA - Atlanta OTP North
- Posts
- 2,546
- Blog Entries
- 1
Thanked: 315
Fingers crossed!
Voidmonster likes this.- Joshua
-
The Following User Says Thank You to JP5 For This Useful Post:
Voidmonster (04-27-2018)
-
04-27-2018, 09:01 PM #77Senior Member
- Join Date
- Feb 2015
- Location
- Duluth, GA - Atlanta OTP North
- Posts
- 2,546
- Blog Entries
- 1
Thanked: 315
I'm going to PM the member that made their own Shokwood and see if they think alumilite would be hard enough by itself.
- Joshua
-
04-28-2018, 01:03 AM #78Senior Member

- Join Date
- Jun 2013
- Location
- archbold ohio
- Posts
- 2,379
Thanked: 546
how about the clear epoxy resin that they use for specimens?
-
04-28-2018, 01:48 AM #79Str8Faced Gent.


- Join Date
- Aug 2013
- Location
- Orangeville, Ontario
- Posts
- 8,466
- Blog Entries
- 1
Thanked: 4207
Evening gents. As tom said, I’ve been playing with a different kind of fine British steel of late. Still am,,

Rez is bang on with his reflections though on what I used for Toms’s red set, as well as the bullet encased brushes, Rubberset clones, and other casings and scales I’ve made.
Alumilite is a urethane and comes in various hardness and ranges of opacity from water clear to solid color. Also offer cool metal brush on treatments that can be applied to the mold cavities prior to casting to give bronze and pewter type effects.
Super finicky as far as both exact measures of parts, and complete elimination of bubbles. Can always grind up failed castings to add as filler to solid colour works or crazy blends later. I throw none away.. hehe.
Air curing would probably result in a more pliable end product due to the lack of pressure as opposed to the pressure casting I do. But so far it looks like Zak is having way more success than I did before I started employing vacuum and pressure. "Depression is just anger,, without the enthusiasm."
Steven Wright
https://mobro.co/michaelbolton65?mc=5
-
The Following 3 Users Say Thank You to MikeB52 For This Useful Post:
32t (04-28-2018), sharptonn (04-28-2018), Voidmonster (04-28-2018)
-
04-28-2018, 02:12 AM #80Captain ARAD.
- Join Date
- May 2011
- Location
- Pacifica, CA
- Posts
- 2,474
Thanked: 2227
The more I look at this project, the more I suspect a Harbor Freight pressure pot is in my future. Looks like lots of folks are successfully using these for castings. Originally Posted by MikeB52
-Zak Jarvis. Writer. Artist. Bon vivant.


 Reply With Quote
