
Results 51 to 60 of 106
 22Likes
 LinkBack URL
 About LinkBacks
-
05-22-2013, 10:23 AM #51Senior Member

- Join Date
- May 2013
- Location
- Berlin, Germany
- Posts
- 286
Thanked: 39 Not really, but I tried that with my tests... about to write.
 Originally Posted by onimaru55

-
05-22-2013, 11:55 AM #52Senior Member

- Join Date
- Jan 2008
- Location
- Sweden, Gotland, Visby
- Posts
- 1,888
Thanked: 222
I don't know how relevant it is to the Naniwa Superstones but how is it with the soaking, some stones get behavioral issues from excessive soaking.
Hur Svenska stålet biter kom låt oss pröfva på.
-
05-22-2013, 12:44 PM #53Senior Member
- Join Date
- May 2013
- Location
- Berlin, Germany
- Posts
- 286
Thanked: 39
.... so I started with the tests.
I first had the idea of not using a razor for that and tried a little piece of brass as well as the blade of a utility knife. But at a level where it makes a difference whether tape is used or not (and even if the tape is new or worn out), You need a highly consistent angle. Also I need an edge as sensitive as our razor edges.
So I took the blade that I had made the third and fourth image from, the one that has been battered so badly.
Meanwhile had quickly done some 3k and 5k work on it and finished it with 8k and cr-ox on balsa to be at least somehow shave-ready (let's say shave-possible).
So this blade was not perfect, but at a level that I needed.
I took the 8k stone and did no lapping on it, but reemployed the nagura. I also took the very coarse stone and broke the edges again. This is a very cheap one I had in the workshop - used for lawn mowers and axes. Definitely high potential for contamination, but I wanted to know. I pull the stone along the edges and downwards - away from the surface.
I washed the stone under the faucet and sprayed some more water on it.
Then I did circles only in order to get rid of most of the scratch pattern. I did those with normal pressure. That is neither pressing nor blade weight only.
I did something like 300 circles each side, maybe more. I wanted to get rid of the scratch pattern and I wanted to see how this stone treats my blade - especially after the "careless" edge breaking.
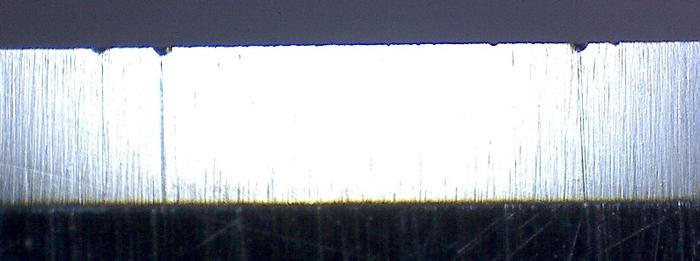
After that it looked like this, basicly all over the blade
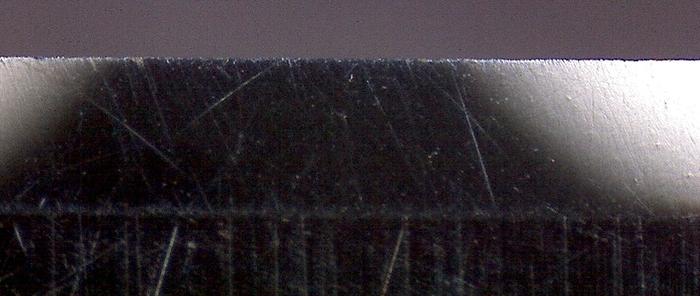
Some remaining scratches and one of the former chips, but apparently nothing new. The bevel still a bit coarse.
After that I drew a pencil grid onto the 12k stone and lapped it away with the 5k stone. Then washed it and drew another pencil grid onto the stone. This one I lapped away with the 8k stone I just had polished the edge with.
When I lap, I do an eight-motion so that evey part is covered. Every now and then I turn one of the stones (alternating) by 180 degrees to avoid effects of uneven pressure etc.
I created a tiny little ruler with my graphics program. The numbers written on it where 2pt. Almost unbelievable, but my printer was able to print it so that I can acutally read it. The challenge was to cut it out and tape it onto the blade. I failed on that. I have it on the blade but not so close to the edge that I have it in sight when investigating the blade. But if I find something I can move the blade vertical and get at least some reference.
Then I started one straight stroke, perpendicular to the stone. I grabbed the blade with two hands. No extra pressure, not extra light either. I did between one and two inches slowly, examined the blade, did the next one or two inches, examined the blade and so forth. As the DOVO-blade has a little bit of smile towards the toe and heel, I could not get the full stone, but that was a start.
Since the starting basis is not perfect and I am only looking at something like 2mm (0.08 inch) at a time, it is very very hard to decide if You see something new or something that was there before. Additionally lighting and sharpness are great factors for *how* things appear.
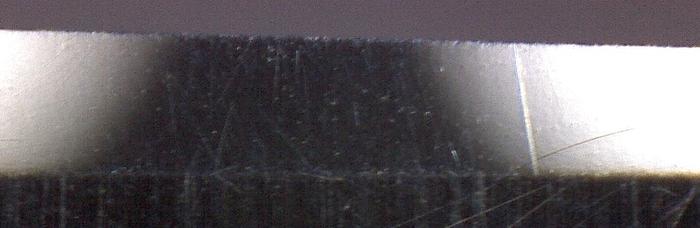
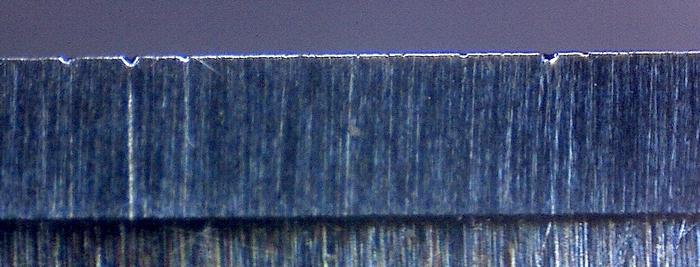
Yesterday I could not tell if this is a new one. Looking at it today, I'd say it is
Interesting to see, how the scratches start to appear.

After the first multi-section stroke, I did one full stroke and thought I found a new chip between 1.4 and 1.7 cm. So I did another stroke and there was one more in the same area. Then I did a stroke on the upper half. No new chip. A stroke on the lower half. One new chip.
With my hand I wiped away the water of the lower half and felt a single grain that could be pushed away. So I washed the stone and tried another stroke on the lower half, which still brought me another chip in the area around 1.4 and 1.7cm (luckily - otherwise I had nothing that I could find).
So, I will have to investigate the lower left part of the stone between 1.5 and 2cm (blade has a little offset). It was half past three by then. So I quit there and went to bed, hoping that I'll be able to find something tonight.
Thanks for all Your time so far.
FrankLast edited by DDTech; 05-22-2013 at 12:47 PM.
-
05-22-2013, 12:51 PM #54Senior Member
- Join Date
- May 2013
- Location
- Berlin, Germany
- Posts
- 286
Thanked: 39
Naniwas do not need to be soaked. Normally I thoroughly wash them when I start honing and spray them every now and then so that they can absorb what they need. Sometimes I put them under water for something like five or two minutes but they don't "bubble" at all. Originally Posted by Lemur
-
05-22-2013, 01:04 PM #55Senior Member
- Join Date
- May 2013
- Location
- Berlin, Germany
- Posts
- 286
Thanked: 39
No, I won't. I tried that with the 10k stone. Once one is gone another appears somewhere. Unless I know they are a / the course I'll leave them in there. On my 12k You can see some that are apparent and others that shine through. The big red one that looks like a crab is visible catches attention, when You just look at the stone. The smaller ones not. Maybe they are there on purpose. Originally Posted by onimaru55
I have taken a photo of the big one with blade also.
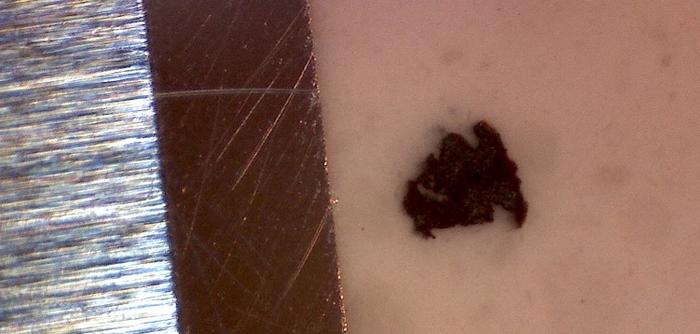
It is so big that You'd really feel, if it did something to the blade.Last edited by DDTech; 05-22-2013 at 01:08 PM.
-
05-22-2013, 01:07 PM #56Senior Member
- Join Date
- May 2013
- Location
- Berlin, Germany
- Posts
- 286
Thanked: 39
One thing I forgot. the 12k stone feels more grainy than the 8k stone. The 8k is very very smooth.
Still, when I did one of the strokes that caught another chip with. There was no point where I could hear or feel when that happened.
-
05-23-2013, 02:22 AM #57The Great & Powerful Oz


- Join Date
- May 2008
- Location
- Bodalla, NSW
- Posts
- 15,634
Thanked: 3751
If you can map those chips & deep scratches to a high spot on the stone there is your problem.
If you have lapped the stone a little too heavily with sandpaper it is possibly embedded particles. Lapping with another stone will not necessarily remove them.
Of course the other possibility is that it is a faulty layer of the stone. Removing a few mm of surface can often fix either problem. A diamond plate is the best tool for that but if the particles are not embedded too deeply sometimes thy can be lifted with a Scotchbrite pad or maybe steel wool tho I have not tried the latter.The white gleam of swords, not the black ink of books, clears doubts and uncertainties and bleak outlooks.
-
The Following User Says Thank You to onimaru55 For This Useful Post:
DDTech (05-23-2013)
-
05-23-2013, 06:53 PM #58Senior Member
- Join Date
- May 2013
- Location
- Berlin, Germany
- Posts
- 286
Thanked: 39
Another sleepless night, but I think, I've got some news.
It really seems to be contamination, but from the stone itself, rather than from other source.
After I had identified a possible source on the lower left part of the stone the day before yesterday, I started to examine the stone in that area yesterday evening.
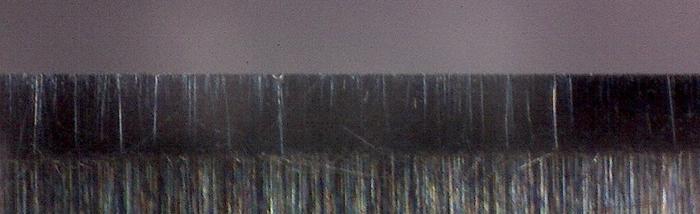
I placed the razor on the stone and followed its path millimeter by millimeter with the microscope watching especially the area where it had caught the latest chips.
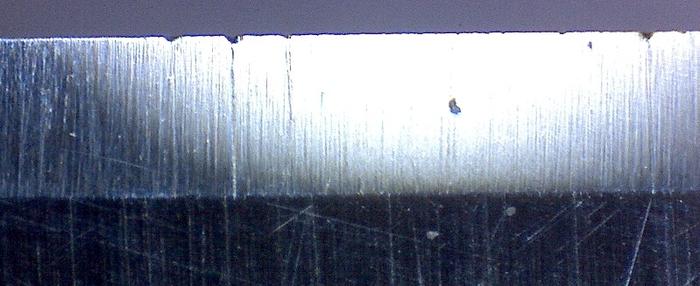
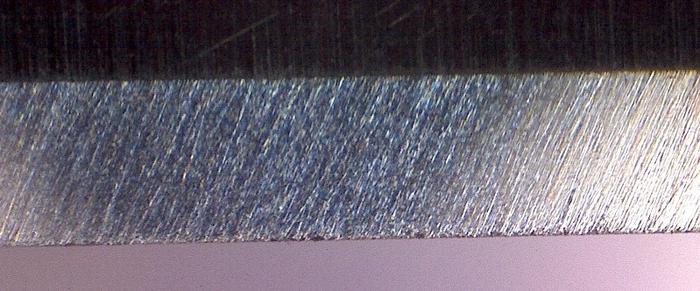
When I came to this point, I thought, "Gotcha!":
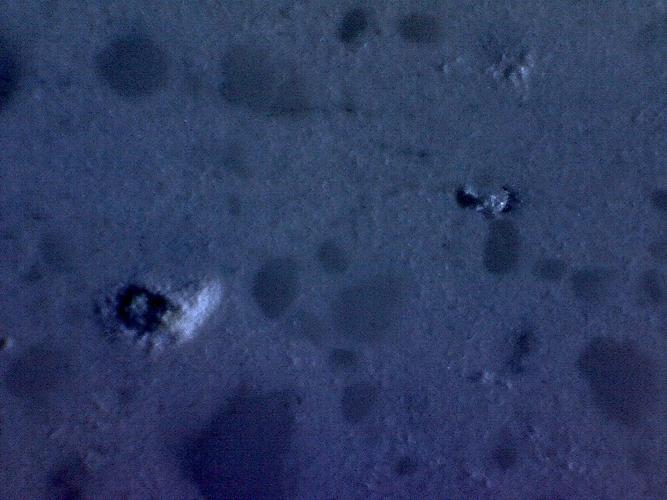
However, under another light it appeared to be nothing... at least, not anymore.
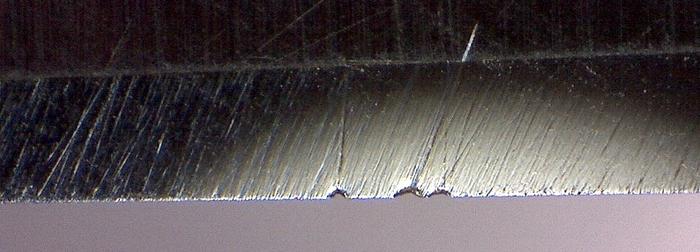
All the way I found nothing that stood in the way, nothing that I could willingly catch with the blade. But there were craters along the path. Not scratches, craters of torn out particles.
On this image You can even see the traces of the track.
As all this led to nothing. I tried something else. One of You had the idea to use a piece of metal and see if deep scratches can be produced. Anotherone suggested to take a glass in order to eliminate contamination.
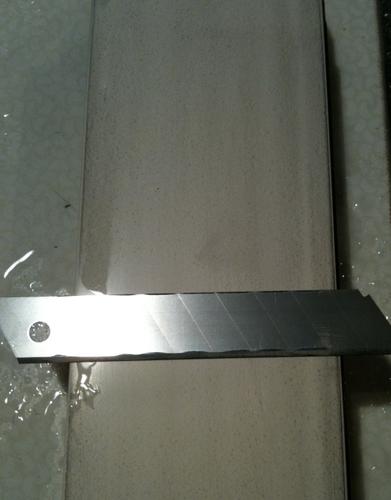
So I took the blade of a utility knife and rubbed one of the flat sides (none of the edges) really hard on the stone - straight up and down - until the stone was basicly black.
Yes, there a few scratches that could be interpreted as a bit more rough, but nothing really dramatic.
So I quickly re-set the bevel of my razor (had so many chips by now) with 800 and a bit of 3k.
Tried my luck.... and caught chips again. Meanwhile I do slow motion and the blade so, that it lays sound on the stone but no pressure - still.
So how can this happen?
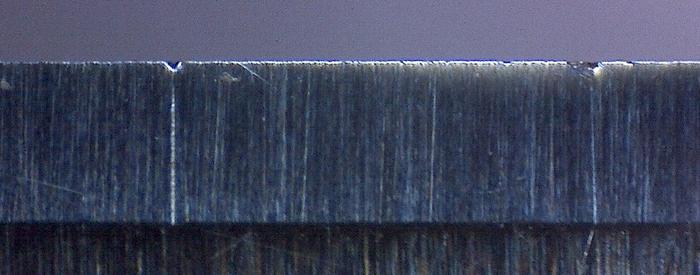
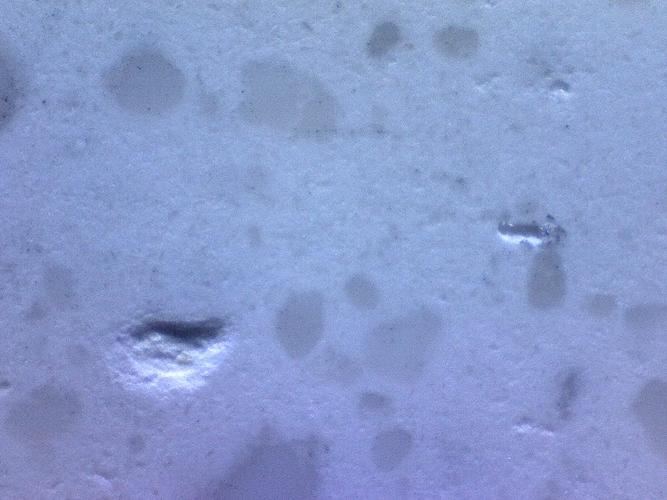
Remember, I wrote the 12k feels more grainy and not as silky as the 8k?
It is hard to see, but if You look closely at the following image, You might see that the particles slightly peak out of the compound - like mountain tips out of the mist.
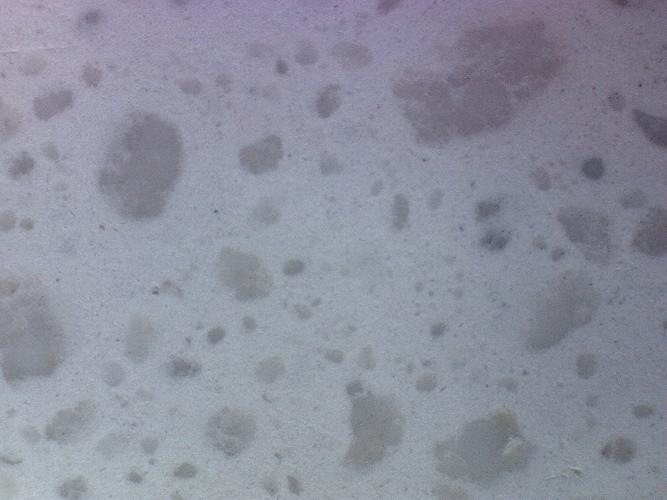
Also in image #3 - the one with the particle traces. There You see small black dots - remainders of the taped spine - mainly on top of the particles, basicly none on the compound.
Here's my theory:
I suspect that - though advised by my Naniwa vendor - lapping stones against each other, more of the compound is removed than of the particles. The peaking out particles then offer a much greater contact surface to the blade.
This is probably the reason why none of You, using diamond plates, has this problem. The diamond plate truely flattens everything equally as it is much harder.
In lack of a diamond plate, I used the nagura, this time really hard - like trying to remove a spot from something. And see.... suddenly the stone felt as soft as silk. All the "mountains" seem to be gone. Still every now and then, I had a single "kr", that indicated another chip, but I got less and less. Maybe I've just met a good layer, but I think, I'm on a good path.
Bought an ATOMA Diamond plate this afternoon. Will try that out tonight.
Besides the fact, that I currently have problems with that stone. I'd like to tell You how amazing it is (when these problems do not occur). I re-set the bevel on an 800 stone and from that directly went to the 12k. Normally one would not do that, but the outcome blew me away.
-
05-23-2013, 07:41 PM #59Senior Member
- Join Date
- May 2013
- Location
- Berlin, Germany
- Posts
- 286
Thanked: 39
Thanks, that's what I did. Have a look at my latest post - hope it's somewhat understandable. I'm close to sure that it comes from the stone's own particles that are torn out. I think the problem arrises due to lapping stones against each other and not using or careful use of thenagura after that Originally Posted by onimaru55
Got a diamond plate this afternoon.onimaru55 likes this.
-
05-23-2013, 08:55 PM #60Senior Member


- Join Date
- Dec 2010
- Location
- Virginia
- Posts
- 3,362
Thanked: 581
Interesting thread! I'd wager that use of the diamond plate will leave you with the same problem. If that is the case, my guess would be that the stone is contaminated, and that it came to you that way. My Naniwa 12K has dark spots in it too, but they cannot be felt, and they have no negative result on the bevel or edge. You've certainly been diligent about trying to isolate the problem. My guess would be it is your stone.


 Reply With Quote