
Results 16,681 to 16,690 of 20600
 91543Likes
Thread: What are you working on?
 LinkBack URL
 About LinkBacks
-
07-12-2019, 02:22 AM #16681Senior Member


- Join Date
- Feb 2013
- Location
- Haida Gwaii, British Columbia, Canada
- Posts
- 14,457
Thanked: 4830
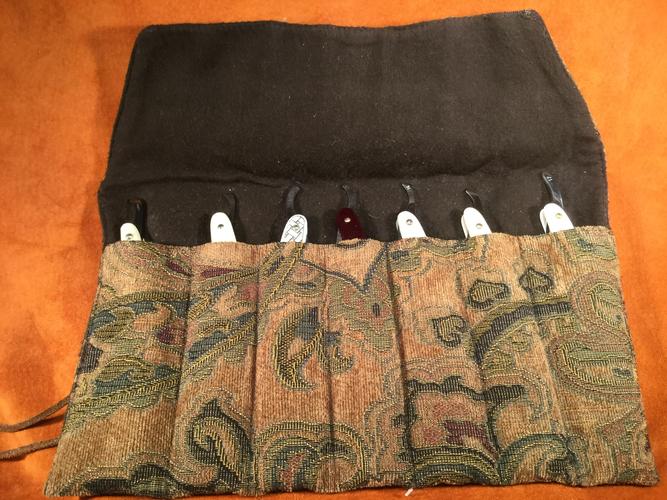
I’m always packing to go somewhere. At work right now, until the 2nd, then a boat trip to the other end of the province, then off to meet my wife at her parents place inland, and drive home. I often take my seven day roll with me. I also like to pack my panama hone, it does a nice job. I have a very nice roll made a member here,greatbolo.
The rest of the gear changes all the time but the roll always travels with me.It's not what you know, it's who you take fishing!
-
07-12-2019, 02:25 AM #16682Senior Member
- Join Date
- Feb 2013
- Location
- Haida Gwaii, British Columbia, Canada
- Posts
- 14,457
Thanked: 4830
Mike thats a serious challenge. I did a similar project in the early days, only I was foolish enough to try to get all the pitting out after the tumbler.
Im not sure why cell rot occurs, Tom uses a silicone spray to keep his well coated to prevent it breaking down.
Jerry, I am looking forward to seeing the finish on those hone boxes.It's not what you know, it's who you take fishing!
-
The Following User Says Thank You to RezDog For This Useful Post:
Gasman (07-12-2019)
-
07-12-2019, 03:25 AM #16683Senior Member


- Join Date
- May 2010
- Location
- Upstate South Carolina
- Posts
- 3,308
Thanked: 987
Yeah, that's some pretty bad cell-rot. Good luck with it, Mike. I too look forward to seeing Jerry's latest finished boxes. I bet those Lyptus boxes smell nice being worked! Originally Posted by RezDog

Nice roll, Shaun-And if we're showing off our "rolls," here's mine with the blades that are coming with me:
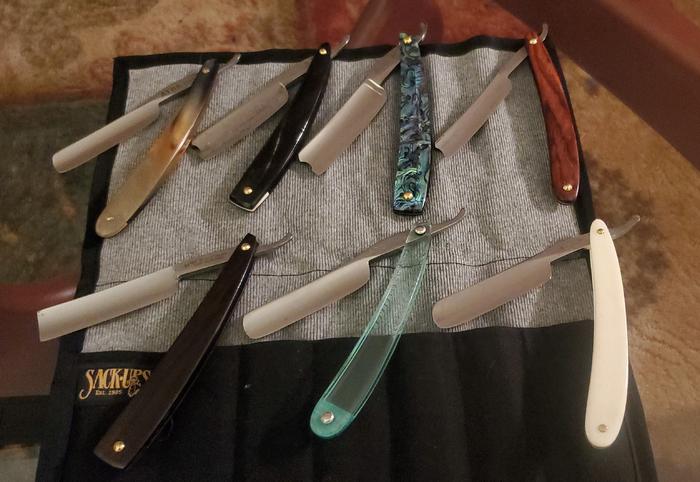
Mine is nothing fancy, but it's very sturdy and protective, with heavy canvas on the outside, and soft silicone-impregnated liner. I got it from The Superior Shave. A homemade one would be cool, though. I should ask my wife-she can sew literally anything. Hmmm, now I'm thinking again (though realistically, she'll never have time. She is also a department chair/AP teacher in the same high school as me, and is even busier than I am).There are many roads to sharp.
-
07-13-2019, 01:18 AM #16684Skeptical Member


- Join Date
- Nov 2016
- Location
- Colorado Springs
- Posts
- 10,555
Thanked: 2195
Got home in time to sand one box to 600 grit. Then I thought I'd put some Ren. Wax on the insides to protect it from whatever coatings I might put on the outside. But the color just popped out so beautifully I couldn't help myself. I just waxed the box completely. No clear finish or oils or stains. Just Wax!
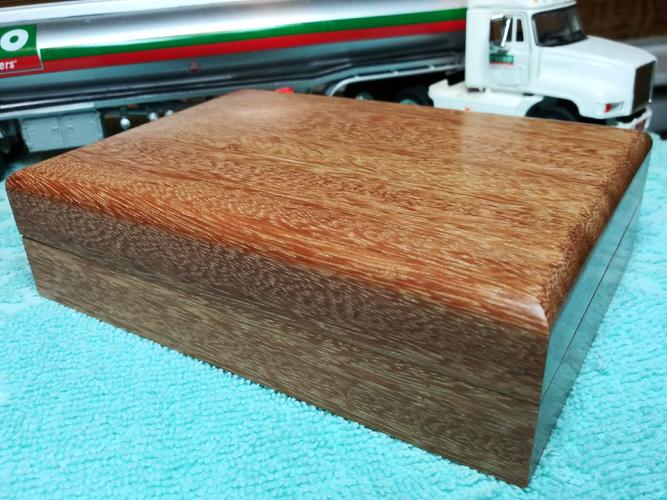
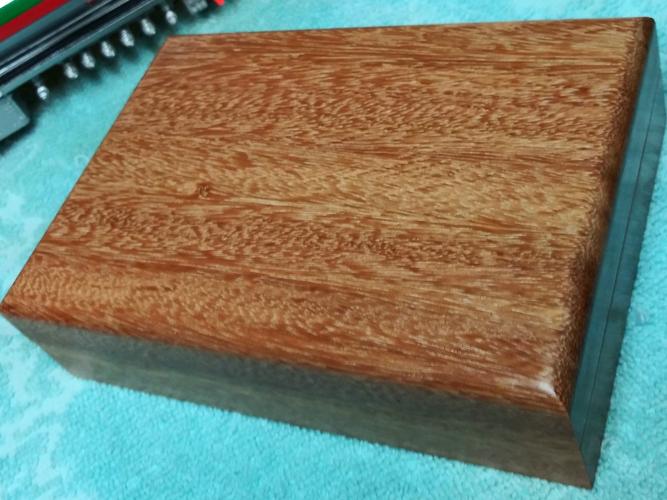
A before pic for comparison
 It's just Sharpening, right?
Jerry...
-
07-13-2019, 03:33 AM #16685Senior Member
- Join Date
- Feb 2013
- Location
- Haida Gwaii, British Columbia, Canada
- Posts
- 14,457
Thanked: 4830
Wax is a beautiful finish.
ScoutHikerDad and jfk742 like this.It's not what you know, it's who you take fishing!
-
07-13-2019, 01:00 PM #16686Senior Member
- Join Date
- Mar 2015
- Location
- Indiana, Portland
- Posts
- 321
Thanked: 70
A very fine bit of work, nice fit and great grain pattern.
ScoutHikerDad likes this.
-
07-13-2019, 07:15 PM #16687Senior Member

- Join Date
- Feb 2019
- Location
- Salida, CA
- Posts
- 600
Thanked: 94 Robeson update
I've actually been working on the razor, but my vacation ended and I haven't had as much time to mess with the photos. Also had to catch up with all the great work being put up. Lots of really nice stuff, congrats to all of your fine work.

So the Robeson...
I worked the blade a bit more with some WD40 and steel wool, got some improvement and am happy with where it's at.
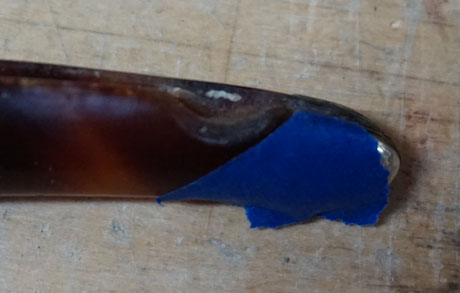
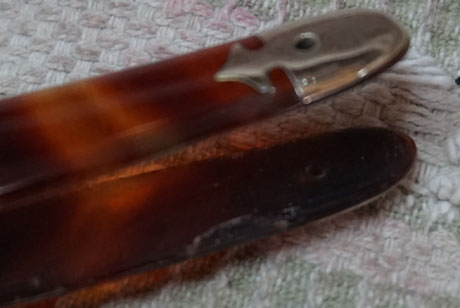
As for the scales, unfortunately when I was drilling out the pins the bit slid off the pin and carved out a chunk of the bolsters. So this is now more of a learning project. So here's a few things I've learned:
Using blue painters tape to protect scales and bolsters makes it hard to see the bit wander off the pin. That left about 3/4 of the pin still in the scale so I wound up using a small ball end dremmel bit in my drill press and it worked pretty well to get the pin cut out. I'll may try that from the start on a future project.
The scales on this razor are effectively one piece, so I didn't even need to remove the rear pin
First time straightening scales. Took me three tries with some boiling water and some carefully placed bamboo skewers and clamps to sneak up on it and get them sorted out.
Before

After

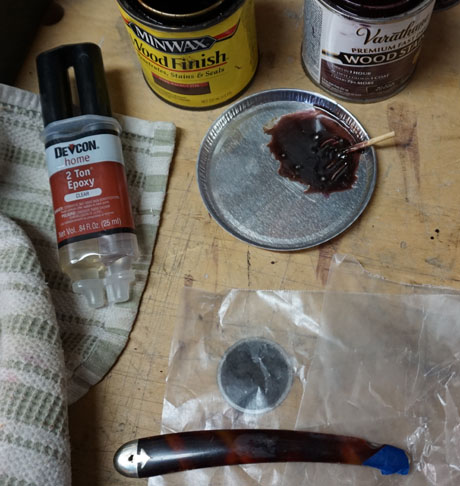
You can use wood stain to color clear epoxy and get a pretty close color match. I used some cherry and dark walnut to get close to the colors of these scales. Not perfect, but I'm not trying to make a show queen. After mixing the epoxy I let it sit for 30-45 minutes (24 hour cure time) so it thickened up and stayed in place better. Time may vary due to temp, so check on it every 10-15 minutes until it's the thickness you want.
Roughed up the damaged area with some sand paper
The repair materials (the epoxy in the mixing dish is a test batch I did to make sure it would harden)
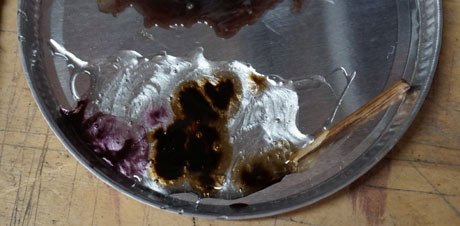
Mixing in the color (I just added a few drops of each until I got to the color I wanted)
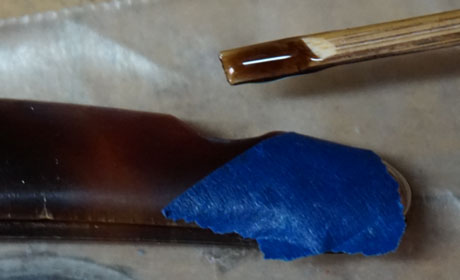
Got the epoxy in place and used the wax paper to help it keep shape while drying.

The repair after rough shaping
The final repair and an idea for covering the damage to the bolsters
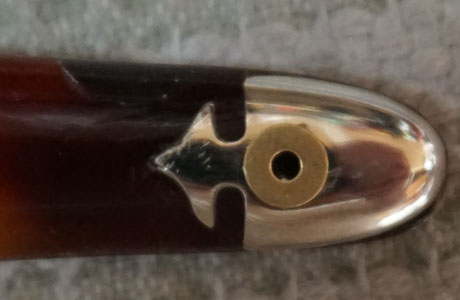
The color of the epoxy seemed to darken a little as it dried so it's a bit off, but not bad. I could file it out and try again, but my goal is more to getting this working again.
I was thinking of gently doming some 00 wide brass washers to cover the damage when I re-pin. Is this a good idea? or would it look kinda goofy? Thanks in advance for your opinions and advice.O'Toole's commentary on Murphy's Law: Murphy was an optimist.
-
The Following 2 Users Say Thank You to JellyJar For This Useful Post:
BobH (07-13-2019), ScoutHikerDad (07-14-2019)
-
07-13-2019, 07:38 PM #16688Senior Member
- Join Date
- Feb 2013
- Location
- Haida Gwaii, British Columbia, Canada
- Posts
- 14,457
Thanked: 4830
Nice repair. I realize it is not perfect but sometimes it’s about learning a process not achieving a seamless result. As for the pin error, they happen at times. In general I fell like I have more control holding the razor in my hand, and pushing it into the turning drill bit. Also, I check often to see hose the hole is going, and I start with making a flat spot on top of the pine with a file and then starting with a split point drill bit by hand and then moving to the drill press. I’ve made many unintentional holes over time. I think Tom is the master of careful control and drilling out pins. I bet he didn’t start there though. :-)
P.S.
You can use large washer to cover an oops, but I would think SS or NiAg would look better.It's not what you know, it's who you take fishing!
-
The Following 2 Users Say Thank You to RezDog For This Useful Post:
JellyJar (07-14-2019), ScoutHikerDad (07-14-2019)
-
07-13-2019, 08:03 PM #16689Senior Member
- Join Date
- Feb 2019
- Location
- Salida, CA
- Posts
- 600
Thanked: 94
I'll try moving the pin to the bit next time. I had filed the pin flat and put a small dimple in it with a punch. Not sure why the bit walked off, just did and I didn't notice till it was too late. Even so, it's been a fun project and I'll get another razor to try in the end
 .
.
I think you're right about the SS or NiAg, the brass is what I had on hand.ScoutHikerDad likes this.O'Toole's commentary on Murphy's Law: Murphy was an optimist.
-
07-13-2019, 08:35 PM #16690Senior Member

- Join Date
- Dec 2018
- Location
- Gainesville, FL
- Posts
- 6,792
Thanked: 678
That's very good work. I haven't done it yet but I thought I'm using the epoxy in the same way. It's helpful to see that you had good results with that and a good tip to maybe go a little lighter than you think it would need to be. I suppose you could always use a detailed brush and paint on some more dark stain if it needed to be darker. I have a Robson shuredge "The razor that fits your face" that I love. That was the first razor that I bought for myself new. Although I should say NOS. It didn't have the box but it still had the sticker on it and looked like it had been in a display case.
Shuan, that's how I take out pins almost exactly except I don't usually drill them all the way through (maybe you don't either). I usually drill them down to where The collar will come off and then try to lift the scale (gently) off of the pin if possible and then unload the washers and the blades if I can rotate the scale back away from the pin. I'm always scared to death of drifting into the scale and yet I still do it sometimes even though I'm as careful as I can be. Once I get that scale loose I'll usually either drive the pin out or pull it out with a pair of bulldog pliers.Last edited by PaulFLUS; 07-13-2019 at 08:39 PM.
ScoutHikerDad and JellyJar like this.Iron by iron is sharpened, And a man sharpens the face of his friend. PR 27:17
-
The Following User Says Thank You to PaulFLUS For This Useful Post:
ScoutHikerDad (07-14-2019)


 Reply With Quote