
Results 18,531 to 18,540 of 20573
 91473Likes
Thread: What are you working on?
 LinkBack URL
 About LinkBacks
-
06-02-2020, 02:13 PM #18531Senior Member


- Join Date
- Feb 2013
- Location
- Haida Gwaii, British Columbia, Canada
- Posts
- 14,448
Thanked: 4829
Nice razor Mike. In your hands it won’t take long to have that one back in service.
It's not what you know, it's who you take fishing!
-
06-02-2020, 08:54 PM #18532Skeptical Member


- Join Date
- Nov 2016
- Location
- Colorado Springs
- Posts
- 10,548
Thanked: 2194
Thats a looker Mike. Those scales sure do show it off. Wont take you long to knock that one out.
Geezer likes this.It's just Sharpening, right?
Jerry...
-
06-05-2020, 05:59 PM #18533Senior Member


- Join Date
- May 2010
- Location
- Upstate South Carolina
- Posts
- 3,308
Thanked: 987
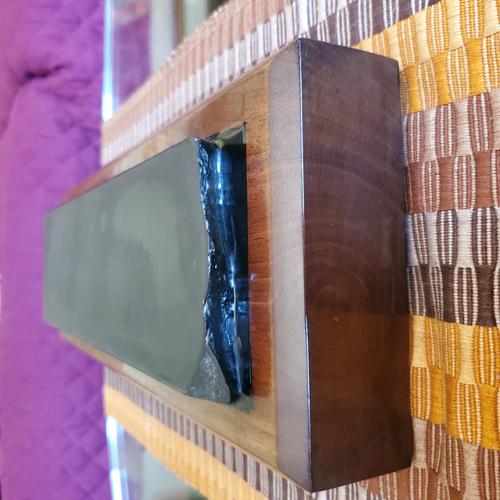
Some of you may remember my in-progress pic on that massive primitive black Arkansas stone that I got recently from Dan's Whetstones. I mounted all 14"x4" of it in a walnut base made for me by local woodworker friend. I set it level in MirrorCoat black epoxy, and finished that walnut in about a dozen coats of TruOil. It weighs in at 13 pounds, and sits on felt furniture pads on my coffee table.
For anyone contemplating using epoxy like this, it took me 3 pours to get it up to level and fill in under the concave bottom of the hone. I had to shim it some with wood strips to raise it up a bit for clearance and get it level. Using a 60cc syringe to inject the epoxy accurately helped greatly, and as you epoxy users already know, mixing accurately and thoroughly is crucial. And that black epoxy stains everything, including spots I had to sand out where it escaped some under my masking tape. Once it all cured rock solid, it is a joy to hone on. I just finished 5 razors on it; we'll see what my test shaves reveal. Now when my buddy finishes my scale blanks and brush handles from the same piece of wood, I look forward to making some complementary sets!

 There are many roads to sharp.
-
06-05-2020, 11:49 PM #18534Senior Member

- Join Date
- Mar 2015
- Location
- Akron, Ohio
- Posts
- 12,095
Thanked: 4312
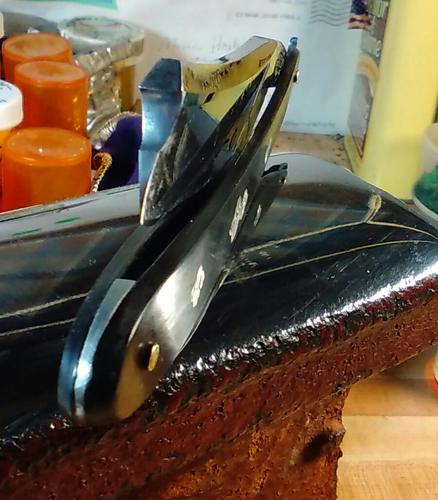
Lots of light pitting, after all was done. Soaked the scales in Neetsfoot for a couple days, then pinned it back up with the original double stacks, and some brass, rod.
Think I'm gonna take it back apart, and finish it right, down the road someday. I just couldn't stand leaving in the drawer any longer. The itchin to shave with it, was just too much to bare anymore.!
[ATTACH=CONFIG]320896[/ATTACH
 Mike
Mike
-
06-06-2020, 12:36 AM #18535Senior Member
- Join Date
- May 2010
- Location
- Upstate South Carolina
- Posts
- 3,308
Thanked: 987
That is one sexy old Sheffield, Mike, pits and all. Originally Posted by outback
 There are many roads to sharp.
-
The Following User Says Thank You to ScoutHikerDad For This Useful Post:
outback (06-06-2020)
-
06-06-2020, 12:39 AM #18536Senior Member

- Join Date
- Oct 2010
- Location
- 50 miles west of randydance
- Posts
- 9,683
Thanked: 1354
You are showing your age with that statement................... Originally Posted by ScoutHikerDad

-
06-06-2020, 08:14 AM #18537Senior Member
- Join Date
- Sep 2009
- Location
- Plymouth, UK
- Posts
- 313
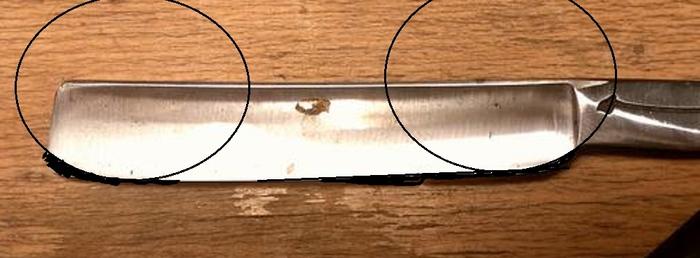
Thanked: 19 Chipped blade: re-profiling options
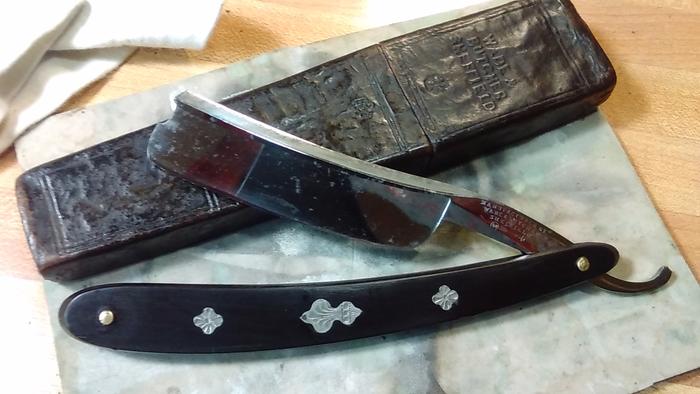
I'm curious what the thread thinks of this, an otherwise nice (aren't they all...) Wostenholm Pipe with a chip:
The damage is bigger than the chip itself:
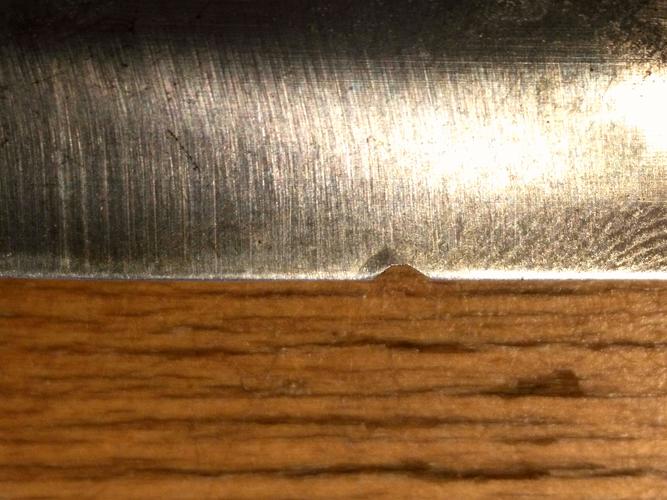
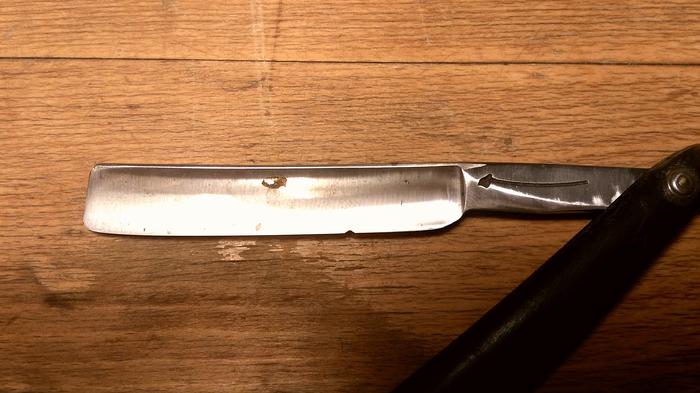
All in all at the location of the chip about 1mm needs removing; at the widest point, the blade is 9/16", and as expected, the grind is quite heavy,

so there is not a lot to play with. I could remove 1mm (more or less) from the whole edge; I was thinking I could also change the profile of the blade slightly, take more off the heel, and keep the full width at the widest point:
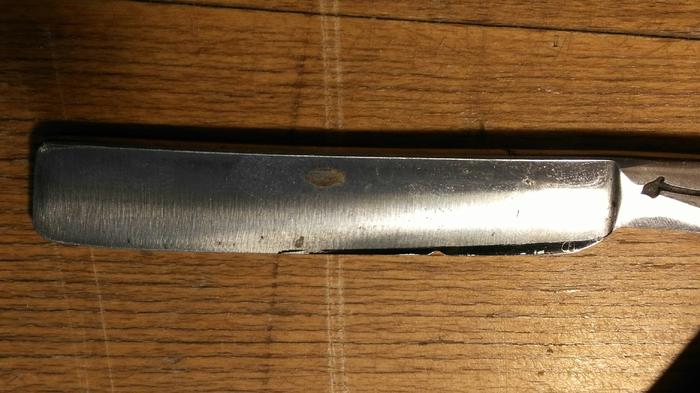
This would mean taking at least 1.5mm off at the heel, which would leave a thickness of about 0.2mm at the heel to put a bevel onto. That might mean that the bevel is quite wide at the heel, and the bevel angle is quite high - the bevel angle at the heel comes out at about 21º at the heel if I remove 1.5mm.
So, there are a few options:
-remove 1mm from the whole edge;
-remove material from the heel and leave the widest part of the blade untouched;
-halfway between the two options, ie remove material from the whole edge but more at the heel;
-do nothing and put this razor in the 'reference collection'.
Any views?
Many thanks!
-
06-06-2020, 01:26 PM #18538Senior Member
- Join Date
- Feb 2013
- Location
- Haida Gwaii, British Columbia, Canada
- Posts
- 14,448
Thanked: 4829
With it being just over a half of an inch to start with, and a wedge, by the time you get the chip out the bevel width will be significant and it will take a very long time, and a lot of effort to get the chip out and the edge shave ready. Be prepared that the damage extends slightly farther than the part that you can see. If you chose to remove the chip and hone the razor, do it with an elevated spine and slowly lower the blade as the chip comes out. I would tend to hone the whole blade with emphasis on the chipped heel. There is not much between the heel and the tang. This one is going to be very challenging to get shaving again.
Montgomery likes this.It's not what you know, it's who you take fishing!
-
The Following User Says Thank You to RezDog For This Useful Post:
Montgomery (06-07-2020)
-
06-06-2020, 02:08 PM #18539Senior Member
- Join Date
- Apr 2012
- Location
- Diamond Bar, CA
- Posts
- 6,553
Thanked: 3215
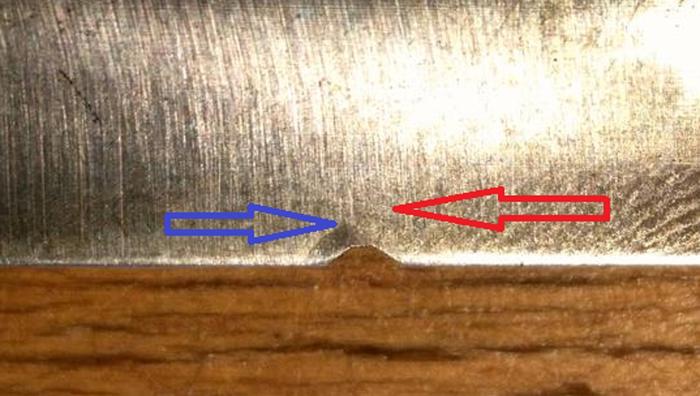
The damage looks deep and may go all the way back to the red arrow. It is good to have a plan, but the damage may throw your plan out the window. Remove as little steel as possible to remove the chip and refining the shape once the chip is removed.
You may need to remove more steel if the edge begins to microchip when honed. I would remove as little steel around the chip first. A smiling edge will help you remove less of the whole edge and give the razor a more pleasing profile.
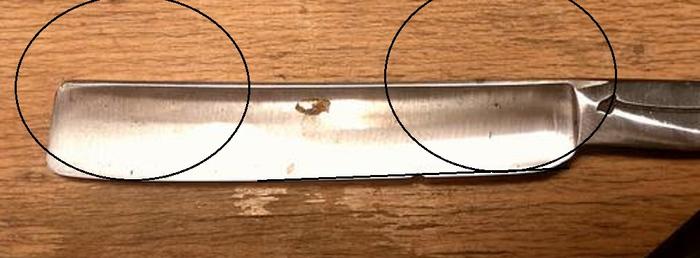
Take good measurement in 3 places the toe, the middle and the heel. Generally the toe and the heel should be the same width, but you can fudge it a bit and it will still look good, by not removing as much from the toe and just accentuate the toe tip a bit more, by rounding to give the allusion of symmetry with a smile.
Note the curve of the toe and heel are the same but more steel is removed from the heel because of the chip. Use a compass or round object to draw your curves. Draw the curve of the heel on cardboard, cut it out and use the same template to draw the toe, so they match.
The chip will dictate how much needs to be removed. I would remove the chip first, removing as little of the heel and toe. It will be an angled cut from about 1/3 of the length back to the heel. (See 2nd photo).
Once the bulk of the chip is removed, shape the heel to a smile then the toe. Do not cut all the way to your lines, remember you will cut more when you hone it, so leave a bit for honing, you can always take more off if needed.
Once you settle on a design, make a cardboard template of the razor, then make another and cut off the parts you intend to remove. Cutting cardboard is much easier and if you do not like it, toss it out and make another. The cardboard templates make it easy to redraw/trace your guidelines if needed. Drawing guidelines on both sides is very helpful, take measurements to ensure the lines are the same on both sides.
I like using red sharpie to mark the razor for cutting, use black for design to visualize the shape. WD40 removes ink easily from the steel.
Removing steel goes quickly with Diamond plates, I use a 140 for this kind of work, but use what your have. A Diamond file is also especially useful for detailed shaping. It is surprising how little material you need to remove to make a shape look balanced. A few lite swipes of a diamond file are at times all it takes. Stop often and look at the profile. Your guidelines are just that, guidelines, stop when it looks good.
This is a good exercise; you will learn a lot doing it. Take your time. Here is an old post on making a smiling edge from a neglected razor, it was re profiled to enhance the look of the edge.( Make me Smile).
Last edited by Euclid440; 06-06-2020 at 02:15 PM.
Montgomery and Aldwyn like this.
-
The Following User Says Thank You to Euclid440 For This Useful Post:
Montgomery (06-07-2020)
-
06-06-2020, 04:24 PM #18540Senior Member

- Join Date
- Feb 2016
- Location
- San Antonio, TX
- Posts
- 1,839
Thanked: 428
If it were me, I would remove at least 1mm from the whole edge. Insted of a 5/8 it would be a 4/8. Get a nice straight edge from heel to toe and re-hone it. But that is just me. No matter what, a great deal of detail work coming your way! Originally Posted by Montgomery
Montgomery likes this.Semper Fi !
John
-
The Following User Says Thank You to Johntoad57 For This Useful Post:
Montgomery (06-07-2020)


 Reply With Quote