
Results 19,441 to 19,450 of 20573
 91473Likes
Thread: What are you working on?
 LinkBack URL
 About LinkBacks
-
06-18-2021, 09:09 AM #19441Skeptical Member


- Join Date
- Nov 2016
- Location
- Colorado Springs
- Posts
- 10,548
Thanked: 2194
Ive made a set that were .065 thick. It was a little thinner than i wanted but they are fine even that thin. I shoot for .080 most the time
It's just Sharpening, right?
Jerry...
-
The Following User Says Thank You to Gasman For This Useful Post:
jfk742 (06-18-2021)
-
06-18-2021, 11:27 AM #19442Senior Member


- Join Date
- Jun 2013
- Location
- archbold ohio
- Posts
- 2,378
Thanked: 546
It just rubs off (at least with something like horn or bone) It's a little harder to get off of wood as it soaks in a little, probably depending on the type of wood you use. Works best on something that's not porous. Originally Posted by jfk742

Last edited by tintin; 06-18-2021 at 11:30 AM.
-
The Following User Says Thank You to tintin For This Useful Post:
jfk742 (06-18-2021)
-
06-18-2021, 01:30 PM #19443Senior Member

- Join Date
- Feb 2013
- Location
- Haida Gwaii, British Columbia, Canada
- Posts
- 14,448
Thanked: 4829
My usual proccess is slightly different. I have the two halves double side taped to a piece of 1/4” aluminum, and once I have one side shaped, I remove it from the aluminum before starting the other side. My wood holding block is similar, but either in the engravers block or the small swivel vice. Your mock up looks good and will evolve until you get to point where it is quick and easy, no matter what material you are working with.
It's not what you know, it's who you take fishing!
-
06-18-2021, 05:49 PM #19444Senior Member
- Join Date
- Apr 2012
- Location
- Diamond Bar, CA
- Posts
- 6,553
Thanked: 3215
I tried Fabuluster and had issues with it loading up, it seems to work best with just a bit of compound on a freshly raked loose unsewn wheel as a finish compound for steel, bone or antler.
A couple of years ago I was doing a lot of antler, I filed a 45-degree bevel hand holding the scale then finished sanded on 120 and 220 belts and hand sanded to 1k by hand with a cork backer. Hand sanding goes quickly if you have a smooth 220 finish, take your time on the belt sander and perfect the finish as much as possible.
From 1k, I buffed with Green Stainless compound to on a Sewn 6-inch wheel to a high gloss, then went to Fabuluster on a loose 6-inch wheel, finished by hand with Maas and paper towels.
For a bit higher gloss, I wipe the item, steel, or scale material with WD40 then buff on Stainless compound, Fabuluster or Castwell’s White Lighting.
The WD40 cuts the compound and takes the finish to a higher sheen, with a 6-inch loose wheel. Green Stainless from a 600-hand sanding finish on horn will make it pop, and finish on White Lighting, and Maas with a paper towel. I hand polish everything with Maas and paper towels.
The brown unbleached paper towels seem to pop a hand- polish a bit more, they are probably a bit more abrasive. I buy them by the case at restaurant supply or your local coffee shop or fast-food joint will donate to your hand finishing project.
Trimming your wheels of loose fibers also can improve the finish. I rake frequently with a Castwell’s rake, and rake with the back side on the sharp wood corner to remove a lot of swarf from the wheel. A WD40 soaked paper towel removes the swarf from the rake’s teeth and back. Finish rake with a folded ¼ sheet of 80-grit.
I discovered the WD40 finish. I had a thin coat of WD40 on everything from cleaning off swarf, and saw the final finishes were a bit brighter and loaded up less. I spray WD40 on a paper towel and wipe the swarf from the razor or scales, I keep a soaked paper towel in my apron pocket and wipe as needed especially at finish. A clean blade or scale and clean wheels help to produce a better finish.
A trick I picked up from a Jewelry Supply video is to finish rake your wheels clean with a folded ¼ sheet of 80 grit sandpaper. It cleans your wheel and grinds off long threads as opposed to, pulling threads like a rake will. You still need to trim, but not as much, and you will see black swarf come off the wheel with sandpaper. Raking will get deeper into the wheel.
Invest in a good two-handed rake. They are much safer and do a better job than a screwdriver or fork, that I have seen recommended.
When I use a rake, I trim the wheel of any long threads. I buy several kitchen shears from the dollar store and keep a couple pair hanging on the wall above the buffer. I re-sharpen with a diamond file, and toss them when past their prime, Compound is hard on the edges and the steel is not that great.
Hold the item near but not touching the wheel, if you feel the threads slapping the item to be buffed, you need to trim the wheel. The threads will lay down when the wheel is not spinning, but the centrifugal force pops them back up.
-
06-18-2021, 05:54 PM #19445Senior Member
- Join Date
- Feb 2013
- Location
- Haida Gwaii, British Columbia, Canada
- Posts
- 14,448
Thanked: 4829
I agree that very little Fabulustre is needed. WD is good stuff for lubricating the polish.
Euclid440 likes this.It's not what you know, it's who you take fishing!
-
06-18-2021, 09:13 PM #19446www.edge-dynamics.com

- Join Date
- Feb 2013
- Location
- London
- Posts
- 3,066
Thanked: 512
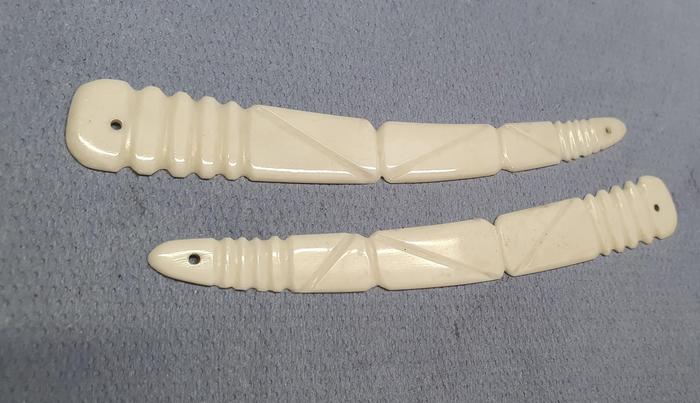
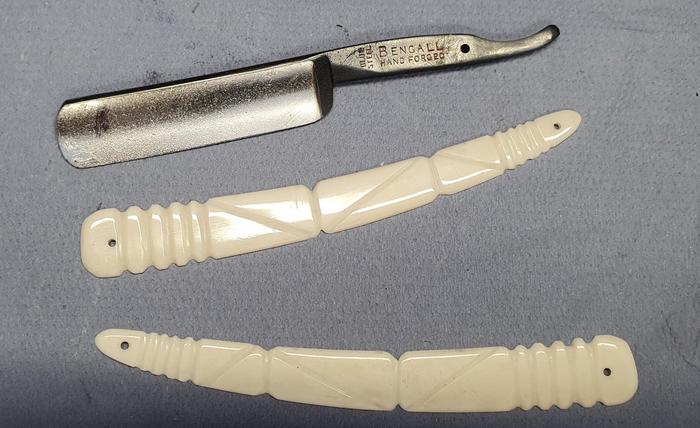
Inspired by Shaun and JFK's post i decided to try some bone carvery .. I was planning to work on metal but bone is a great place to start. The bone comes from Shaun, quality stuff.
I planned on cutting lines maybe into a basket weave type style , some hours later i had this.. It is a learning curve and im glad i got the ball rolling.
Cheers
Last edited by JOB15; 06-18-2021 at 09:15 PM.
-
06-18-2021, 09:49 PM #19447Senior Member
- Join Date
- Feb 2013
- Location
- Haida Gwaii, British Columbia, Canada
- Posts
- 14,448
Thanked: 4829
Looking good!
cudarunner and JOB15 like this.It's not what you know, it's who you take fishing!
-
06-18-2021, 10:16 PM #19448Senior Member
- Join Date
- Feb 2018
- Location
- Manotick, Ontario, Canada
- Posts
- 2,801
Thanked: 557
Very attractive scales. Your work and Shaun’s have inspired me to try my hand at bone scales.
Any hints or cautions?JOB15 likes this.David
Shared sorrow is lessened, shared joy is increased
― Spider Robinson, Callahan's Crosstime Saloon
-
06-18-2021, 10:31 PM #19449Senior Member
- Join Date
- Feb 2013
- Location
- Haida Gwaii, British Columbia, Canada
- Posts
- 14,448
Thanked: 4829
I have had no success with wood carving chisels. I use gravers for most of my stuff. You can also do inking along with carving and get some nice effects. Kind of a hybrid of engraving, carving and scrimshaw. I also do a lot of file work for shaping. I could use a belt sander but faster is not always the goal. Its a zen activity.
-
The Following User Says Thank You to RezDog For This Useful Post:
DZEC (06-19-2021)
-
06-18-2021, 11:14 PM #19450www.edge-dynamics.com
- Join Date
- Feb 2013
- Location
- London
- Posts
- 3,066
Thanked: 512
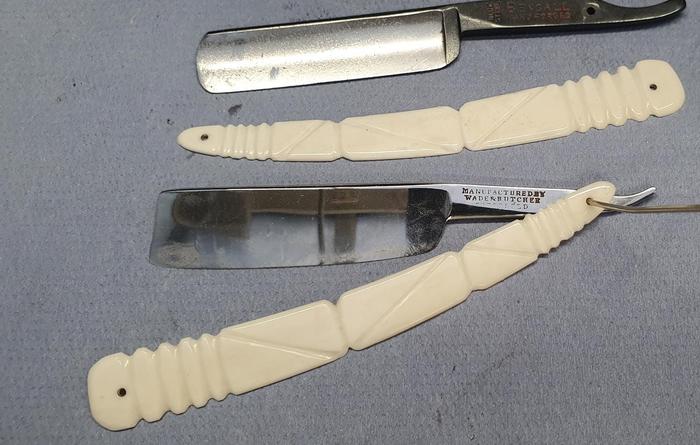
Mine was done with needle files, i recently bought some swiss made, different shapes..I did find that the further i went the better it looked.
My carving is reminiscent of an accordion :/ Hopefully in the future i can do something really special..


 Reply With Quote