
Results 81 to 90 of 4688
 13682Likes
Thread: The Butchered Blade
 LinkBack URL
 About LinkBacks
-
08-18-2015, 03:38 AM #81Str8Faced Gent.


- Join Date
- Aug 2013
- Location
- Orangeville, Ontario
- Posts
- 8,456
- Blog Entries
- 1
Thanked: 4207 Sort of a TI looking scale shape. Will go well with that blade profile fer sure.
 Originally Posted by outback

 sharptonn likes this."Depression is just anger,, without the enthusiasm."
Steven Wright
https://mobro.co/michaelbolton65?mc=5
-
The Following User Says Thank You to MikeB52 For This Useful Post:
outback (08-18-2015)
-
08-18-2015, 04:42 AM #82Razor Vulture

- Join Date
- Oct 2010
- Location
- Lone Star State
- Posts
- 26,151
Thanked: 8616
Bring your projects forth! It all takes time. Let's make this a fun restoration thread. Originally Posted by MikeT
Bring your tired, your weary, your skills! !
!
Last edited by sharptonn; 08-18-2015 at 04:45 AM.
"Don't be stubborn. You are missing out."
I rest my case.
-
08-18-2015, 12:30 PM #83Senior Member


- Join Date
- Mar 2015
- Location
- Akron, Ohio
- Posts
- 12,106
Thanked: 4313
I'll say this, no race for me. Originally Posted by sharptonn
Limited time after work(like Tom).
And inside of shop during day has been almost 100 degrees with fan going.
So a little before work, n a little after sundown.
I've got 8 more blades in the to do box, and saving the best for last.
Their all mine, so no rush.

Can't wait till i get to her.
And put a smile on her perty face.
And mine [emoji5]Mike
-
The Following User Says Thank You to outback For This Useful Post:
sharptonn (08-21-2015)
-
08-18-2015, 11:16 PM #84Razor Vulture
- Join Date
- Oct 2010
- Location
- Lone Star State
- Posts
- 26,151
Thanked: 8616
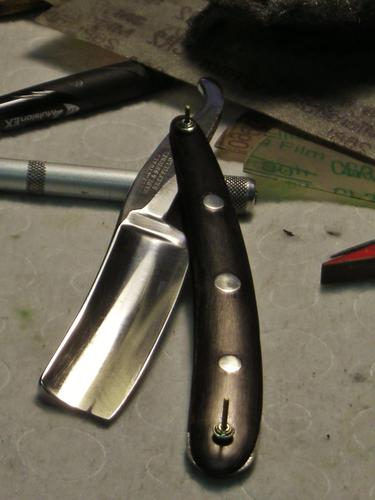
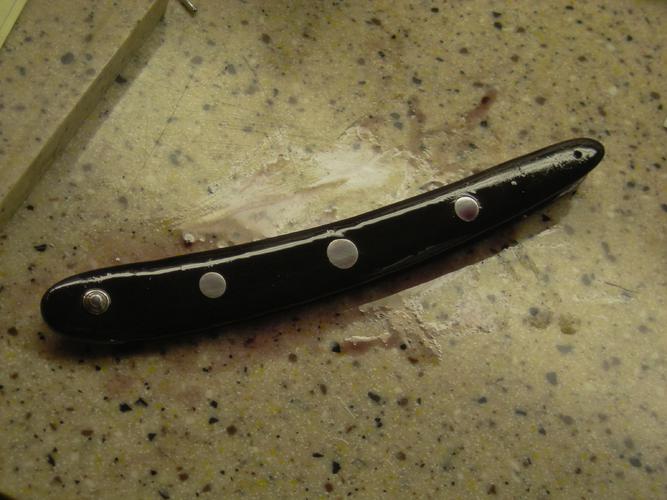
I sanded and sharpied my scales a bit more, smoothed the scales a bit with worn scotchbrite pad and steel wool. I then bolted them up to one another and sanded the profiles closer. Looking decent, so a mock-up was done, a wedge chosen.
I will pin the bottom with the top bolted up, spacers between the scales at the pivot. Then, filing on the wedge and end of scales, some sanding and contouring will even all out down there. All centers nice without spacers. Think I shall forgo those.
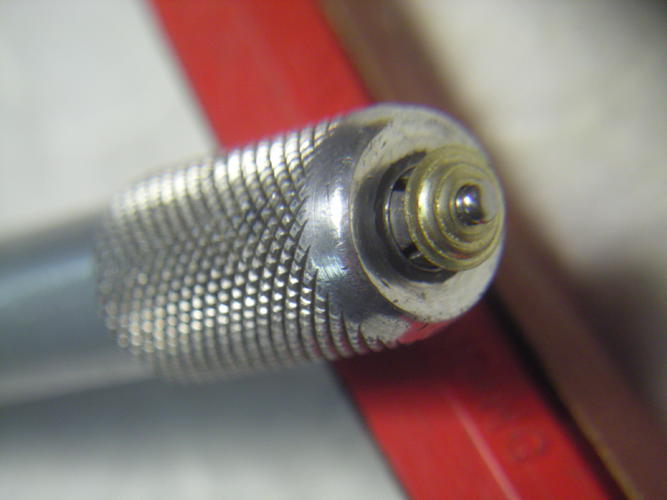
These collars come unpolished, so I used a pre-peened pin and a pin-vise for a way to take them to the buffer.
 "Don't be stubborn. You are missing out."
I rest my case.
-
The Following User Says Thank You to sharptonn For This Useful Post:
engine46 (08-24-2015)
-
08-18-2015, 11:31 PM #85Senior Member
- Join Date
- Mar 2015
- Location
- Akron, Ohio
- Posts
- 12,106
Thanked: 4313
Lookin good tom. Originally Posted by sharptonn
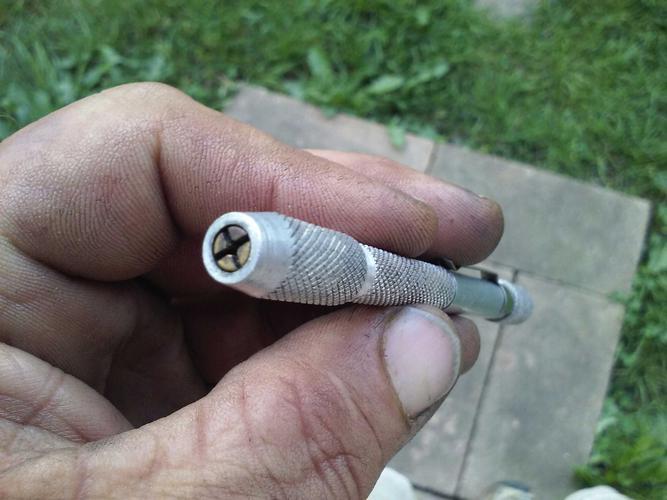
Your pin vice gave me a idea.
Its slowly becoming a multi tool.
This should work for the same thing.
 sharptonn likes this.Mike
-
08-19-2015, 12:53 AM #86Razor Vulture
- Join Date
- Oct 2010
- Location
- Lone Star State
- Posts
- 26,151
Thanked: 8616
Yup! That looks to be the same thing! Good for lots of uses. Have you decided on scale material?
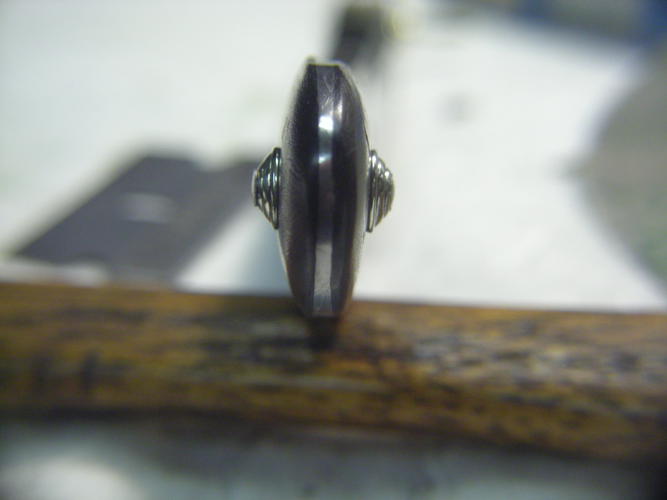
Pinned the bottom, tapped the lead wedge in tight and cut most off with a razor blade. Sanded the rest smooth. More Sharpie, steel wool, worn scotchbrite. The Sharpie does not necessarily 'dye' the scales, but sort of blends things in without filling anything or preventing neetsfoot from soaking in. A lot of it comes off as wiping the oil off, but it seems to help with horn repairs.
Never have gotten what I would consider a perfect horn repair job. Sometimes, I just tell myself that it is as good as I can do.
Gonna slather the scales with Neetsfoot and let them soak it in for a day or two. I see a bit more sanding is needed on the wedge, however. Oh well, no rush.
 "Don't be stubborn. You are missing out."
I rest my case.
-
08-19-2015, 01:34 AM #87Senior Member
- Join Date
- Mar 2015
- Location
- Akron, Ohio
- Posts
- 12,106
Thanked: 4313
They'll be of wood, just haven't decided the type. Originally Posted by sharptonn
I've only got a piece of american walnut and african mahogany, oh and pile of teak.
Gonna take a trip to a amish town tomorrow and see what else they got.
Its where i got the african padauk for my last razor. I remember seeing others but dont remember the names. All different colors too.
Hope to decide soon, cause im a couple days from finishing this blade.[emoji6]
-
08-19-2015, 01:36 AM #88Str8Faced Gent.
- Join Date
- Aug 2013
- Location
- Orangeville, Ontario
- Posts
- 8,456
- Blog Entries
- 1
Thanked: 4207
Looking fine Tom.
Really neat use of the finger drill. Never occured to me to use it as such!
Will now though. Wedge is looking perfect my friend. Coming together with precision..
 "Depression is just anger,, without the enthusiasm."
Steven Wright
https://mobro.co/michaelbolton65?mc=5
-
The Following User Says Thank You to MikeB52 For This Useful Post:
sharptonn (08-19-2015)
-
08-19-2015, 01:43 AM #89Razor Vulture
- Join Date
- Oct 2010
- Location
- Lone Star State
- Posts
- 26,151
Thanked: 8616
[QUOTE=outback;1532194]Lookin good tom.
Your pin vice gave me a idea.
Its slowly becoming a multi tool.[quote]
This should work for the same thing.
BTW, Outback. The thing is tightened a bit, the pin tapped, snugged more. The collar does not spin as using.
Someone could load something onto it and chuck it into a drill press or lathe jaws to do most anything. Grooves, files, sand, polish. Just a tiny chuck!"Don't be stubborn. You are missing out."
I rest my case.
-
The Following User Says Thank You to sharptonn For This Useful Post:
outback (08-19-2015)
-
08-20-2015, 01:49 AM #90Razor Vulture
- Join Date
- Oct 2010
- Location
- Lone Star State
- Posts
- 26,151
Thanked: 8616
Moooving along, the bottom is done, test-fit good. Slathered with NFO. True to form, the Sharpie (liberally applied along the way) is coming into the oil. I thought about it being bad that the oil takes the black off. Then, I figured the black was going into the oil which was going into the scales? At any rate, it seems to make for a proper job. Not too bad, not too good. Not like someone attempted something heroic or anything. Time will tell.
 "Don't be stubborn. You are missing out."
I rest my case.
-
The Following User Says Thank You to sharptonn For This Useful Post:
MikeB52 (08-20-2015)


 Reply With Quote