Results 15,081 to 15,090 of 20602
Thread: What are you working on?
-
12-29-2018, 08:40 PM #15081

JMHO
I agree with making the new ones s bit longer than the originals. Use a compass between the pivot hole of the blade to the furthest top/ end of the blade to determine how nice of an extension will be necessary. Design the new scales dimension to wedge from that.
~RichardBe yourself; everyone else is already taken.
- Oscar Wilde
-
The Following User Says Thank You to Geezer For This Useful Post:
MikeT (12-29-2018)
-
12-29-2018, 09:35 PM #15082Senior Member


- Join Date
- Feb 2013
- Location
- Haida Gwaii, British Columbia, Canada
- Posts
- 14,457
Thanked: 4830
A couple of thoughts.
I would not want to have to make stuff without my compass, it is just a super useful tool. Richard has shown me new uses for an already loved tool.
The Reaper would look bad ass in nice dark bog oak with the original inlays as on lays.It's not what you know, it's who you take fishing!
-
The Following User Says Thank You to RezDog For This Useful Post:
MikeT (12-29-2018)
-
12-29-2018, 11:05 PM #15083

I think I worded it wrong, the celluloid shrunk.
Not bad, and obviously the inlays still fit, it just must have lost length.
On second thought I think I was worrying too much, just make the wedge a little shorter so the blade fits right.
Thanks Richard for the compass reminder, that is the best way to lengthen.
I agree Shaun, the bog oak will look great. I'm still contemplating a natural red material for the wedge.
Was looking for something translucent.
But only finding garnet and a couple other semi-precious stones and that might be a little hard to cut and shape.
I've got a tile cutter..? Might be over-kill.
Maybe stick with bloodwood.
Scales soaking now... Here I go!“You must unlearn what you have learned.”
– Yoda
-
12-30-2018, 12:36 AM #15084

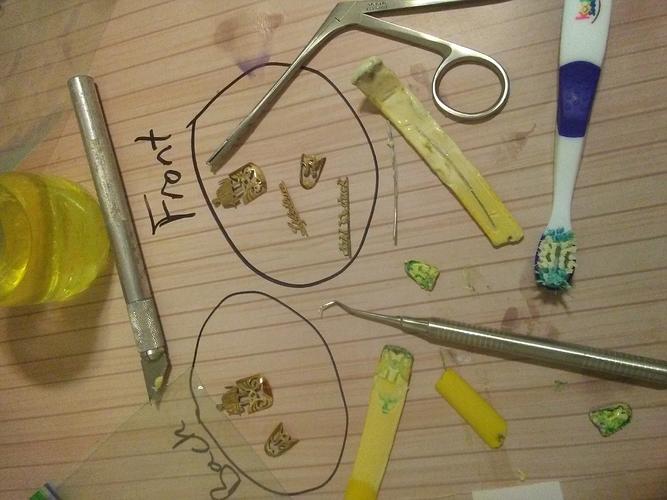
Here it is.. The inlays are off!
The reapers and pivot end pieces were very easy, popped right off. The Lifetime was a PITA! Just would not get off.
Ended up sticking it in the acetone and using one of the kids old toothbrushes to brush it until it began to move.
No casualties. Successful first inlay removal.

 “You must unlearn what you have learned.”
– Yoda
-
-
12-30-2018, 01:01 AM #15085Senior Member


- Join Date
- Feb 2013
- Location
- Haida Gwaii, British Columbia, Canada
- Posts
- 14,457
Thanked: 4830
Waist deep now Mike!
It's not what you know, it's who you take fishing!
-
12-30-2018, 01:09 AM #15086
-
The Following User Says Thank You to cudarunner For This Useful Post:
sharptonn (12-30-2018)
-
12-30-2018, 02:11 AM #15087

Good go, MikeT! If any residual cell sticks to any of it, a soak in some clean acetone will usually clear it off.
What's the plan to stick them on the new scales?
-
The Following User Says Thank You to sharptonn For This Useful Post:
MikeT (12-30-2018)
-
12-30-2018, 02:38 AM #15088

Is that the inlay wire laying between the front circle and the scale? It looks pretty small diameter.
I am glad I read old toothbrush.
I wonder if acetone would shine your teeth up?
-
12-30-2018, 02:46 AM #15089

I'd like to sink them in a bit (tiny bit as they are very thin).
Following the curves as close as possible to the outer edge of the inlays, but not on the inside holes.
Push them into some bog epoxy, scrape off excess.
Paying close attention to make it flush.
Some fine detailing...
I know they are thin, so it's not a huge deal to "onlay", some I've seen looked good, some bugged me.
Figure I'll go for gold on this one and try to inlay those complicated little pieces of brass!
Yep that's the wire, I pulled it out for ships and giggles.
I keep all toothbrushes as they are great tools.Last edited by MikeT; 12-30-2018 at 02:55 AM.
“You must unlearn what you have learned.”
– Yoda
-
12-30-2018, 03:03 AM #15090

Another reason that pops into my head about that wire is a sacrificial anode.


 91550Likes
 LinkBack URL
 About LinkBacks


 Reply With Quote

