
Results 15,671 to 15,680 of 20602
 91550Likes
Thread: What are you working on?
 LinkBack URL
 About LinkBacks
-
03-14-2019, 01:11 AM #15671Skeptical Member


- Join Date
- Nov 2016
- Location
- Colorado Springs
- Posts
- 10,559
Thanked: 2197
Did some searching and found out that the last razor in my pics with the number 173 and crosshatched over the name is an Ern Razor. Don't know why this was done to it but at least I figured it out.
I'd be all over that lot of razors, but the funds are not handy right now. Damn!sonnythehooligan likes this.It's just Sharpening, right?
Jerry...
-
03-14-2019, 01:54 AM #15672Razor Vulture

- Join Date
- Oct 2010
- Location
- Lone Star State
- Posts
- 26,190
Thanked: 8621
Several threads on the subject, Jerry. Seems Neil Miller weighed in on one.
Here..https://sharprazorpalace.com/razors/...yone-know.html
-
The Following User Says Thank You to sharptonn For This Useful Post:
32t (03-14-2019)
-
03-14-2019, 02:34 AM #15673Senior Member

- Join Date
- Feb 2019
- Location
- Salida, CA
- Posts
- 600
Thanked: 94 One more question
Started in on my WB barber notch. Blade cleaned up really nice with 0000 steel wool and polish, original? grind marks remain and that's were it's going to stay. Outback has given me some excellent tips for bringing back the honey horn. When I fist posted about the razor (my newest project in the Show and tell thread). BobH mentioned saving the collars. I was successful, bit they are kinda beat. Outback and Cudarunner suggested a doming block. I picked one up as I'd like to try making some copper domes for another project. I haven't worked with collars before so here's the questions. The steel of the collar extends in to the pin hole kind of like a tube. I don't see how I can undent the domes without destroying that area. Would you just flatten it out and re-drill? There were only three of the small support washers present (fourth could have gone awol while I wasn't looking - those things are ridiculously tiny). The ones I have look like they've given their all and need to be put to rest. Where can I find replacements? I hope the pics show it well enough, it's a lot easier to see in 3D.
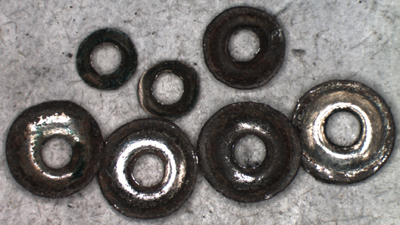
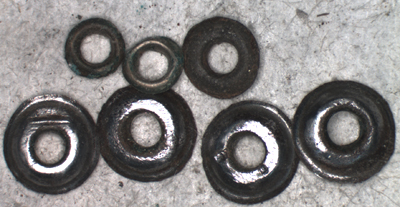
Outside and inside of collars/support washers
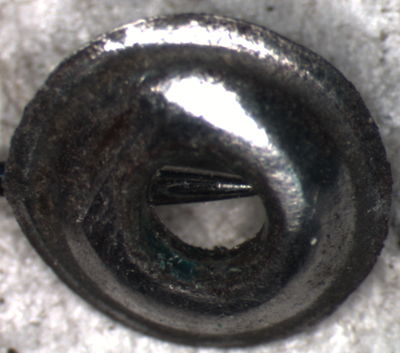
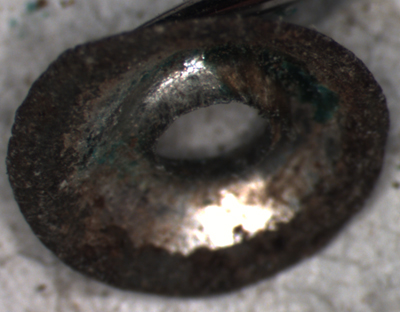
Close up of outside/inside of pin hole
I'm taking several in progress pics and will post it up when I'm finished.
I thank you all again for your advice and willingness to share your craft.
-
03-14-2019, 02:44 AM #15674Razor Vulture
- Join Date
- Oct 2010
- Location
- Lone Star State
- Posts
- 26,190
Thanked: 8621
Old steel collars and pewter undercollars. Good job on saving them!
Next time, run them lightly against the buffer before unpinning them!
Easy to reuse. Pin a tiny bit long. Peen it all in.
They look neat with brass pins.
-
-
03-14-2019, 03:10 AM #15675Skeptical Member
- Join Date
- Nov 2016
- Location
- Colorado Springs
- Posts
- 10,559
Thanked: 2197
Thanks for the link, Tom. I like the explanation he gave. I hated to think it was a bad grind or something as I got a decent bevel on it. I will go with them not wanting to sell German stuff in England and everyone knowing.
It's just Sharpening, right?
Jerry...
-
03-14-2019, 03:17 AM #15676Senior Member


- Join Date
- Oct 2010
- Location
- 50 miles west of randydance
- Posts
- 9,699
Thanked: 1355
Not only England but here in the US also. Originally Posted by Gasman

-
03-14-2019, 03:29 AM #15677Razor Vulture
- Join Date
- Oct 2010
- Location
- Lone Star State
- Posts
- 26,190
Thanked: 8621
A piece of razor history...
HEY! I don't have one!
-
03-14-2019, 04:12 AM #15678Senior Member
- Join Date
- Oct 2010
- Location
- 50 miles west of randydance
- Posts
- 9,699
Thanked: 1355
This would be one that would be easy to imitate.
Take that old POS and use your dremel......
-
03-14-2019, 04:51 AM #15679Senior Member
- Join Date
- Feb 2019
- Location
- Salida, CA
- Posts
- 600
Thanked: 94
Argh... Originally Posted by sharptonn
 : wish I'd thought of buffing them first, would have been so much easier. I guess that's how I learn.
Reuse is not my issue, I'd like to get the damage out, but not sure how. May just keep it with damage if I can't figure it. I feel like this needs to be kept with some of it's age, was really clean when I got it. Thinking a bit of cold bluing them.
Had brass pins original, will be using brass again.
-
03-14-2019, 05:03 AM #15680Senior Member
- Join Date
- Apr 2012
- Location
- Diamond Bar, CA
- Posts
- 6,553
Thanked: 3215
Just attach them to a Dremel brush shaft or with a small bolt nut & washers attach one colllar and chuck in a Dremel.
At slow speed buff on a scotch brite pad. Once clean you can polish them on a paper towel and metal polish.
The dents can be worked out with a small die from the Dapping set or a rounded chop sick or bamboo skewer rounded over and held in a dimple in a block of wood.
A quick soak in vinegar will get most of the gunk off.


 Reply With Quote