
Results 16,041 to 16,050 of 20573
 91473Likes
Thread: What are you working on?
 LinkBack URL
 About LinkBacks
-
04-19-2019, 12:56 AM #16041Senior Member


- Join Date
- Feb 2019
- Location
- Salida, CA
- Posts
- 600
Thanked: 94 You got it, I was referring to the scale material. Sorry, I guess I could have been clearer.
 Originally Posted by RezDog

-
04-19-2019, 01:54 AM #16042Senior Member


- Join Date
- Feb 2013
- Location
- Haida Gwaii, British Columbia, Canada
- Posts
- 14,451
Thanked: 4829
I am guessing if you have enough to two sets of scales you could do a different finish on each half and get four different looks. I’d like to see how the appearance changes from one finish to the next.
It's not what you know, it's who you take fishing!
-
04-19-2019, 02:41 AM #16043Senior Member
- Join Date
- Feb 2019
- Location
- Salida, CA
- Posts
- 600
Thanked: 94
I might have enough left to do a thinner set with less curve. I couldn't quite get two sets out of this pattern, it was like 2-3 mm off every way I tried. What I was thinking was taking one of the small scraps and just photo it after each grit/polish combo. The smaller piece would be faster to run up through the grits. If that sounds good, I could get the pics up next week for sure, maybe this weekend.
RezDog likes this.
-
04-19-2019, 02:50 AM #16044Senior Member
- Join Date
- Feb 2019
- Location
- Salida, CA
- Posts
- 600
Thanked: 94
Euclid440-HUGE THANK YOU!

Got the grits in a couple days ago. Started with the 60 grit tonight and got both sides of my black ark almost done - only took about 35-40 minutes. I've got a 1/2 inch spot left on one side to finish off. I had things cleaned up and put away when I noticed it, so I'll finish it off tomorrow. Time to relax with the family.
-
04-20-2019, 06:11 PM #16045Senior Member

- Join Date
- Jan 2018
- Location
- Illinois
- Posts
- 277
Thanked: 47
Time to get back to some projects.
Here's my first time taking scales apart without mangling them.
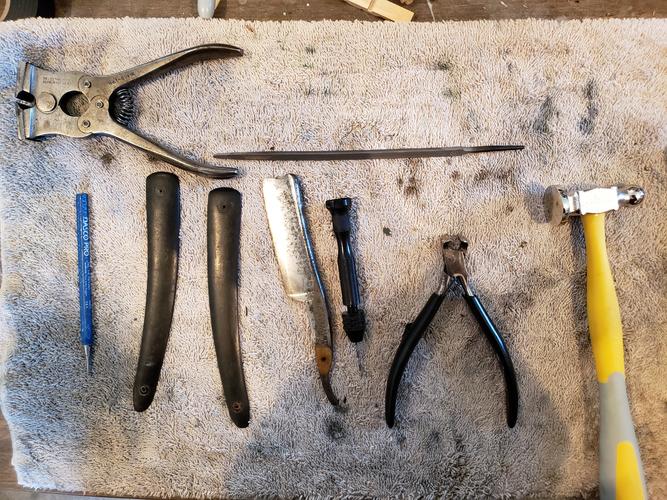
That's a big ol' Mappin. Time to see if that old razor can be shined up a bit.
-
04-20-2019, 06:46 PM #16046Senior Member

- Join Date
- Feb 2018
- Location
- Manotick, Ontario, Canada
- Posts
- 2,808
Thanked: 559
Where did you find that brute of a tool in the top left of the photo? Originally Posted by sonnythehooligan
David
Shared sorrow is lessened, shared joy is increased
― Spider Robinson, Callahan's Crosstime Saloon
-
04-20-2019, 06:58 PM #16047Senior Member
- Join Date
- Jan 2018
- Location
- Illinois
- Posts
- 277
Thanked: 47
I believe it was Cudarunner who was recommending these.
If I'm not mistaken these are for cutting piano wire, but it works great for brass rod.
You can get vintage ones on Ebay- they are called Starrett cutters. Some go for a little dough, but I got mine reasonably priced.Last edited by sonnythehooligan; 04-20-2019 at 07:00 PM.
-
The Following User Says Thank You to sonnythehooligan For This Useful Post:
DZEC (04-20-2019)
-
04-20-2019, 07:21 PM #16048Skeptical Member


- Join Date
- Nov 2016
- Location
- Colorado Springs
- Posts
- 10,548
Thanked: 2194
Congrats on removing the pins. Hope you didn't put many gouges on the scales with those clippers. It can be tough to do without any marks left over. I don't see a roll of tape. Tape helps this marking on the scales.
sonnythehooligan likes this.It's just Sharpening, right?
Jerry...
-
04-20-2019, 07:50 PM #16049Senior Member
- Join Date
- Jan 2018
- Location
- Illinois
- Posts
- 277
Thanked: 47
Thanks!
That little black drill did most of the work (not sure what those are called). Once I got the pins drilled down far enough, then the collars and washers pop off on their own. Then I use the big cutters to snip off the ends of whatever brass rod is showing, then finally pull the cleaned up rod through with the smaller set of flush cutters. I had to take a file to it once or twice and got lucky- no marks. I'll remember the tape next time, good recommendation!
-
04-20-2019, 10:21 PM #16050Senior Member
- Join Date
- Jan 2018
- Location
- Illinois
- Posts
- 277
Thanked: 47
Well, this is going to one of those razors that has "character" and a few battle scars.
Removal of the devil's spit has revealed the pitting underneath. I'm going to keep sanding for now (I work by hand) but if I'm not seeing any progress I'll just leave it be. There's no spine wear and it has a tiny bevel so it should shave well.


 Reply With Quote