
Results 16,561 to 16,570 of 20602
 91550Likes
Thread: What are you working on?
 LinkBack URL
 About LinkBacks
-
07-01-2019, 07:47 PM #16561Senior Member


- Join Date
- Feb 2013
- Location
- Haida Gwaii, British Columbia, Canada
- Posts
- 14,457
Thanked: 4830
Walnut shell with some rouge from an old dried out block of polishing compound. I have no idea what it was before it got crushed and added to the mix but it was actually fairly red.
ScoutHikerDad and MikeT like this.It's not what you know, it's who you take fishing!
-
07-01-2019, 09:13 PM #16562Senior Member

- Join Date
- Jun 2015
- Location
- South Carolina
- Posts
- 1,838
Thanked: 516
I used the walnut. Then dripped in the polish. More polish than suggested by directions.
I've thought of trying various polishing compounds, or even adding abrasives.
A friend suggested that the polish is best one that will stick to the walnut, or the various materials will stratify within the container.ScoutHikerDad and RezDog like this.You must unlearn what you have learned.
Yoda
-
07-01-2019, 10:44 PM #16563Senior Member


- Join Date
- Dec 2018
- Location
- Gainesville, FL
- Posts
- 6,875
Thanked: 683
I don't think it was blued. I think it was just darkened from the forge. I don't know if these were forged and hammered but that was the look they were going for. I have one that I bought NOS and it was the same way but...NOS so you can see clearly that it was not blue but black. So in other words after the quenching they left the carbon darkening on the tang but did clean it off the blade. Originally Posted by JellyJar

Last edited by PaulFLUS; 07-01-2019 at 10:49 PM.
Iron by iron is sharpened, And a man sharpens the face of his friend. PR 27:17
-
The Following User Says Thank You to PaulFLUS For This Useful Post:
JellyJar (07-01-2019)
-
07-02-2019, 01:41 PM #16564Senior Member
- Join Date
- Dec 2018
- Location
- Gainesville, FL
- Posts
- 6,875
Thanked: 683
At least that's what it looks like. Maybe they did treat it with something but my guess is they either left that part rough after the quench or intentionally darkened it that way and added some hammer marks. It seems a little precise to have been hammered out but maybe they just left that one spot in the rough. I don't know for sure but It looks cool that way. Originally Posted by PaulFLUS
ScoutHikerDad likes this.Iron by iron is sharpened, And a man sharpens the face of his friend. PR 27:17
-
07-02-2019, 02:11 PM #16565Senior Member
- Join Date
- Dec 2018
- Location
- Gainesville, FL
- Posts
- 6,875
Thanked: 683
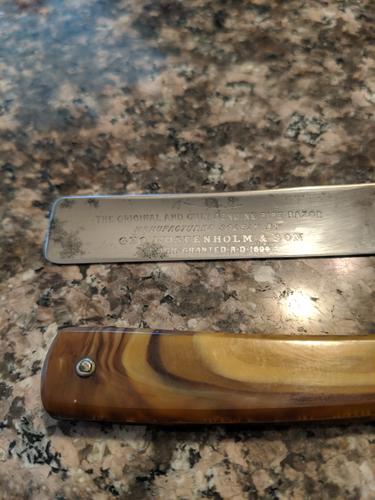
I have this old George Wosthenholm and Son Pipe Razor that came in a lot that I've been working on.
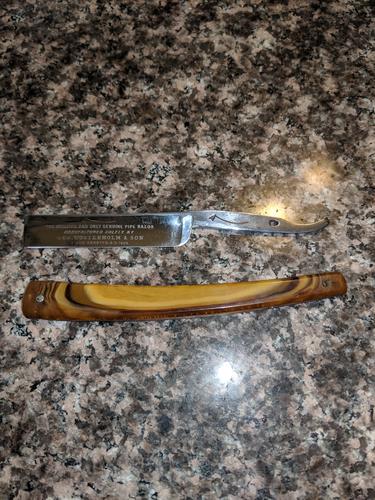
It had a very pronounced frown which took a lot of work to get out. The geometry of the blade was way out of whack. I had to relieve the stabilizer some and rework the spine a little. Someone did a really crappy attempt at restoration once (at least) before. Maybe they warped it or maybe it was already like that. Who knows?
I don't know if these faux tortoise shell scales are original or not but I like them. I I'm inclined to think they are original or it's been restored more than once because you can see file marks on the scales where they removed the pin. The pin they replaced it with was horrible, all bent and twisted and one of the discs was missing. What a mess!
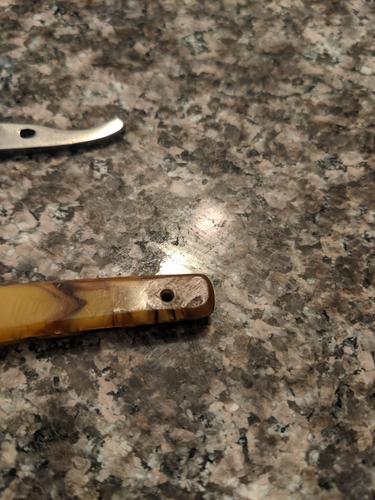

Say, does anyone have any tricks for deep pitting like this?
I've got one I bought on eBay restored a long time ago that looks like there is some kind of filler or something. I don't want to do that because it looks kind of weird and I was a little afraid to shave with it because it almost looked like a coating on the blade.Iron by iron is sharpened, And a man sharpens the face of his friend. PR 27:17
-
07-02-2019, 02:50 PM #16566Senior Member
- Join Date
- Feb 2013
- Location
- Haida Gwaii, British Columbia, Canada
- Posts
- 14,457
Thanked: 4830
To actually remove the pitting you must remove all the surrounding steel to s the same depth as the bottom of the pitting. That is often a tall order. If you want to simply remove the black rust from the pitting steel wool and WD-40 works well, followed by steel wool and polish, followed by polish. It does take a fair amount of elbow grease. 0000 is the finest steel wool and it works well, leaving very fine scratch pattern.
There are some blades out there that were plated. It was not popular though so there are not many out there. Perhaps the blade you have was plated and not filled.ScoutHikerDad likes this.It's not what you know, it's who you take fishing!
-
07-02-2019, 03:04 PM #16567Senior Member
- Join Date
- Dec 2018
- Location
- Gainesville, FL
- Posts
- 6,875
Thanked: 683
I'm just starting to use steel wool more but haven't really quite gotten the hang of that yet. Although as I said before I've used it with Hoppes to take surface rust off of gun barrels. I still don't have polish either. I need to stop and get some. to polish I've just been using the buffing wheel with rouge and then a loose cotton wheel. I have been able to get dark spots bout of the pitting before using the buffing wheel but I don't like to lean on it that hard. It further complicates issues that this blade is engraved or stamped, whatever that is.I might just get them clean and leave the pits. I don't want to sand/grind it down that far. Originally Posted by RezDog
You know, I was going to edit that post and say that maybe that blade had been plated because It looks like pits were filled and then it was plated over.ScoutHikerDad likes this.Iron by iron is sharpened, And a man sharpens the face of his friend. PR 27:17
-
07-02-2019, 04:37 PM #16568Senior Member


- Join Date
- May 2010
- Location
- Upstate South Carolina
- Posts
- 3,308
Thanked: 987
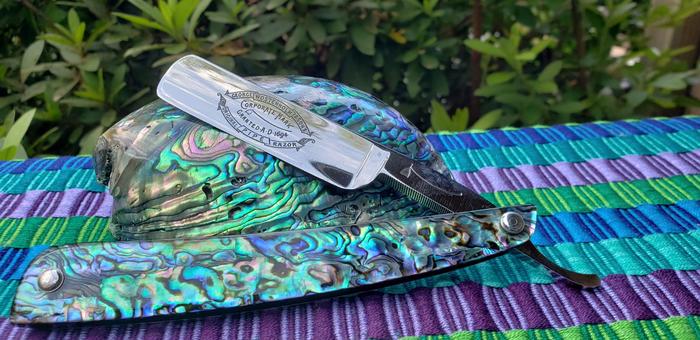
Paul-I LOVE those Wosty Pipes with the blade-face etch. I've got a nice one myself. I agree with Shaun that trying to get all of that pitting out will probably not be the best idea; note how one patch goes all the way to the edge under the "GEO" in the etch. You would lose some of your etched face (and probably some of the integrity of the grind) getting that out. But as Shaun said, WD-40 and polish with 0000 steel wool is your friend. Don't be afraid to dig in and work it either; the result will be a beautiful razor with some character marks that we all appreciate and understand. And many a razor with nice square corners and sharp delineations between spine and blade have been rounded or "melted" by someone being too agressive on a buffer (did that on a few of my early ones before learning better). As for polish, Mothers, Mass, or Flitz are good, and usually available at your local auto parts store. I also ordered and have been using the Wenol Blue "Ultrasoft" for a fine final polish, and like it very much. There is a red tube Wenol that is more aggressive that I am about to try. We look forward to seeing the finished product in any event. Originally Posted by PaulFLUS
Gratuitous Wosty Pipe pic with etched blade face:
 There are many roads to sharp.
-
07-02-2019, 04:55 PM #16569Senior Member
- Join Date
- Dec 2018
- Location
- Gainesville, FL
- Posts
- 6,875
Thanked: 683
Nice razor. What are those scales, abalone or a faux ? Originally Posted by ScoutHikerDad
I've already lost some width. I'm thinking I might reshape the point into a French or maybe just back to round. I think a French point would look good with the tortoise. Besides it already looks a little like it with the wear it has.Iron by iron is sharpened, And a man sharpens the face of his friend. PR 27:17
-
07-02-2019, 05:25 PM #16570Senior Member
- Join Date
- May 2010
- Location
- Upstate South Carolina
- Posts
- 3,308
Thanked: 987
The scales are called ALVS (Abalone Laminate Veneer Sheets). Basically it's a thin veneer of paua abalone sandwiched between a base of black and clear acrylics. I tried making my own with epoxy, and wasn't satisfied with the results-the veneer sheets are much more practical! If you're reshaping and grinding steel, I assume you know a little about metallurgy, heat treats and tempers, and keeping things cool while working? That's a little above my pay grade (or at least I haven't tried too much of it yet). Slow and easy does it-the more experienced metal guys might chime in with some tips. Originally Posted by PaulFLUS
PaulFLUS likes this.There are many roads to sharp.


 Reply With Quote