
Results 19,271 to 19,280 of 20574
 91475Likes
Thread: What are you working on?
 LinkBack URL
 About LinkBacks
-
03-04-2021, 01:36 PM #19271Senior Member


- Join Date
- Jan 2011
- Location
- Lorton, VA
- Posts
- 349
Thanked: 153
Beautiful job on the reshape of the blade and restoration of the scales. Hair dye works perfectly on epoxy mixed with horn. What kind do you use? I have had success with a product called Bigen out of Thailand. Available on the bay for $6. Good stuff. Now to select proper collars for that beauty. Originals saved?
-
The Following User Says Thank You to ajkenne For This Useful Post:
PaulFLUS (03-04-2021)
-
03-04-2021, 04:36 PM #19272Senior Member


- Join Date
- Dec 2018
- Location
- Gainesville, FL
- Posts
- 6,691
Thanked: 675
Good tip, thanks. I was going to make a post about it start to finish when I'm done. But I used a mixture of charcoal dust and wood dust to match the color. Actually one of the collars was missing so I was going to use the ones that I bought from you off the bay. Originally Posted by ajkenne

Last edited by PaulFLUS; 03-04-2021 at 04:39 PM.
Iron by iron is sharpened, And a man sharpens the face of his friend. PR 27:17
-
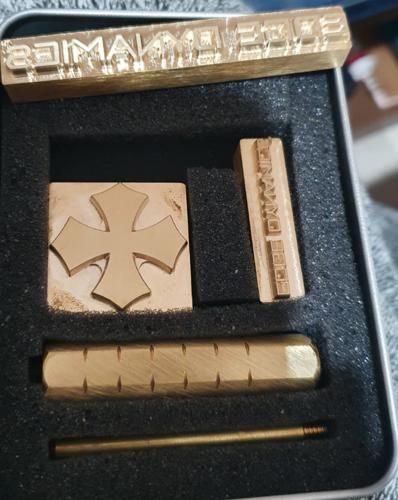
03-12-2021, 10:38 AM #19273www.edge-dynamics.com

- Join Date
- Feb 2013
- Location
- London
- Posts
- 3,066
Thanked: 512
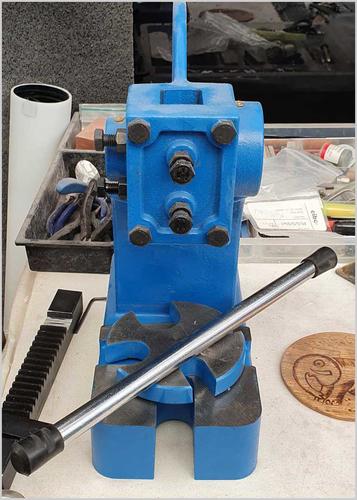
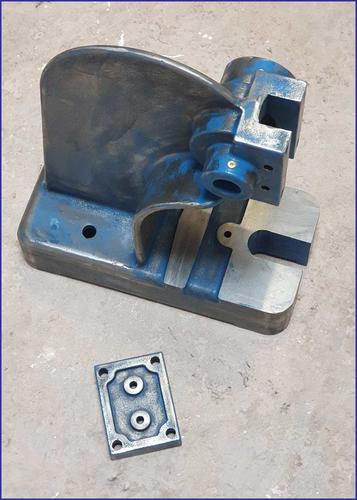
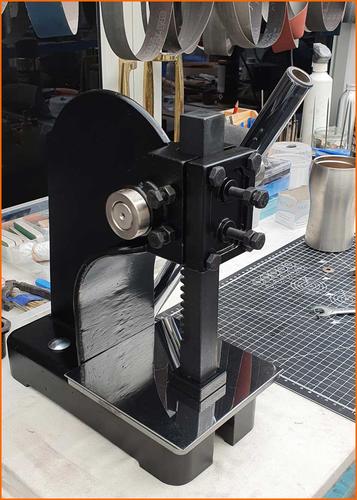
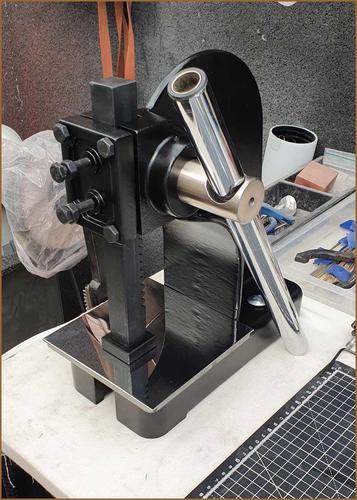
Got myself an Arbor press and made some modifications .
Bored out the lever arm hole to 29mm that way i could use a larger bar and get more power behind my pressing. The bar was the spine from my Dremel drill press, finally it has a use now.
Grinded off two teeth from the top of the ram, this allows the arm to be positioned as needed.
Purchased a 4x4cm magnetic ram head attachment for a wider distribution of press force.
Attached some bottom plates to press onto instead of the circular jobby that comes with.
Finally, coated the press with a tough non chip black spray to give it that next level super cool look :/
-
03-12-2021, 11:54 AM #19274Senior Member


- Join Date
- Mar 2015
- Location
- Akron, Ohio
- Posts
- 12,112
Thanked: 4314
So what's its use...?
JOB15 likes this.Mike
-
03-12-2021, 06:28 PM #19275www.edge-dynamics.com
- Join Date
- Feb 2013
- Location
- London
- Posts
- 3,066
Thanked: 512
Oh..for stamping leather with my Edge Dynamics logo on razor sheaths & strops ....And anything i see fit to squash. Originally Posted by outback
Last edited by JOB15; 03-12-2021 at 06:30 PM.
-
03-12-2021, 10:23 PM #19276Senior Member
- Join Date
- Jan 2011
- Location
- Lorton, VA
- Posts
- 349
Thanked: 153
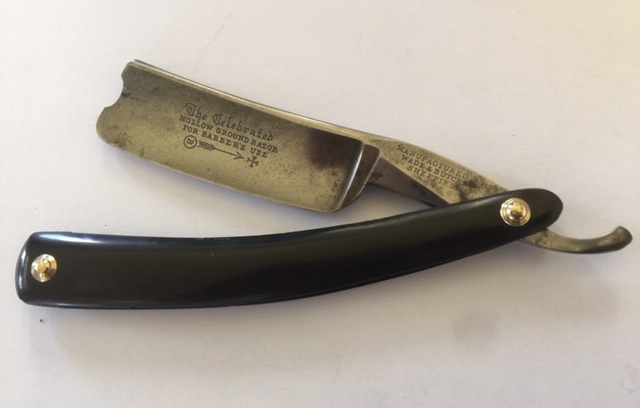
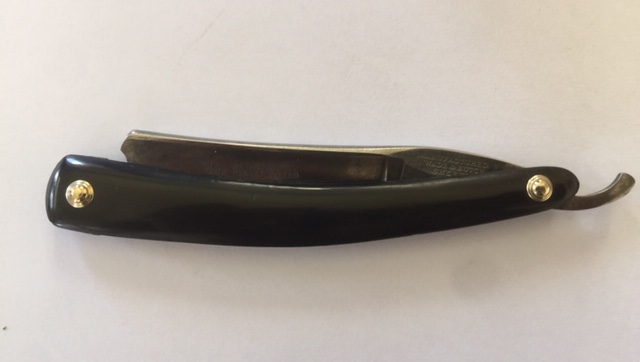
Just finished up the scale restoration on this Wade & Butcher FBU 17/16. Had some significant bug bites and delamination but thought they were worthy of restore. Used the “outback method” mixing dark horn with epoxy, sanding then soaking in black hair dye, then soaking in neatsfoot oil. Believe they turned out nicely, and happy to save the original scales. Not able to save brass Bullseye original washers, so will use the large Beehive replicas sanding them down to 1.8mm. Seems to give it a better profile. Polished up the blade a bit removing some oxidation but left some patina to show its age. Will put it back together tonight. Pivot washers are from Terry Bruton, his are the best.
Last edited by ajkenne; 03-13-2021 at 04:45 PM. Reason: Add photos
-
03-13-2021, 12:12 AM #19277'with that said'

- Join Date
- Aug 2010
- Location
- Walla Walla in WA State USA
- Posts
- 11,254
Thanked: 4238
I've got a 1 ton Harbor Freight Arbor Press and I've been thinking about doing some mods to it. Originally Posted by JOB15
I've read about grinding the two teeth off but------I'd hate to lose some of the flexibility of the ram. I found this a bit interesting and you could keep the teeth. While not Rock Solid, it should allow things to stay in place unless things were forced.
Our house is as Neil left it- an Aladdins cave of 'stuff'.
Kim X
-
03-13-2021, 02:55 AM #19278Senior Member
- Join Date
- Sep 2020
- Location
- Austin, TX
- Posts
- 653
Thanked: 56
Anyone have advice on installing a pivot washers and blade in a pair of scales that are epoxied together? My best idea so far has been to run thread through everything and pull it together. But that was also complicated and I think needs two people. Maybe contact cement the washers to the blade?
Another thought is, how important are pivot washers? I figure pretty important to keep things aligned long term and to help drying.
I guess another option is to cut them apart and make a new wedge.
Anyway, before a recruit extra hands or do something stupid, figured I'd run it by yall. Thanks.If you're wondering I'm probably being sarcastic.
-
03-13-2021, 03:33 AM #19279'with that said'
- Join Date
- Aug 2010
- Location
- Walla Walla in WA State USA
- Posts
- 11,254
Thanked: 4238
I would presume that you are talking about scales that have the wedge built into them and the scales are glued together at the wedge end. Originally Posted by planeden
I've worked with several and I've never found a need to separate them. I did work on a razor for my good friend Ski and the scales had come unglued and I simply used a glue rated for plastic to put them back together.
While Ski's razor originally didn't have friction washers I did put thin brass shims in and once pinned back together the blade sat properly.
I hope this has been of some help.Our house is as Neil left it- an Aladdins cave of 'stuff'.
Kim X
-
The Following User Says Thank You to cudarunner For This Useful Post:
planeden (03-13-2021)
-
03-13-2021, 03:47 AM #19280Senior Member
- Join Date
- Sep 2020
- Location
- Austin, TX
- Posts
- 653
Thanked: 56
Sorry, I wasn't clear. Yes, bought scales and the wedge end is bonded together. I am trying to figure out how to get the pin to get everything to line up to get the pin through when I can't reach in between the scales to shift things around. Originally Posted by cudarunner
Usually I stand my pin up and just drop scale, washer, blade, etc. on the pin. To be fair I find stacking all this together to be the most difficult and frustrating part of restoring even when I can reach everything. Bunch of fine movements with tiny parts and my big dumb fingers .
If you're wondering I'm probably being sarcastic.
.
If you're wondering I'm probably being sarcastic.


 Reply With Quote