
Results 5,391 to 5,400 of 20516
 91320Likes
Thread: What are you working on?
 LinkBack URL
 About LinkBacks
-
11-06-2016, 03:30 PM #5391Senior Member


- Join Date
- Mar 2015
- Location
- Akron, Ohio
- Posts
- 11,973
Thanked: 4304
From the pic, I would say all it needs is a light cleaning. Start with just a metal polish, like Never Dull, then move to something more aggressive like flitz or Maas. then steel wool and WD-40. Last resort... "Sand paper"!! But that's JMO
Mike
-
11-06-2016, 03:31 PM #5392Member
- Join Date
- Oct 2016
- Posts
- 42
Thanked: 5
Great project and gift for your son. I would leave the blade as is. Keep the engraving if at all possible. Originally Posted by TheGeek

Tom
Sent from my iPhone using TapatalkHaroldg48 likes this.
-
11-06-2016, 03:36 PM #5393
Try "outback's" solution first.... Originally Posted by TheGeek
I would suggest that you would use a sanding film around a wine cork. My reasoning and experience is that the film does not flex into the etch. and I have done quite a few. Use either water or a bit of liquid soap...you may use WD-40 if you wish.The blade looks good to start with 600 grit or so. do one set of sandings along the blade and the finals across the blade, edge to spine..
However you do it keeping the swarf from sloping the side walls of the etch is important. That is why I like liquid soap so I can rinse the blade and abrasive, often.
Buff carefully, by hand with a good car polish or what you normally use for a final glow on your previous projects!
Have fun!
~Richard
-
The Following User Says Thank You to Geezer For This Useful Post:
1oldDago (11-11-2016)
-
11-06-2016, 04:08 PM #5394Fizzy Laces Connoisseur
- Join Date
- Dec 2009
- Location
- Scotland
- Posts
- 1,553
Thanked: 227
Thanks for the replies guys. I had a chat with the wife as well and she agrees to leave it as is for this one. Geezer I do like that idea though so gonna keep it for a future restore.
Spent the wee while reshaping the scales and wanted to get a rough idea of how it will look.

looks like a good fit. Needs a lot of finishing and a spacer though
Sent from my LG-H850 using Tapatalk
-
11-06-2016, 04:57 PM #5395Senior Member

- Join Date
- Dec 2011
- Posts
- 173
Thanked: 25
Little update on my Fred Reynolds. Mirror polish/leather scales all cleaned up. This one wasn't so bad but a lot of deep scratches on the front that i sanded out. Just going to repin and hone it now. Waiting for my order from Maggards to come in with my scale blanks to finish my American eagle W&B next.


Sent from my iPhone using Tapatalk
-
11-06-2016, 05:13 PM #5396Historically Inquisitive

- Join Date
- Aug 2011
- Location
- Upstate New York
- Posts
- 5,780
- Blog Entries
- 1
Thanked: 4249
Very nice work, cool that you kept the leather scales.
-
11-06-2016, 05:43 PM #5397Senior Member


- Join Date
- Jan 2013
- Location
- Communist State of California
- Posts
- 1,461
Thanked: 463
In my opinion those scales are way too long for that blade. I'm not trying to criticize, but you may want to consider shortening them before finishing. Originally Posted by TheGeek
I think this project is very cool. Two generations making a set for the third. How awesome is that?
-
11-06-2016, 05:48 PM #5398Fizzy Laces Connoisseur
- Join Date
- Dec 2009
- Location
- Scotland
- Posts
- 1,553
Thanked: 227
Constructive criticism is always wecome. Always. I think the image I posted had the blade sitting not quite right as there was no pin. So I will mock up a wedge from some wood I have kicking around and see how it looks. Originally Posted by BeJay
Geek
Sent from my LG-H850 using TapatalkBeJay likes this.
-
11-06-2016, 11:30 PM #5399'with that said'


- Join Date
- Aug 2010
- Location
- Walla Walla in WA State USA
- Posts
- 11,158
Thanked: 4230
Well after servicing my front forks of my HD I lowered the bike down and when I slid the Harbor Freight Lift out the rubber pad on one side slid off.
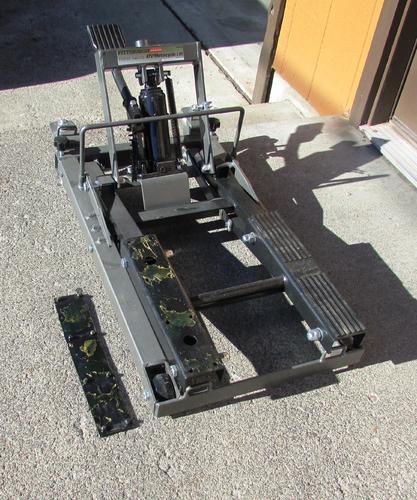
So I went about cleaning off the Made by the C. H. Ina Companies 'adhesive'. A little paint thinner did the trick.
I then used Barges Adhesive (contact cement) to re-install the rubber pad. I did run into a small problem as the rubber nibs wouldn't go though the holes by just hammering on them with the rubber mallet/so I used the ball end of a ball peen hammer on top and punched them in with the rubber mallet. Then all of the rubber was hammered down with the rubber mallet and I think I got a real good contact.
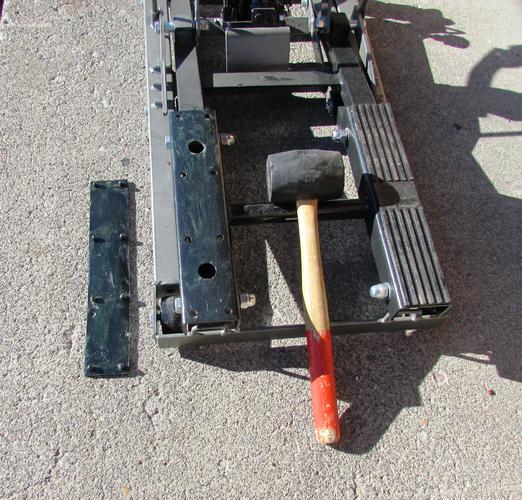
All is well now!
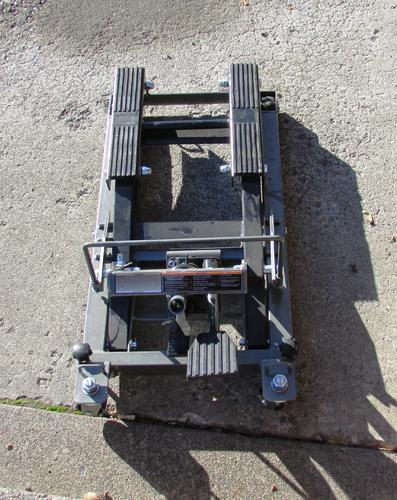
Well all is well until the other side slides off, but I'll deal with that when the time comes!
Last edited by cudarunner; 11-07-2016 at 01:18 AM.
Our house is as Neil left it- an Aladdins cave of 'stuff'.
Kim X
-
11-07-2016, 05:32 AM #5400Fizzy Laces Connoisseur
- Join Date
- Dec 2009
- Location
- Scotland
- Posts
- 1,553
Thanked: 227
Put together a quick cardboard wedge to see it all together and I think I agree. I'm going to take them back to just before the pin hole and reshape the end. Originally Posted by BeJay
Geek
Sent from my LG-H850 using Tapatalk


 Reply With Quote

