
Results 18,611 to 18,620 of 20602
 91550Likes
Thread: What are you working on?
 LinkBack URL
 About LinkBacks
-
06-29-2020, 01:32 PM #18611Incidere in dimidium


- Join Date
- Mar 2012
- Location
- Val des Monts, Quebec
- Posts
- 4,070
Thanked: 1440 Argon is heavier than air - could you not just pour out what you need and fill the top of the can containing the left overs with argon?
 Originally Posted by 32t

From the fair warning dept.: I have absolutely no idea if that would work. I do like the marble/ball bearing idea too.ScoutHikerDad and 32t like this.
It was in original condition, faded red, well-worn, but nice.
This was and still is my favorite combination; beautiful, original, and worn.
-Neil Young
-
06-29-2020, 01:55 PM #18612Senior Member

- Join Date
- Apr 2012
- Location
- Diamond Bar, CA
- Posts
- 6,553
Thanked: 3215
Bloxygen, Argon gas in a can. About $10. They claim it can lengthen some paint or finish up to 10 years of more.
ScoutHikerDad and Cangooner like this.
-
06-29-2020, 02:00 PM #18613Senior Member

- Join Date
- Dec 2006
- Location
- Burkburnett TX
- Posts
- 3,100
Thanked: 2392
I have used this stuff with finishes that dry by oxidation, it worked pretty well. I have also poured a layer of mineral spirits on top of oil based finishes when putting them up for storage this works well also but does not last as long. Originally Posted by Euclid440
-
06-29-2020, 02:53 PM #18614Senior Member


- Join Date
- May 2010
- Location
- Upstate South Carolina
- Posts
- 3,308
Thanked: 987
One of the more well-known woodworkers said in a video that he had thrown out more oil-based finishes over the years than he has used, and he's a professional! Being just an occasional hobbyist, I just try to buy smaller amounts. One trick that works with TruOil (at least for awhile) is to just poke a pin-hole in the foil seal in the bottle. Of course you can't do that with a metal paint jar.
There are many roads to sharp.
-
06-29-2020, 03:13 PM #18615Senior Member
- Join Date
- Jun 2014
- Location
- Eastern Washington State USA
- Posts
- 406
Thanked: 59
Okay, these are really cool. Why didn't I check this thread out earlier? This is a way better practice option than buying a worn out razor on ebay or a GD. I love the fact that they are not finished ground or heat treated. It's like all of the heavy lifting is done and just the fun parts are left! Originally Posted by randydance062449
-
06-30-2020, 04:38 PM #18616Senior Member
- Join Date
- Jun 2014
- Location
- Eastern Washington State USA
- Posts
- 406
Thanked: 59
I bought 4 of them for practice and examination (two of each color). One is going to my buddy as a gift.
-
07-02-2020, 08:45 PM #18617'with that said'


- Join Date
- Aug 2010
- Location
- Walla Walla in WA State USA
- Posts
- 11,260
Thanked: 4238
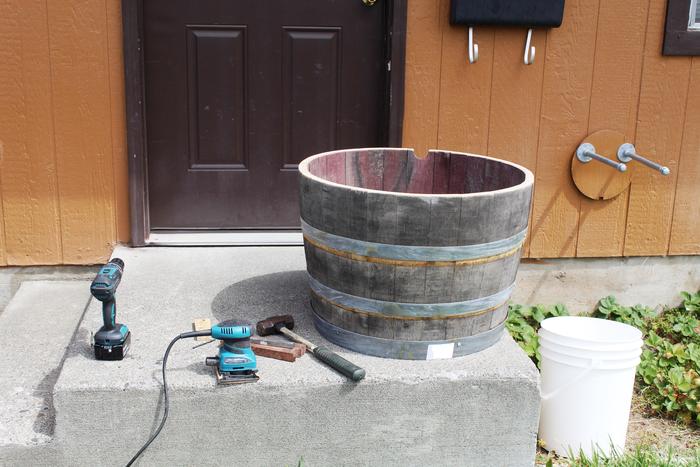
Not Razor related but here's my latest project.
It's for an old friend. She emailed asking me if I could pick up some wine barrel halves she wanted to use as planters for her yard. They were $20 each which she tells me was 1/2 of what they were in the Lewiston/Clarkston area. She lives in Pomeroy and there's not much for shopping options.
Turns out the guy selling them was less than a 4 blocks from me. I managed to get the 5 half barrels in the back of my Cherokee AND get the rear hatch closed. Once home into the garage/shop they went.
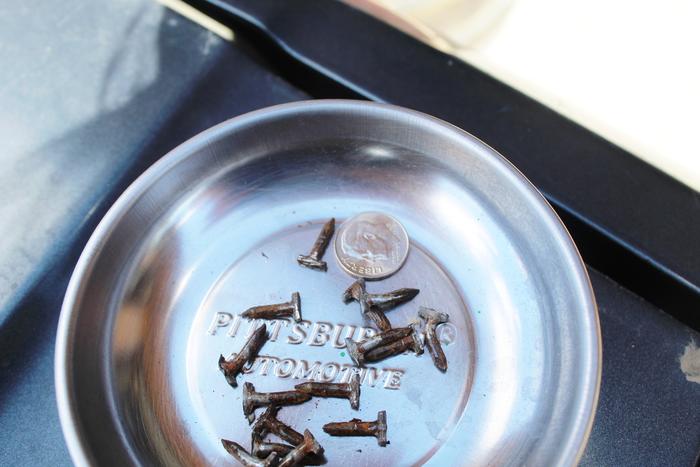
I could see that they were well dried out and in fact some of the barrels were close to falling apart. I KNEW that if I just took them to her as they were she'd just fill them with soil and once the little nails rusted through that they would fall apart.
Here's how most of the barrels were as far as tightness--
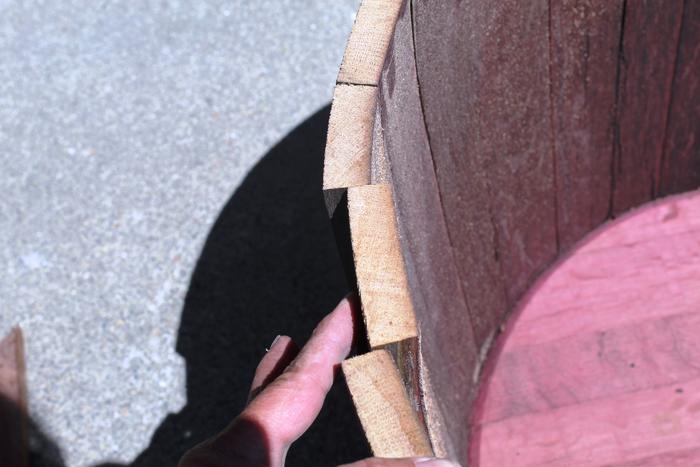
All of the hoops were held in place with six of these 1/2" long nails/one to each hoop 180 degs from each other.
After pulling all of the nails and using a 3# sledge and a piece of 6" long 1/2"X1/2" square piece of key stock as a punch to drive the hoops down solid I drilled out the holes in the hoops and then ran 3/4" long #10 flat head sheet metal screws to hold it all in place.
I used 60 grit Garnet Sandpaper around the cut edges to smooth them up and help prevent splinters.
The barrels are made of oak which isn't the most rot resistant wood out there and I figure that the wood will rot away before those screws do.
I'll take the barrels to her when I get a chance. I"m dog sitting for my oldest this weekend so maybe after they get back I can take them up next week.Our house is as Neil left it- an Aladdins cave of 'stuff'.
Kim X
-
07-02-2020, 11:31 PM #18618Senior Member

- Join Date
- Sep 2016
- Location
- Silicon Valley
- Posts
- 465
Thanked: 113
I love wine barrel planters and have used them for years. I used to be able to pick them up localy for 15-20 bucks no problem. Now they sell for 40 in wine country and 60 localy. They are so popular now my two spots have dried out. Now I have to buy a whole used barrel and cut it myself but I liked cuda's idea and will give it a go on my next pair of planters. Thanks for sharing!
-
07-02-2020, 11:56 PM #18619'with that said'
- Join Date
- Aug 2010
- Location
- Walla Walla in WA State USA
- Posts
- 11,260
Thanked: 4238
I hope my idea does work. Years ago my mother dragged some 1/2 barrels home, filled them with soil and put flower plants in them. It didn't seem to take long for the nails to rust through and the barrels fell apart. Originally Posted by Toroblanco
The corporate grocery chain that I made a career with (Safeway) used to bring in whole whiskey barrels and I'd have to cut them in half with my skill saw. As hard as I tried I couldn't get the cut to end up close to where I started. Finally the company got smart and had the barrels pre-cut. Whoever was doing the cutting always got the cut to within 1/8 of an inch of where they started. These barrels are cut very similar.ScoutHikerDad and Toroblanco like this.Our house is as Neil left it- an Aladdins cave of 'stuff'.
Kim X
-
07-03-2020, 12:15 AM #18620Senior Member


- Join Date
- Dec 2018
- Location
- Gainesville, FL
- Posts
- 6,878
Thanked: 683
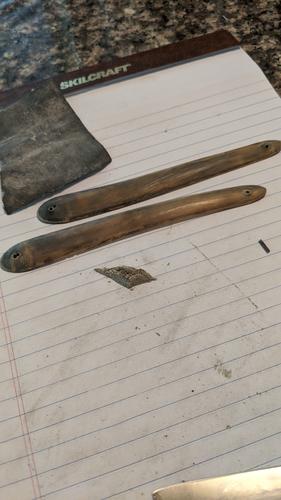
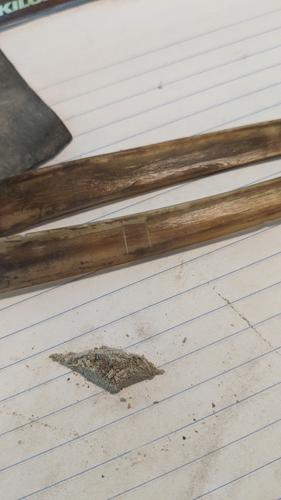
Working on the WB wedge. The scales made such a dramatic turn around I just can't believe it. I mean, horn always does. That's one of the cool things about it, but these went from blah to spectacular.
Before:
After:

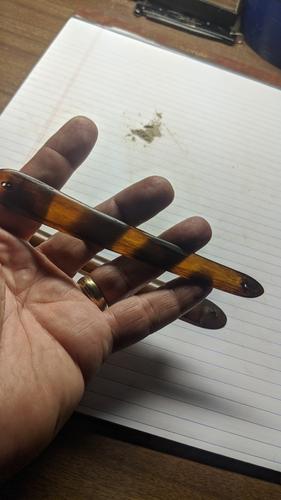
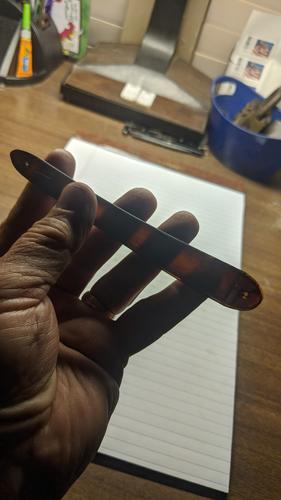
I sanded them lightly to preserve the old look, dyed them with hair dye which did almost nothing to the color then dyed them in dark brown Rit dye (on clearance by the way) then soaked in Neatsfoot for a couple of days. I'm pretty pleased with that. Still working on the blade. It looked like a wind chime case when I got it. I'll post more when it's together. I remembered to take the before, during and after pictures of each step with this one.Iron by iron is sharpened, And a man sharpens the face of his friend. PR 27:17


 Reply With Quote