
Results 4,111 to 4,120 of 20573
 91473Likes
Thread: What are you working on?
 LinkBack URL
 About LinkBacks
-
08-02-2016, 03:40 AM #4111
 Yep MikeT, ya gotta be very careful. I always tell people on here to practice on a junk blade first & ALWAYS know which way the tool is turning. If people aren't experienced using a Dremel, they need to practice first.............a lotta practice or just leave it alone if you are accident prone!
 Originally Posted by MikeT

Yep, I agree. You're kinda blending everything in................... Originally Posted by outback
-
08-03-2016, 05:57 PM #4112Member...


- Join Date
- Dec 2013
- Location
- Lakewood, WA
- Posts
- 845
Thanked: 305
It's not perfect but I got her profiled with in .008" of spine and cleaned up and ready for honing. There's oil on blade not scratches. Originally Posted by jmercer


I didn't un-pin this one for cleaning as you can see the pin is bent and looks like it was drilled wonky.
I don't have the skill level to fix this. I tried one before and had to fill holes in and re-drill several times before I got it close but not dead on.
...Shave the Lather...
-
08-03-2016, 07:16 PM #4113
J, if you have a bent pin, that would be an easy fix. I've had some like that, that came from the factory that way. I would re-pin it & it would close a lot better, usually perfect! I have one that the factory drilled the scales off, so I used a different set of scales but I kept those scales because all I need to do is fill 'em in & re-drilll 'em. They are a white color so I'll probably use baking soda & CA.
I'm working on my Harley. My battery was going bad so I got a new one. When I was tightening the negative cable on the ground stud, the stud broke so now I need to drill a hole somewhere to use a bolt for the ground connection but now my brother down the road called & wants me to go with him to get license tags for his car. I can sometimes never get my things done that I need to because he always wants me to go with him somewhere but he's diabetic so it's probably best. He fell out in Wal-Mart one day when I wasn't with him. His glucose level was way up there the day & the manager of the store was concerned. He's my best friend aside from my dog & I would much rather go with him but that is why I don't get much done at times. I'd do it for anyone though..............jmercer likes this.
-
The Following User Says Thank You to engine46 For This Useful Post:
azourital (08-16-2016)
-
08-03-2016, 09:48 PM #4114Senior Member

- Join Date
- Nov 2015
- Location
- Rio Rancho, New Mexico
- Posts
- 250
Thanked: 72
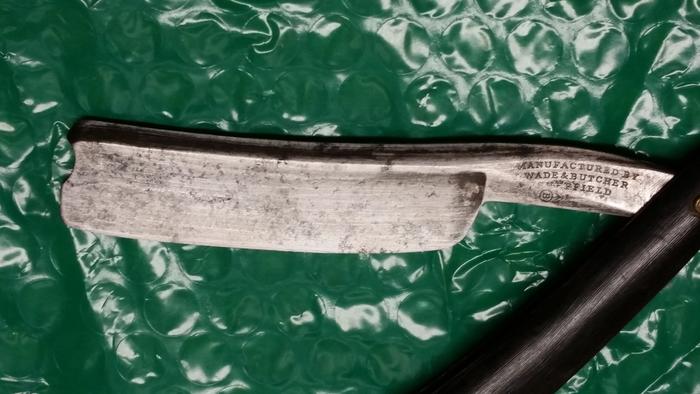
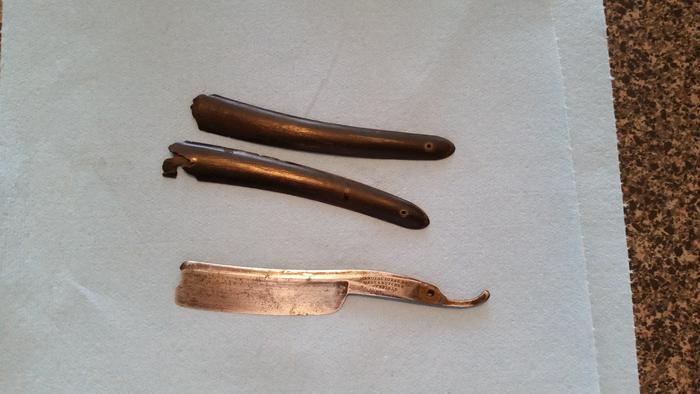
Well I've started what will be the most advanced project for me to date. I am the new owner of a nice 3/4 W&B near wedge. Blade seems straight and true. Not much active rust and a few small chips in the edge. I can see trace amounts of etching on the blade but its so far gone its unreadable.
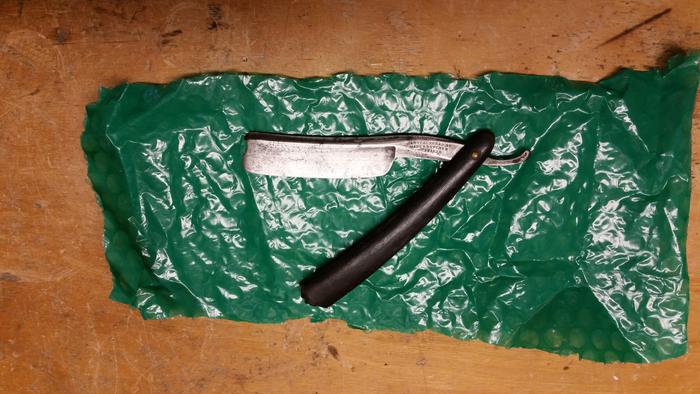
As you can see it will need a new set of scales. I will be making those(first time) out of some black horn from Maggard. Still undecided on wedge and pin/washer color. Im wanting to keep it close to period correct.
Today I started the tear down and initial cleaning to see what I had to work with.
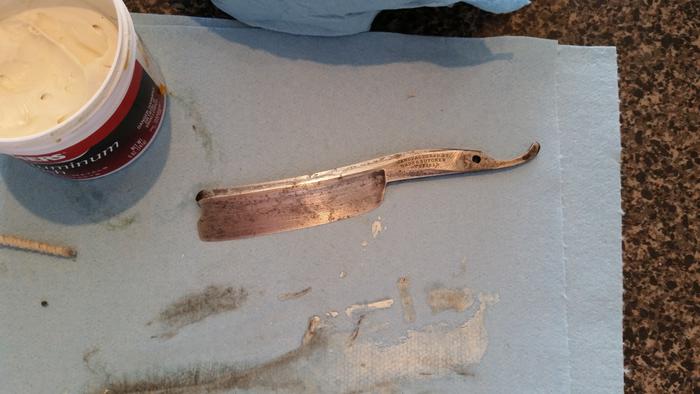
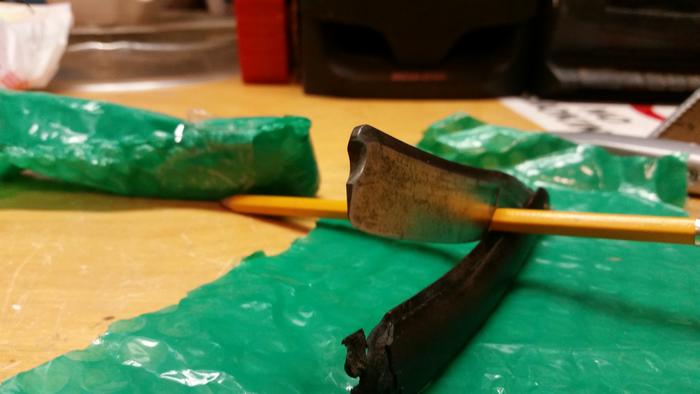
In series this is just unpinned, after some mothers mag polish and then after about 5 min hand sanding at 500 grit. You can see a lot of blemishes still remain. I have a new buffer however, I have zero flight hours on it and would hate to mess this one up so hand sanding will remain until I find time and a blade to break it in. I think I will be dropping down to 240 and work my way up to 1500 or so and then start to polish. It doesnt have to be perfect as I like a little character so I 'll play it by ear.
The most challenging part of this will be the scales. I've watched a few videos on the topic to get me started I'll just have to take it slow and be patient. Im really excited about this one as it will be the biggest blade and heaviest grind I've owned. Here's to success and a great shaver. Thanks for looking and I'll be posting updates as I move along.
Phil
-
The Following User Says Thank You to Phil129 For This Useful Post:
engine46 (08-04-2016)
-
08-03-2016, 10:35 PM #4115Member...
- Join Date
- Dec 2013
- Location
- Lakewood, WA
- Posts
- 845
Thanked: 305
Thanks for the tips. Originally Posted by engine46
Sorry I failed to have mentioned that it closes almost perfect as is. That is why I left it. The holes are off in addition to bent pin. One high one low. The bent pen seems to make up for the holes being off.
If it is a good shaver for me I will probably re-scale it. The scales have some dings and small cracks plus discoloration.
I like the cream color it is now. Were they white to begin with or cream?sharptonn likes this.Shave the Lather...
-
08-04-2016, 12:48 AM #4116
Originally Posted by Phil129
Well, I finally made it back after I wrote earlier. I just have to laugh. I know my friend well & had to make more stops before getting me back home. He's a good hearted fella though.
Phil, that is a beautiful blade! I don't think that is the ordinary W&B. I love the beveled spine along with the smile on it.Phil129 likes this.
-
08-04-2016, 12:57 AM #4117Senior Member
- Join Date
- Nov 2015
- Location
- Rio Rancho, New Mexico
- Posts
- 250
Thanked: 72
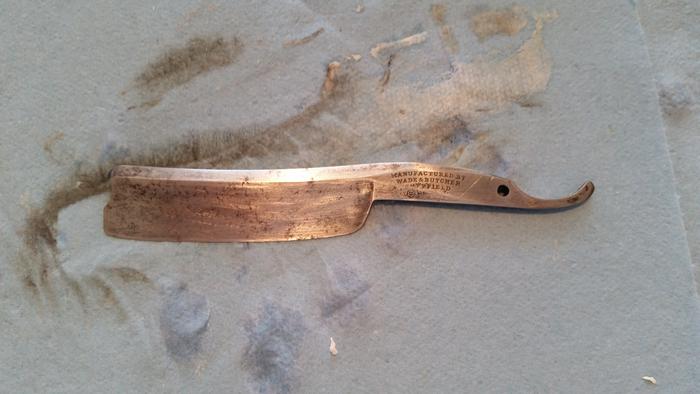
Thanks, I really dig that beveled spine as well. I'm hoping I can keep those lines nice and crisp while sanding. Been using different backers with my paper. I was very intrigued with the etch but I just couldn't get it to come through before I hit it with the sand paper, would like to have know what it said. Oh well. Gonna get back at it, had to drop down to 150 grit to get some of this deep pitting. Originally Posted by engine46
Sent from my SM-G900V using Tapatalk
-
08-04-2016, 01:15 AM #4118Senior Member

- Join Date
- Jun 2016
- Location
- NH
- Posts
- 1,924
Thanked: 1363
I like that you are sanding by hand. You will be able to keep the lines crisp and the contours correct. For me, a few different size dowels, a popsicle stick with one end cut square, and 1x1 or 1x2 inch leather chunks from an old belt are what I use the most for backers. Awesome blade!
-
08-04-2016, 01:17 AM #4119
[QUOTE=Phil129;1655886]Thanks, I really dig that beveled spine as well. I'm hoping I can keep those lines nice and crisp while sanding. Been using different backers with my paper. I was very intrigued with the etch but I just couldn't get it to come through before I hit it with the sand paper, would like to have know what it said. Oh well. Gonna get back at it, had to drop down to 150 grit to get some of this deep pitting.
Sent from my SM-G900V using Tapatalk[/QUOT
Yeah, once the etch is gone you might as well clean it up in progressions & take it easy on the bevels. If the pitting isn't too bad then it should clean up well.
-
08-04-2016, 01:22 AM #4120
Originally Posted by xiaotuzi
Exactly, in fact a popsicle stick came to mind when I was thinking or it. Anything is good as long as it is non metallic & has a nice flat edge..


 Reply With Quote