
Results 18,471 to 18,480 of 20573
 91473Likes
Thread: What are you working on?
 LinkBack URL
 About LinkBacks
-
05-16-2020, 09:15 PM #18471Senior Member


- Join Date
- May 2010
- Location
- Upstate South Carolina
- Posts
- 3,308
Thanked: 987
I love your razor drawer, Alan-color me envious!
So I'm going to mount that 14" long Dan's primitive black Arkansas in a walnut stand. My wife thinks I'm crazy-she is right. Anyway, after getting a nice piece of walnut from Ebay, I got a local woodworker friend to rout the channel for the hone and radius the sides. I intentionally got a piece about 7" longer than I needed for some matching scale blanks and brush handles for matching sets (a later project). Based on his advice, I got some MirrorCoat black epoxy to set it in permanently.
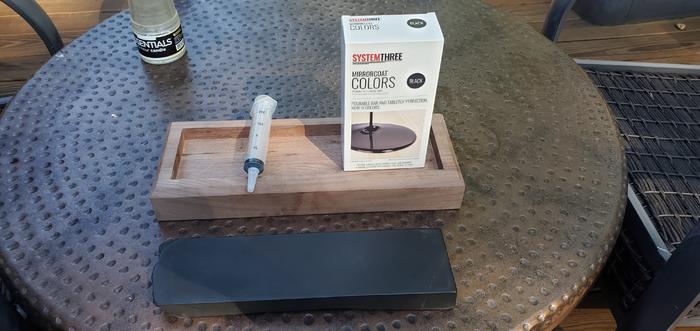
Though I have used small amounts of 2-part epoxy for years on wedges and what-not, I have never done an epoxy "pour" before. I know I've got one chance to get this right, so I've read up, watched some YouTube videos, etc.
So the plan is to test-fit, level, and glue in wooden shims 1st before starting the pour, then mask it off with tape around the opening. To lessen bubbles: warm up epoxy as well as all tools and materials, wooden base and hone. Stir, mix very slowly and gently. Once epoxy is mixed, pour about 1/3 full and gently place/position hone in it, then level, and use a syringe to inject the rest around the perimeter and under the lip. Fill to level with just a hint of meniscus depending on viscosity. Cover with plastic bin until tack free and hard.
My woodworker friend suggested that I do the pour in 2 batches to avoid over-heating. Any experienced epoxy pourers want to weigh-in here? TIA for your thoughts.
Oh, and when it's done, it's getting a hand-rubbed TruOil finish, rubber pads on the bottom, and a spot on the coffee table where I can hone while watching tv!There are many roads to sharp.
-
05-16-2020, 09:29 PM #18472Str8Faced Gent.


- Join Date
- Aug 2013
- Location
- Orangeville, Ontario
- Posts
- 8,456
- Blog Entries
- 1
Thanked: 4207
Thats going to be a nice base, love walnut.
Use a lot of epoxy and alumilite up here and my $0.02 is do not preheat the stuff as heat is the activation and you will shorten the working life, and possibly have more bubbles entrapped than if you let it chemically get up to heat on its own reaction.
Make sure there are channels under the stone so the epoxy can flow and fully grip and encapsulate the bottom of the stone. Injection from the low side with it tipped slightly askew will allow the venting as you plan.
Good luck on the pour cause yup, only one shot.
Have an extra job ready to get poured so the extra you will have mixed wont be to waste.
If everything fits tight Id be surprised if you need more than an Oz of finished epoxy to fill that base..
Cheers.."Depression is just anger,, without the enthusiasm."
Steven Wright
https://mobro.co/michaelbolton65?mc=5
-
The Following User Says Thank You to MikeB52 For This Useful Post:
ScoutHikerDad (05-16-2020)
-
05-16-2020, 10:47 PM #18473
FWW Almost all of my antique mounted stones including a few Coticules were bedded in plaster of Paris, the opening of the wood was tight. Thinner stones especially, were which made setting a tapered stone simpler. It certainly makes it easier to safely remove the stone by soaking and wiggling.
JMHO
-RichardBe yourself; everyone else is already taken.
- Oscar Wilde
-
The Following 2 Users Say Thank You to Geezer For This Useful Post:
32t (05-18-2020), ScoutHikerDad (05-17-2020)
-
05-17-2020, 12:11 AM #18474Skeptical Member


- Join Date
- Nov 2016
- Location
- Colorado Springs
- Posts
- 10,548
Thanked: 2194
Good luck Aaron. Shimming? So do you have some little bits to set in the bottom so when the stone sits in it sits level? So there will be a gap to fill? Im with Mike on the warming. Im no pro with any type of epoxys but heat does sound like it would shorten the setting time. Not so sure thats a good thing.
 ScoutHikerDad and MikeB52 like this.It's just Sharpening, right?
Jerry...
-
The Following User Says Thank You to Gasman For This Useful Post:
ScoutHikerDad (05-17-2020)
-
05-17-2020, 12:13 AM #18475Senior Member
- Join Date
- May 2010
- Location
- Upstate South Carolina
- Posts
- 3,308
Thanked: 987
Wow, thanks Mike-I got the pint and a half size so that I would have enough; I guess I'll have enough. So don't pre-warm-check. I got a needle and a butane torch if I have to pop any bubbles around the edges-not really sure what to expect bubble-wise, but since most will be covered by the hone, I'm not too worried about them.
Richard-I thought about plaster, but gradually warmed to the idea of epoxy (especially after discovering the black-colored!). I don't guess I'll be taking it out lol!
Jerry-I have wood-glued in some shims, and it sits stable and level all the way around. Will let that dry and probably do the deed tomorrow.Last edited by ScoutHikerDad; 05-17-2020 at 12:21 AM.
There are many roads to sharp.
-
05-17-2020, 02:47 AM #18476Senior Member

- Join Date
- Dec 2018
- Location
- Gainesville, FL
- Posts
- 6,612
Thanked: 670
Amen to that brother! Originally Posted by AlanQ
 Iron by iron is sharpened, And a man sharpens the face of his friend. PR 27:17
-
05-18-2020, 12:35 AM #18477Senior Member

- Join Date
- Feb 2019
- Location
- Salida, CA
- Posts
- 600
Thanked: 94
I took The Mois for a spin this morning with the microbevel off my primitive ark with soap and water. Whooo! It's been a struggle to not facerbate. I'll try oil next, but the microbevel trick is staying in my bag. I feel like I'm getting better with the honing thing - you guys have been a great help
 .
.
SHD: Nice mount for your ark. The walnut will look great next to that giant black stone. Looking forward to seeing the final outcome.O'Toole's commentary on Murphy's Law: Murphy was an optimist.
-
The Following User Says Thank You to JellyJar For This Useful Post:
ScoutHikerDad (05-18-2020)
-
05-18-2020, 03:52 PM #18478Senior Member
- Join Date
- May 2010
- Location
- Upstate South Carolina
- Posts
- 3,308
Thanked: 987
Thanks, JJ-Good to hear you're getting that primitive dialed in! I am actually thinking about getting Steve at Dan's to look out for me a big white primitive trans that I can mount in a black wood like ebony or African blackwood. I can have one in every room haha! (The wife will kill me). Originally Posted by JellyJar
I did the pour with that black epoxy and mounted it yesterday morning, and am now waiting for it to cure completely-still slightly gummy. It was actually easier than I expected to do. Problem is, I used up ALL of that epoxy, as that stone has a long, concave underneath that took a lot of filling. I ended up about 1/8" from flush to the side, so I had to order some more to fill in around the edges and the remaining space under that concave side. I just have to be patient. I'll annoy you guys with another pic when done.There are many roads to sharp.
-
05-18-2020, 05:22 PM #18479Senior Member

- Join Date
- Feb 2013
- Location
- Haida Gwaii, British Columbia, Canada
- Posts
- 14,448
Thanked: 4829
Pics are great A-A-Ron.
Having extra when the new batch comes in simply means you will have to invent a project to use the rest of in on. Of course you could trim that 1/8” off of the wood so the epoxy is flush.
Nice to hear honing is improving and you have a new arrow in your quiver.It's not what you know, it's who you take fishing!
-
05-18-2020, 10:16 PM #18480Senior Member
- Join Date
- Sep 2009
- Location
- Plymouth, UK
- Posts
- 313
Thanked: 19
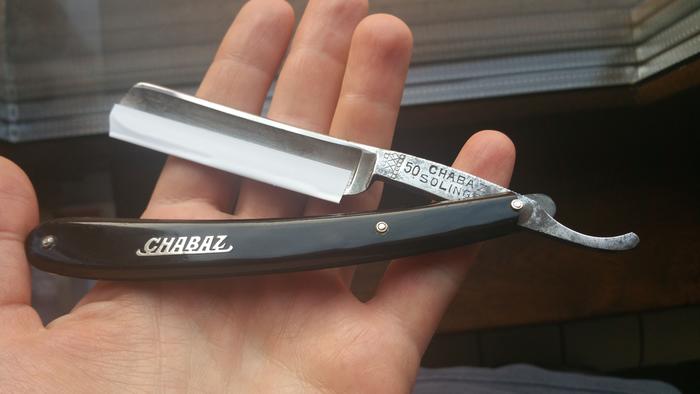
I would have a go at repairing those Chabaz scales, especially as you seem to want to keep it as original as possible. I would guess they are celluloid, and the others will have to chip in on how well different adhesives stick to celluloid, but that apart it is perfectly doable. I did these the other day, I believe they are bakelite: Originally Posted by Eurofighter
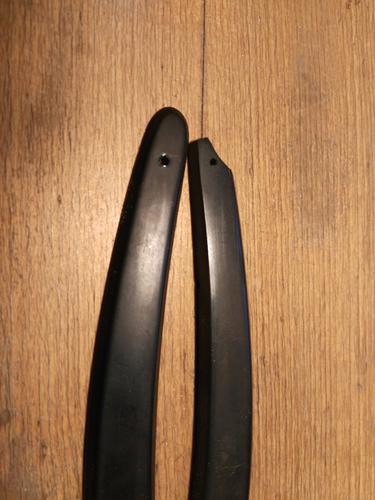
I know the damage doesn't extend quite as far as the pivot, but I don't think that need make a big difference. The basic idea is to use a liner, but I wanted a liner that would be invisible. So, I made the liner smaller than the profile of the scales. Also, because it was close to the pivot, I put right angles on the edges of the insert for stiffness. The liner is made from 0.3mm brass sheet. Then I drilled the insert to give an extra mechanical lock with the adhesive:
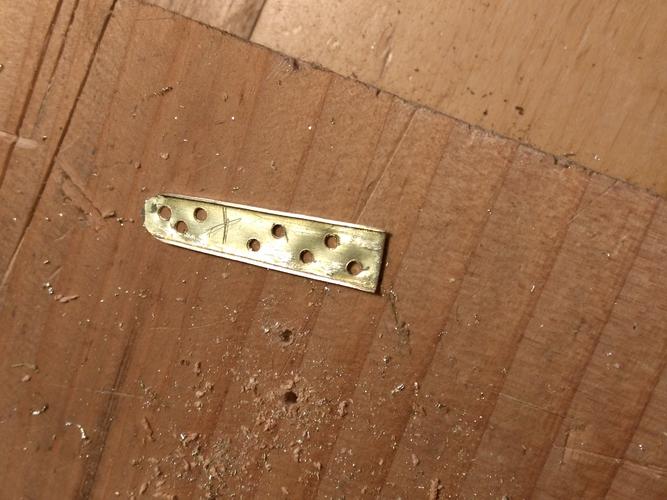

Next stage was to cut into the scales so that the insert could be glued in flush:
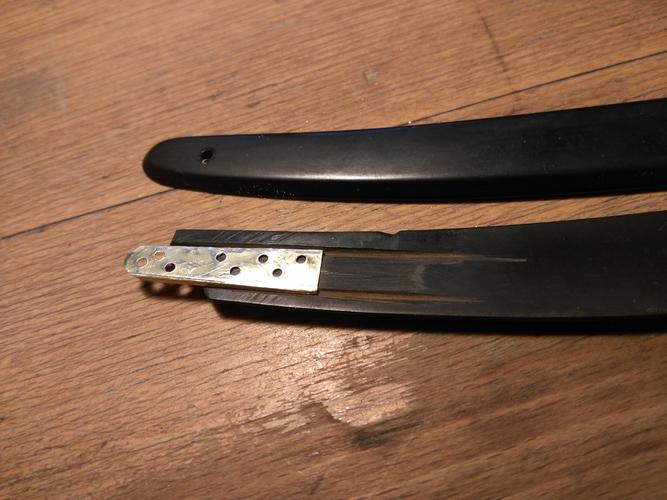
Then the insert was glued in, and the missing section re-built with filled epoxy resin:
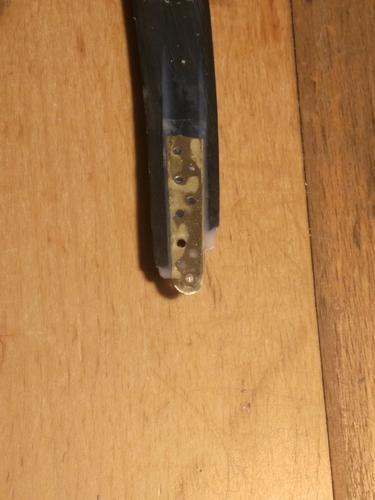
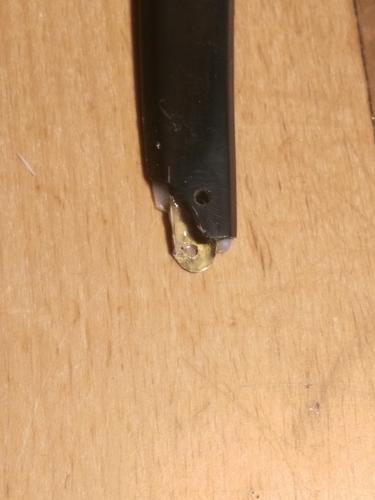
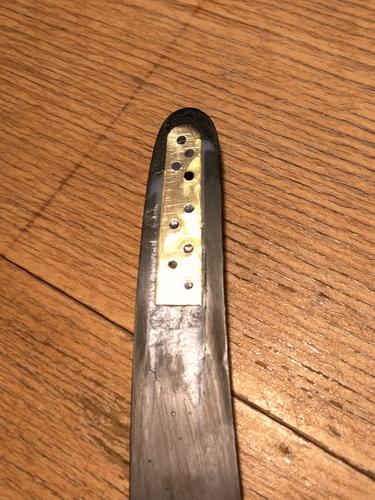
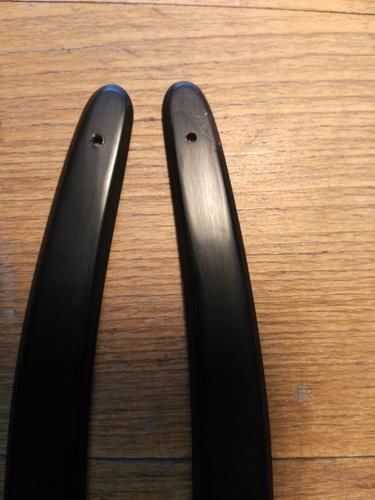
I have had success gluing small sections of celluloid with CA (superglue), I'd be curious what the board says about gluing celluloid. Other than that, I think it is very doable, it took me about two hours with basic hand tools. The great thing about having the insert/liner going through the pivot is that the pivot should to some extent clamp it all together.
What say the board about gluing celluloid?Last edited by Montgomery; 05-18-2020 at 10:33 PM.


 Reply With Quote
