Results 18,901 to 18,910 of 20573
Thread: What are you working on?
-
09-17-2020, 11:00 AM #18901

I'm vacillating on this one. The more I look at it some of it looks like natural streaking.
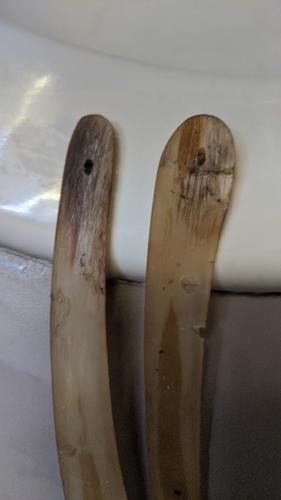
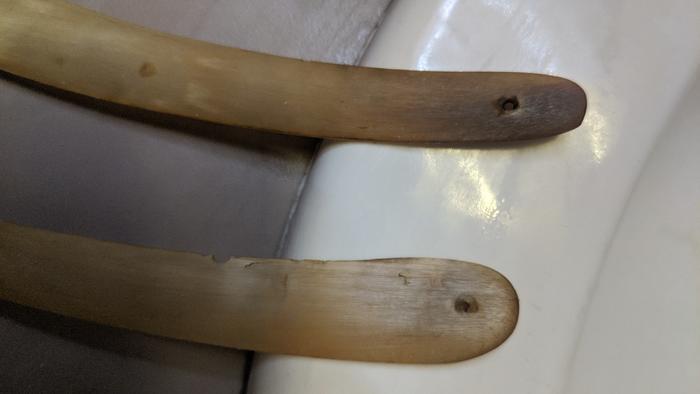
If you look at it against a light it goes almost all the way through on the one pivot end so I'm not sure if it matters. If I can't get it to come out by soaking and scrubbing then I'd either have to live with it or cut so much out there would just be a thin veneer of horn on the outside if that. It's still a little cloudy in some spots so I'm thinking Neatsfoot might clear it up some but I obviously don't want to do that before repairs so I guess I have to just make a decision and live with it.Last edited by PaulFLUS; 09-17-2020 at 11:12 AM.
Iron by iron is sharpened, And a man sharpens the face of his friend. PR 27:17
-
09-17-2020, 02:17 PM #18902Senior Member


- Join Date
- Feb 2013
- Location
- Haida Gwaii, British Columbia, Canada
- Posts
- 14,448
Thanked: 4829
In those pictures there is some of what looks like streaking.
It's not what you know, it's who you take fishing!
-
The Following User Says Thank You to RezDog For This Useful Post:
PaulFLUS (09-17-2020)
-
09-17-2020, 04:01 PM #18903

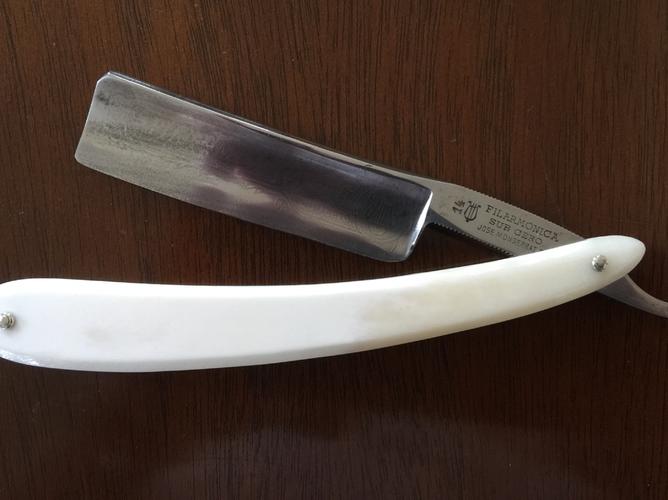
Reduced the tip of blade from 23.5mm to 22.4mm closer to heel width. Used 600 grit sandpaper on a flat surface. Went really slow checking my caliper often. Took about an hour or so. Also rounded the point a bit. Believe it has a much better look and feel now. Installed small nickel silver cup washers and NS pin hardware similar factory Filarmonica hardware. Now to get it honed up properly. Should be ready to go. Thanks for input and assistance on this restore.
Last edited by ajkenne; 09-17-2020 at 05:08 PM.
-
09-17-2020, 04:36 PM #18904

I'd agree....looks more like streaking.
Mike
-
The Following User Says Thank You to outback For This Useful Post:
PaulFLUS (09-17-2020)
-
09-17-2020, 06:32 PM #18905

See I kind of thought so too, especially after I scrubbed it up and let it soak in some hot water. So maybe I'm not stupid... about this at least. I guess I'll do a little bit more cleaning up to get any stains out of the bug bites and maybe trim up that little bit of delamination on the inside although it doesn't show from the outside yet at least. It probably will once I soak it in Neatsfoot. Fill those holes with some dust and epoxy and sand my ass off.
Iron by iron is sharpened, And a man sharpens the face of his friend. PR 27:17
-
09-23-2020, 11:33 PM #18906

Today I got some shop time so I made these two brushes and a new Pen.
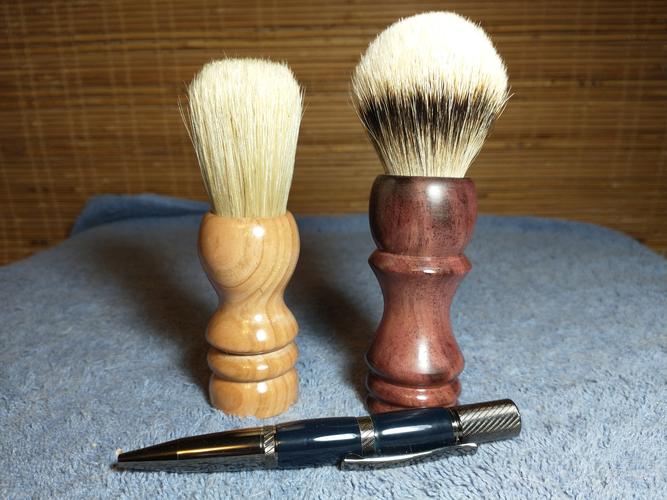
Now I'm out of knots so only handles will be made for a while. Maybe they might sell.It's just Sharpening, right?
Jerry...
-
10-06-2020, 01:43 AM #18907

Haven't posted in a bit because I'm still on the same project.
Fighting with my latest Fredrick restore . I set a bevel before I started, not a great bevel (popped hair at skin level), but I thought it would be OK. Now I'm trying to get it really good and have been having micro-chipping issues. Started at one layer of tape, and spent 5-6 nights doing 50 laps/joint, 50 laps/joint. I decided to up the angle with a 2nd layer of tape to see if it helped. Same story, same tedious number of laps/jointing. Upped to 3 layers (still at around 18.7 degree honing angle) and have been at it for 4 nights now. It's back to popping hair at skin level, but still has areas of really small chips. They're really hard to see with my 7X loupe so I took it to work to get a microscope pic. It's easy to see at 15-20X. I took the pic at 32X just to make it really clear. The double bevel is from changing from 2 to 3 layers. The sharpie marks are a couple of the worst chips. All honing has been on my 1K.
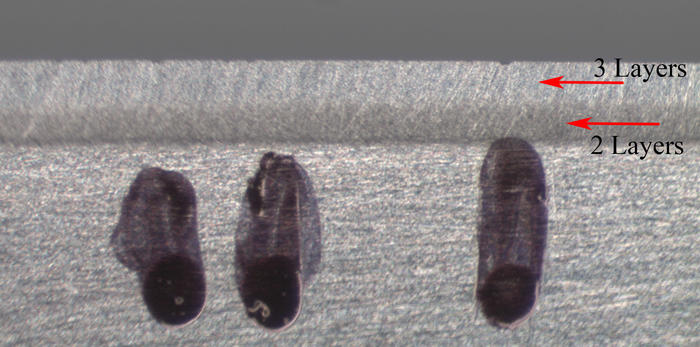
It's still a bit over 6/8 width, so I think I'll keep going. Nothing to loose really. I think this is going to turn into a "when I feel like it" project.
I've got to stop buying Fredricks from the bay... O'Toole's commentary on Murphy's Law: Murphy was an optimist.
-
10-06-2020, 02:58 AM #18908Senior Member


- Join Date
- Feb 2013
- Location
- Haida Gwaii, British Columbia, Canada
- Posts
- 14,448
Thanked: 4829
Those are really tiny chips. Try going up, you can still remove steel pretty quick on the 4K. Some razors don’t come off the 1K perfect, but smarten up on the 4K.
It's not what you know, it's who you take fishing!
-
The Following User Says Thank You to RezDog For This Useful Post:
planeden (10-06-2020)
-
10-06-2020, 03:31 AM #18909

Yeah, they are really tiny. The largest I can barely see at 7X. But it's not really popping hair like I've come to expect and I can feel the rough areas on the stone. That's one of the reasons I sharpie marked it, so I can focus on the areas with the chips.
I'll try moving to the 4K, maybe the less aggressive grit will mellow the chipping.
Thanks for the advice.O'Toole's commentary on Murphy's Law: Murphy was an optimist.
-
10-06-2020, 03:41 AM #18910

I don't remember which razor it was but it was an old Sheffield I believe that I had this same issue with on 1K. I chalked it up to foreign grit or residual loose grit from the 1K or that the surface was too rough. I cleaned up my 1K on the flattening stone and it seemed like it was better. Maybe it was coincidence and I just honed past it but it might be worth a try re-dressing the stone.
Last edited by PaulFLUS; 10-06-2020 at 03:55 AM.
Iron by iron is sharpened, And a man sharpens the face of his friend. PR 27:17
-
The Following User Says Thank You to PaulFLUS For This Useful Post:
planeden (10-06-2020)


 91473Likes
 LinkBack URL
 About LinkBacks


 Reply With Quote

