
Results 18,891 to 18,900 of 20600
 91543Likes
Thread: What are you working on?
 LinkBack URL
 About LinkBacks
-
09-15-2020, 10:51 PM #18891Senior Member


- Join Date
- Apr 2012
- Location
- Diamond Bar, CA
- Posts
- 6,553
Thanked: 3215
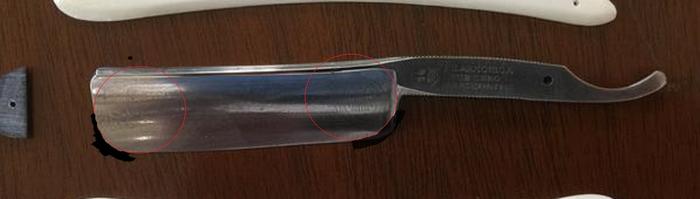
Heres a thought.
A 50 cent piece or a bottle cap from a gallon jug should be about the right radius. A circle template, or trace the razor profile on a piece of cardboard then with a compass draw circles over the tracing until you find a pleasing radius, then cut it out an trace it onto the razor with a sharpie.
If you use a black sharpie it will give you a good idea of what it will look like. WD40 will easily remove it, if you need to start over.
-
09-15-2020, 10:53 PM #18892Senior Member


- Join Date
- Jan 2011
- Location
- Lorton, VA
- Posts
- 349
Thanked: 153
Rez, I don't have a router but do have a spindle sander and belt sander and they seemed to work well for this taper. Hand sanded both sides progressively to 1500 grit, then finished them off on the buffer. Router is a thought for me to ponder. Thanks
-
09-15-2020, 10:58 PM #18893Senior Member
- Join Date
- Jan 2011
- Location
- Lorton, VA
- Posts
- 349
Thanked: 153
Euclid440, great idea and will try this. Have read your previous posts on similar topic and appreciate your input on this. Blade does need some work, before honing, as it just doesn't look right to me yet.
-
09-16-2020, 12:05 AM #18894Senior Member

- Join Date
- Mar 2015
- Location
- Akron, Ohio
- Posts
- 12,116
Thanked: 4315
Put more of a smile on 1/3 of the blade, towards the toe.
Mike
-
09-16-2020, 01:31 AM #18895Skeptical Member

- Join Date
- Nov 2016
- Location
- Colorado Springs
- Posts
- 10,555
Thanked: 2195
I agree with Mike. A good way to get closer to same thickness but also shape it as Marty said too. That would make a winner in my book.
cudarunner likes this.It's just Sharpening, right?
Jerry...
-
09-16-2020, 01:45 AM #18896Senior Member
- Join Date
- Apr 2012
- Location
- Diamond Bar, CA
- Posts
- 6,553
Thanked: 3215
Make a cardboard template then play with the design until you get it just the way you want. Then cut it out to make a template and transfer the design to the razor with a sharpie. Fine tune it, then cut to the sharpie line.
The metal is thin and cuts easily with a Diamond file or plate, take your time.
Here is a step by step post of one I did and photographed a couple years ago.
(Make Me Smile).
cudarunner and Gasman like this.
-
09-16-2020, 02:29 AM #18897Senior Member
- Join Date
- Jan 2011
- Location
- Lorton, VA
- Posts
- 349
Thanked: 153
Euclid440. This makes a lot of sense and seems straight forward. Will give it a go. Great tutorial. Thanks again. Originally Posted by Euclid440
 cudarunner and Euclid440 like this.
-
09-17-2020, 02:08 AM #18898Senior Member


- Join Date
- Dec 2018
- Location
- Gainesville, FL
- Posts
- 6,792
Thanked: 678
Doing a restore on a W&B Celebrated Hollow Ground. It is in honey horn which have a LOT of bug bites to repair. I have been soaking in hot water and scrubbing with a fingernail brush and hand soap.
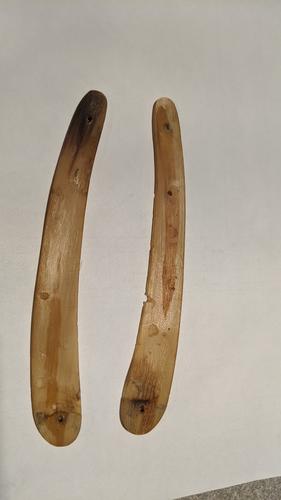
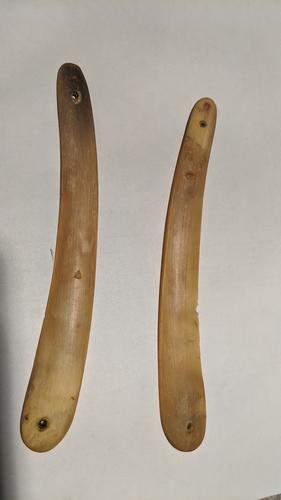
Both scales had some darkening around the pin as you would expect. One cleaned up pretty easily but the other is still dark. Do you think that is staining or streaking? I want to say stain. Any advice on getting that out?Geezer likes this.Iron by iron is sharpened, And a man sharpens the face of his friend. PR 27:17
-
09-17-2020, 02:30 AM #18899Senior Member

- Join Date
- Feb 2013
- Location
- Haida Gwaii, British Columbia, Canada
- Posts
- 14,457
Thanked: 4830
It looks like mostly staining. If you have a really well ventilated area or a good mask or both you can hit it with starter fluid in an aerosol can. It’s ether and is quite vile but it degreased like no ones business. Oven cleaner is als an option. Other than that, simple green and elbow grease.
It's not what you know, it's who you take fishing!
-
The Following User Says Thank You to RezDog For This Useful Post:
PaulFLUS (09-17-2020)
-
09-17-2020, 10:36 AM #18900Senior Member
- Join Date
- Mar 2015
- Location
- Akron, Ohio
- Posts
- 12,116
Thanked: 4315
If its dirt and grime, I typically have to cut it, or grind out, what can't be scrubbed out
PaulFLUS likes this.Mike
-
The Following User Says Thank You to outback For This Useful Post:
PaulFLUS (09-17-2020)


 Reply With Quote