
Results 2,051 to 2,060 of 4688
 13682Likes
Thread: The Butchered Blade
 LinkBack URL
 About LinkBacks
-
10-21-2015, 08:50 PM #2051Senior Member


- Join Date
- Jun 2015
- Location
- South Carolina
- Posts
- 1,838
Thanked: 516
Oh man that sounds like a fun quick project!
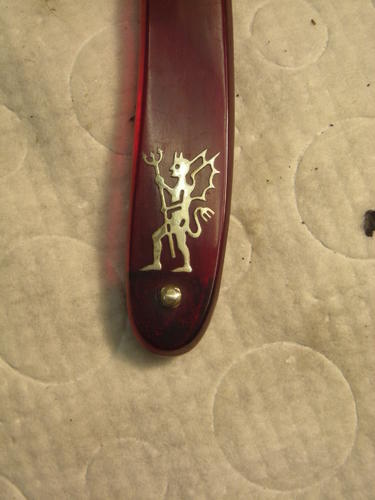
I've thought about it, have some thin inlays that I want to transplant.. one is a black demon. I have two, one has the metallic inlay, and one just cheap etching on celluloid scales..
I figure CA. I've seen it done on various scales. Figured I would put masking tape down to get the placement right..
Getting just the right amount of CA on the inlay.. so as not to have unsightly CA pushing out on the edges... that's the hard part I think.
Thought about heating the inlay up and pressing it in... but that would possibly displace plastic and leave razed edges. Don't know if those could be sanded off though..
I'm very interested in seeing how this turns out.
Also very interested in seeing Glen's tutorial on it as he is very skilled too.Last edited by MikeT; 10-21-2015 at 08:57 PM.
You must unlearn what you have learned.
Yoda
-
10-21-2015, 09:10 PM #2052Fatty Boom Boom

- Join Date
- Jul 2012
- Location
- Rockville
- Posts
- 3,258
Thanked: 638
Attachment 216214
Dr. Sharptonn
Fingers crossed.Last edited by WW243; 10-21-2015 at 09:13 PM.
"Call me Ishmael"
CUTS LANE WOOL HAIR LIKE A Saus-AGE!
-
The Following User Says Thank You to WW243 For This Useful Post:
sharptonn (10-21-2015)
-
10-21-2015, 09:31 PM #2053Senior Member

- Join Date
- Apr 2014
- Location
- Goiânia, Brasil
- Posts
- 530
Thanked: 159
Look for people who operantes CNC laser cutting machines. These people can save you many hours of very freaking delicate work. Spare material similar to the final material to be recessed is a must to test depth of recessão given by distinct laser beam potencies. Originally Posted by prodigy

-
10-21-2015, 09:59 PM #2054Razor Vulture


- Join Date
- Oct 2010
- Location
- Lone Star State
- Posts
- 26,151
Thanked: 8616
Yeah, My laser buddy and all 180 people at a large oilfield-related shop recently were all told to go. No severance, no warning.
Every piece of equipment was auctioned off. Dismal down here. My shop is dead. Here I sit working on butchered razors!
Anyhoo, it seems it will have to go low on the scale to fit.
Mike's thought on tape to locate it is a good one, I think!"Don't be stubborn. You are missing out."
I rest my case.
-
10-21-2015, 10:17 PM #2055Razor Vulture
- Join Date
- Oct 2010
- Location
- Lone Star State
- Posts
- 26,151
Thanked: 8616
Gee, I have looked around. Everyone is an expert at getting them off. No one has shared how they put them on.
The Reaper tute shows 'look what I did', but not how. They were also using wood scales. I suppose it is one of those top-secret deals we have around here.")
I have thought about CA-ing a toothpick to the top of the inlay as a handle with a dot of glue which can be removed easily.
Spread some CA on a flat surface and dip the inlay onto it, pull it off fast and stick it onto the scale, using another toothpick to push it down here and there. Thoughts?"Don't be stubborn. You are missing out."
I rest my case.
-
10-21-2015, 10:17 PM #2056Str8Faced Gent.


- Join Date
- Aug 2013
- Location
- Orangeville, Ontario
- Posts
- 8,456
- Blog Entries
- 1
Thanked: 4207
Very cool inlay saveTom. Never tried, but will now. I have the dorko logo on the broken bits from the one Steve helped with to put onto the 444 when it's done.
Now as far as the replacement, masking tape test run is a great idea. What I used to do for exacting decal replacement in aviation included that, but also we used scotch tape to hold the decals A, or outside surface, twined the scotch tape between our fingers on both hands so it was held by the index finger and went over the knuckle of the first fingers, both hands, then we could hover the decal over where we wanted it applied and touch it to the surface with either thumb when we were ready to commit. Then the tape came off the top.
Hope that makes sense.."Depression is just anger,, without the enthusiasm."
Steven Wright
https://mobro.co/michaelbolton65?mc=5
-
10-21-2015, 10:22 PM #2057Razor Vulture
- Join Date
- Oct 2010
- Location
- Lone Star State
- Posts
- 26,151
Thanked: 8616
THAT sounds a winner, Mike! Masking tape. So. how to apply the glue to the inlay. Not get it too thick. Do it fast all over.
Stick it down before it cures.
Chevhead has been seen poking around down here. Him and his ducks.......
Gonna give him a shout!Last edited by sharptonn; 10-21-2015 at 10:25 PM.
"Don't be stubborn. You are missing out."
I rest my case.
-
10-21-2015, 11:06 PM #2058
Oh boy.... There is a LOT of trial and error! Originally Posted by sharptonn
At least there was for me....still is actually....
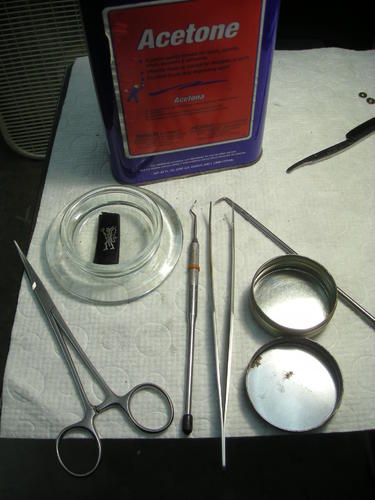
For removing the inlays I would NOT soak them in acetone.
I brush it on to the scales and use a dental pick to get behind them and loosen them and keep brushing on more acetone.
Takes about 1-2 minutes to get 99% of them off.
Some others might take up to 5 minutes, or you might HAVE to soak them if they are being a PITA!
Ed
-
The Following 4 Users Say Thank You to Chevhead For This Useful Post:
engine46 (10-22-2015), HARRYWALLY (12-18-2015), MikeT (10-22-2015), sharptonn (10-21-2015)
-
10-21-2015, 11:17 PM #2059Senior Member


- Join Date
- Mar 2015
- Location
- Akron, Ohio
- Posts
- 12,106
Thanked: 4313
Clint Eastwood said it best.... Originally Posted by prodigy
A mans got to know his limitationsMike
-
10-21-2015, 11:20 PM #2060Razor Vulture
- Join Date
- Oct 2010
- Location
- Lone Star State
- Posts
- 26,151
Thanked: 8616
Thanks, Chev! If you look above, I have it off......Want to put it on another scale! Originally Posted by Chevhead
"Don't be stubborn. You are missing out."
I rest my case.


 Reply With Quote
