
Results 17,001 to 17,010 of 20573
 91474Likes
Thread: What are you working on?
 LinkBack URL
 About LinkBacks
-
08-26-2019, 11:17 AM #17001Senior Member


- Join Date
- May 2010
- Location
- Upstate South Carolina
- Posts
- 3,308
Thanked: 987 Marty-I didn't misinterpret your instructions, which are always clear. I just have always been afflicted with "What would happen if?" Sometimes it even works. I had actually already buffed them with 3M polish by itself. I am always experimenting that way. Thanks for the historical info., which I find enlightening.
 Originally Posted by Euclid440

I may look for the 10Pups tutorial. I remember his ground-breaking work with Ducks. Seems like ChevHead did some too?
Tom and Paul-I am definitely interested in your scales. If I went that route, I can always use my funky celluloid acyrlics for other blades of similar size, so no waste. Thanks again!
edit: Tom and Paul, check your pm's. I'm at work all day, but can check in this evening.Last edited by ScoutHikerDad; 08-26-2019 at 11:46 AM.
There are many roads to sharp.
-
08-26-2019, 12:41 PM #17002Senior Member

- Join Date
- Apr 2012
- Location
- Diamond Bar, CA
- Posts
- 6,553
Thanked: 3215
Yea, Chevhead and Glen did some, but Jerry did a nice tutorial on fitting the bolsters and also some video.
Here is the original post and beginning of the Double Duck tutorial, he branched it off into a video tutorial series the links are in the tutorial.
If you do an Advanced search for 10Pups, Double Ducks, you will see all of the Ducks he did in a rainbow of colors, I think he did 20 or 30 plus the ones he did for other guys.
(10Pups Restores a Reaper)
-
The Following User Says Thank You to Euclid440 For This Useful Post:
ScoutHikerDad (08-26-2019)
-
08-26-2019, 03:20 PM #17003Razor Vulture

- Join Date
- Oct 2010
- Location
- Lone Star State
- Posts
- 26,119
Thanked: 8612
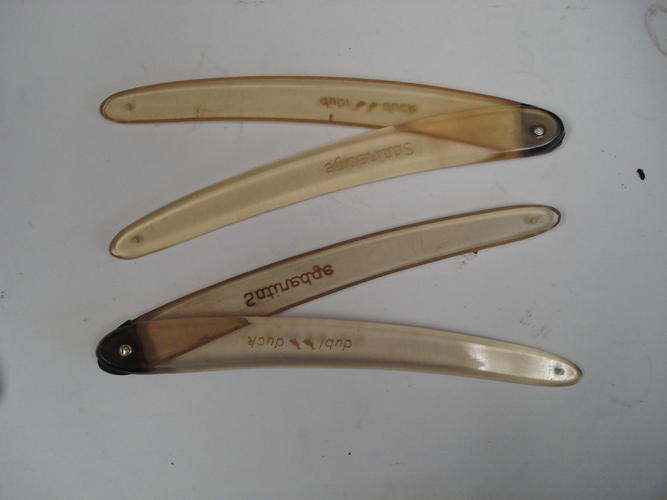
Here they are, Aaron. These are for the 5/8 Satinedges. 114mm from top pin-hole back to the wedge.
Unused, but some shelf-scratches. I used 3 of the others on other razors by sanding off the hot stamps and polishing. Gave one set away.
They clean-up nice.

-
The Following User Says Thank You to sharptonn For This Useful Post:
ScoutHikerDad (08-26-2019)
-
08-26-2019, 03:34 PM #17004Senior Member

- Join Date
- Feb 2013
- Location
- Haida Gwaii, British Columbia, Canada
- Posts
- 14,443
Thanked: 4828
A little rub n buff and those should be good to go.
It's not what you know, it's who you take fishing!
-
08-26-2019, 08:52 PM #17005Senior Member
- Join Date
- May 2010
- Location
- Upstate South Carolina
- Posts
- 3,308
Thanked: 987
I think Shaun is right-sometimes easy is good. I just measured, and both of those Satin Edges are 110-111mm from the center of the pin-hole to the end, so enough clearance for the wedge. I think I would like those, Tom. Returning your pm. Originally Posted by sharptonn
And thanks again too Paul-If I'm going with Tom's scales, I can't use yours. Get another Satin Edge blade, and test your scale re-hab skills with the tutorial Marty linked to! I remember all those colored acrylic Ducks-loved em!
Now to find similar-sized blades for the two pearloid acrylic scale sets I rough cut. There are many roads to sharp.
-
08-27-2019, 01:17 AM #17006Razor Vulture
- Join Date
- Oct 2010
- Location
- Lone Star State
- Posts
- 26,119
Thanked: 8612
They will be off to-morrow, Aaron. I recommend unpinning the bottom and light super-fine steel wool, avoiding the hot-stamps. Should get all the light scratches.
Do inside and outside, Maas or whathaveyou to polish. They can be buffed with white compound, but are easy to get hot, so lightly goes.
They get really clear after a while, so polish-up some brass spacers for the pivots. They shall be seen! Looking forward to seeing them as-done!Last edited by sharptonn; 08-27-2019 at 01:19 AM.
-
08-27-2019, 09:51 AM #17007Senior Member
- Join Date
- May 2010
- Location
- Upstate South Carolina
- Posts
- 3,308
Thanked: 987
Thanks for the scales and advice, Tom! I have buffed acrylic with white compound on a loose wheel, but I'm concerned about mushing out the stamps (though I guess I can just steer clear of them). I'll post them here when finished. You da man! Originally Posted by sharptonn
sharptonn likes this.There are many roads to sharp.
-
08-27-2019, 11:32 AM #17008Senior Member


- Join Date
- Dec 2018
- Location
- Gainesville, FL
- Posts
- 6,531
Thanked: 663
Marty, here is the Jung's Jewel with the broken scales.
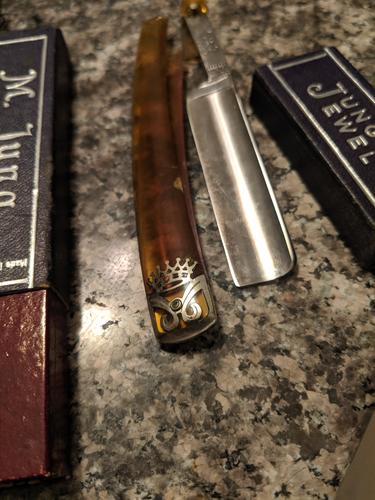
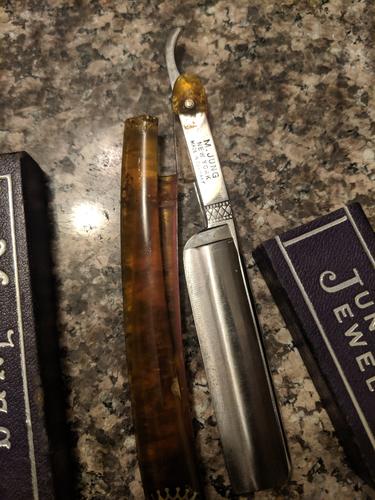
It looks like that bolster which I guess is really an inlay was pressed in a mold with the scales. You can see if you look closely that I have glued them once before with epoxy and the scale broke again next to the glue. I'm still boning up on removing the inlay like what I guess is shown in the post you linked to. I suppose I'll find out but I must need to mold another set of scales around it in the same way these were made originally. I haven't gotten to that part yet. Still reading through all the other stuff at the beginning and trying to live life, run a business etc.Iron by iron is sharpened, And a man sharpens the face of his friend. PR 27:17
-
08-27-2019, 02:11 PM #17009Razor Vulture
- Join Date
- Oct 2010
- Location
- Lone Star State
- Posts
- 26,119
Thanked: 8612
Yes, avoiding the stamps themselves is important The edges are raised and they don't look right if that is obliterated. They sell some firmer Q-tips for make-up with a pointy end which are great for polishing up-close and around the letters. Originally Posted by ScoutHikerDad
-
08-27-2019, 02:58 PM #17010Senior Member
- Join Date
- Apr 2012
- Location
- Diamond Bar, CA
- Posts
- 6,553
Thanked: 3215
Put a piece of tape on the clear scales over the etching and buff. Then pick up a 3 bottle set of Novus, about $15, the set is nice to have for polishing plastic lenses of safety glasses and visors and works super on Horn. Then hand polish with Novus, with paper towels. It is some good stuff, designed to high polish plastic.
Paul, yea those bolsters can be removed with acetone just like the Ducks and re-applied with CA glue. They will stick up a bit but if you fit them well and apply glue evenly, they will glue down well. Buffing with a high grit polish like red or green compound or even a good metal polish will even them out, if needed sand with 1 or 2k then buff.ScoutHikerDad and PaulFLUS like this.
-
The Following 2 Users Say Thank You to Euclid440 For This Useful Post:
PaulFLUS (08-27-2019), ScoutHikerDad (08-27-2019)


 Reply With Quote