
Results 8,971 to 8,980 of 20602
 91550Likes
Thread: What are you working on?
 LinkBack URL
 About LinkBacks
-
04-16-2017, 04:15 AM #8971Senior Member


- Join Date
- Feb 2013
- Location
- Haida Gwaii, British Columbia, Canada
- Posts
- 14,457
Thanked: 4830
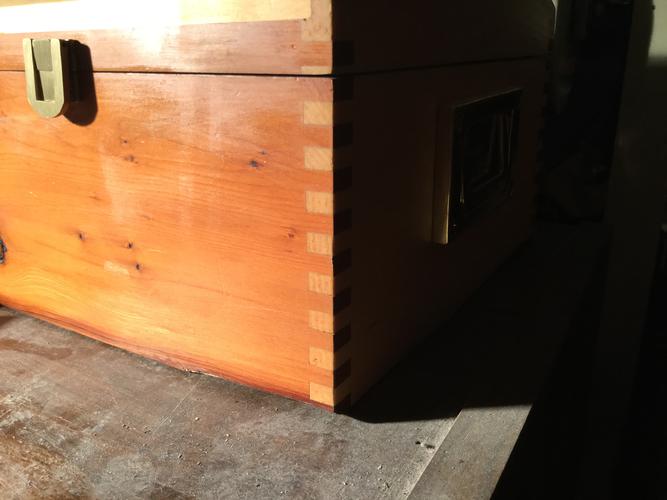
That is. Is is the side of an arch top box. I made three of them at the same time. It was just before Christmas and our rules for the draw that year was that the gifts had to be homemade. The other two went as gifts. Arch top boxes are a giant pain. It is in yellow cedar and pacific yew. Once upon a time it housed my entire razor collection, and my barbers hones.;-)
It's not what you know, it's who you take fishing!
-
-
04-16-2017, 07:05 AM #8972Member
- Join Date
- Apr 2017
- Location
- Poland/Warsaw
- Posts
- 59
Thanked: 13
Step by step. Wapienica Special not Surgary (stailes scales) made for export to Germany.
Pick up from post.
.jpg
Views: 207
Size: 13.5 KB")
open the box
.jpg
Views: 207
Size: 18.1 KB")
take off scales and first clen up
.jpg
Views: 209
Size: 46.5 KB")
and finally just one side
.jpg
Views: 205
Size: 41.8 KB")
I hoppe now is better.
To compare
SKI Razor made by Friedrich ERN. Really broke
.jpg
Views: 202
Size: 27.7 KB")
after little work
.jpg
Views: 210
Size: 26.6 KB")
Last edited by PR100; 04-16-2017 at 07:07 AM.
-
The Following User Says Thank You to PR100 For This Useful Post:
Geezer (04-16-2017)
-
04-16-2017, 12:58 PM #8973Str8Faced Gent.


- Join Date
- Aug 2013
- Location
- Orangeville, Ontario
- Posts
- 8,465
- Blog Entries
- 1
Thanked: 4207
That's a fine example Shaun! Was that done with the forest blades? Very crisp edges mate. Originally Posted by RezDog

The box I'm building is going to have burl and bog oak as its main components.
Hope their end grains can hold up to fingering.
This is finer cabinet type work then I have done in the past so it's a slow learning process..
Dowels are easy, but I wanted something more traditional and timeless on this project..
Cheers.."Depression is just anger,, without the enthusiasm."
Steven Wright
https://mobro.co/michaelbolton65?mc=5
-
04-16-2017, 06:42 PM #8974Senior Member

- Join Date
- Nov 2016
- Posts
- 250
Thanked: 122
So, I bought this here razor on a whim when I was at an antique shop -- it was cheap and I was already buying something else.
Now, I don't normally collect 5/8" pitted razors made by the Lafayette Cutlery Co., but I liked the scales and I thought I might use them for something else.


I'm having a bit of a tough time removing the top pin -- it seems to be pretty hard stuff and my drill bit is wandering on it and I don't want to screw up the scales.
Two questions -- first, what do you think these are made of? Second, is that copper pin likely to be original or a repair? I am thinking of drilling it out.
-
04-16-2017, 06:52 PM #8975Senior Member


- Join Date
- Jan 2013
- Location
- Communist State of California
- Posts
- 1,461
Thanked: 463
They are likely celluloid and copper is definitely not original. I like to file the pin flat before using a pin vice to drill through it. It helps to have a decent drill bit too. Originally Posted by jmabuse
B.J.
-
The Following User Says Thank You to BeJay For This Useful Post:
jmabuse (04-16-2017)
-
04-16-2017, 07:35 PM #8976Senior Member
- Join Date
- Feb 2013
- Location
- Haida Gwaii, British Columbia, Canada
- Posts
- 14,457
Thanked: 4830
I can't help but agree with the above. A split point drill bit in a pin vice will work extremely well, and if it is cobalt or solid carbide you are really in business. Some of the old razors I have encountered have hard the hardest pins known to man. I do not know what the really hard pins are made from but they are zero fun to deal with.
It's not what you know, it's who you take fishing!
-
The Following User Says Thank You to RezDog For This Useful Post:
jmabuse (04-16-2017)
-
04-16-2017, 07:48 PM #8977Historically Inquisitive

- Join Date
- Aug 2011
- Location
- Upstate New York
- Posts
- 5,782
- Blog Entries
- 1
Thanked: 4249
A center punch before drilling will make a divot on the pin preventing your drill bit to wander all over.
-
04-16-2017, 07:59 PM #8978Senior Member
- Join Date
- Nov 2016
- Posts
- 250
Thanked: 122
Thanks for the hints gents, I wouldn't have thought this bit was dull but I will pop it in the drill doctor.
In the meantime, I got the pin out...

and that is one rusty blade.

I threw caution to the winds and just sanded it with some garnet paper on a drum.

The pitting doesn't go to the edge, so after new scales and honing it will probably end up in a monthly giveaway.
But I always wondered what it would be like to cut my own jimping!


-
04-16-2017, 08:05 PM #8979Senior Member
- Join Date
- Nov 2016
- Posts
- 250
Thanked: 122
I always do center-punch, but my bit started to head off to one side once it was already in the pin about 1/32". Like what happens when you're drilling concrete and run into some hard gravel. Differential hardness in the pin material perhaps. I'll sharpen it.
-
04-16-2017, 08:33 PM #8980Member
- Join Date
- Apr 2017
- Location
- Poland/Warsaw
- Posts
- 59
Thanked: 13
Nice job jmabuse
 . I see a lot of work with this razor but try use just hand for this renowation. Good luck.


 Reply With Quote